Flash XDR User’s Manual
Front Panel Details
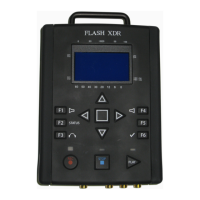
1. LCD Display: Shows the status of the Flash XDR in the various operating modes. Also
displays warning and errors in correspondence with flashing LED error lights. (see p. 10)
2. Navigation Buttons: Allows the user to navigate the menu. (see p. 11)
3. Function Keys: Programmable function keys for various configurations. Currently, the only
keys that function are <F1>, <F2>, <F4> and <F5>, which can be used for updating and
formatting. In the future, the user will be able to customize these keys with a Configuration File
editor tool which we will provide.
a. <F1>: Allows Mic gain adjustment during record for analog audio channel-1 when the
audio input is set to Analog -> Mic. Press once to turn off the capability (and make the
arrows on that side disappear), and once again to enable adjustment during record.
b. <F4>: Performs the same function on audio Chan-2 as the <F1> key does on Chan-1.
c. <F2> & <F5>: These two keys are used together to perform a firmware update or
format of the cards in the unit.
4. Indicator LEDs: Status LEDs for the various play and record mode: Bright red indicates that
data is being recorded to this CF card. Steady green indicates that the card is ready for record
or playback operation. Solid white indicates a playback operation.
5. Record, Stop, Play Buttons: <REC>, <STOP>, and <PLAY> buttons for control of respective
modes. The Flash XDR, when powered on, is in a ready mode. Record or Playback can be
activated by pressing the appropriate buttons, as described below:
a. REC: Press <REC> to start recording a clip to the card. The unit will record to CF slot
one initially and proceed in order if record time exceeds the amount of time available for
one card, allowing the clip to span several cards. If there is no card present or the card
is full, an error message will appear.
b. STOP: Press <Stop> button until the blue LED turns on to terminate record or playback
mode. Also used to cancel a card format.
Note: the STOP button is immediately responsive upon being pressed. To prevent
accidentally stopping a record, see alternative record trigger options (timecode trigger,
remote trigger)(page 11), which de-activate the REC and STOP buttons.
c. PLAY: Press once to enter Playback mode. By default, Play will start with the last
recorded clip. Use the left and right arrow keys to advance / backup to the next /
previous file. You can hold down these keys to move very quickly from file to file.
6. Other button functions:
Delete Last Clip: Press and hold the Stop key, then press left arrow key, to delete last
clip off of currently inserted card which was last recorded to. (ver1.5.25)
Convergent Design, Inc 9
 Loading...