6VA/AVA/AF IO&M B51146-004
Maintenance
Establish a schedule for inspecting all parts of the fan.
The frequency of inspection depends on the operating
conditions and location of the fan.
Inspect fans exhausting corrosive or contaminated air
within the rst month of operation. Fans exhausting con-
taminated air (airborne abrasives) should be inspected ev-
ery three months.
Regular inspections are recommended for fans exhaust-
ing non-contaminated air.
It is recommended the following inspections be con-
ducted twice per year:
• Inspect bolts and setscrews for tightness. Tighten as
necessary.
• Inspect belt wear and alignment. Replace worn belts with new
belts and adjust alignment as needed. Refer to Belt and Pulley
Installation, page 3.
• Bearings should be inspected as recommended in the Lubri-
cation Conditions Chart.
• Inspect springs and rubber isolators for deterioration and re-
place as needed.
• Inspect for cleanliness. Clean exterior surfaces only. Remov-
ing dust and grease on motor housing assures proper motor
cooling. Removing dirt from the wheel and housing prevents
imbalance and damage.
Lubrication
Fan Bearings
NOTICE! The fan bearings are provided prelubri-
cated. Any specialized lubrication instructions on
fan labels supersedes information provided here-
in. Bearing grease is a petroleum lubricant in a lith-
ium base conforming to an NLGI #2 consistency.
If user desires to utilize another type of lubricant,
they take responsibility for ushing bearings and
lines, and maintaining a lubricant that is compat-
ible with the installation.
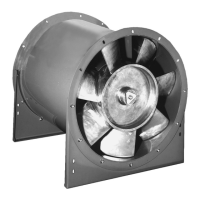
Vane Axial bearings are lubricated through a
grease tting on the exterior of the fan housing and should
be lubricated by the schedule, Lubrication Conditions
Chart.
For best results, lubricate the bearing while the fan is in
operation. Pump grease in slowly until a slight bead forms
around the bearing seals. Excessive grease can burst
seals thus reducing bearing life.
Before lubricating, the grease nipple and immediate
vicinity should be thoroughly cleaned without the use of
high pressure equipment. The grease should be supplied
slowly as the bearing rotates until fresh grease slips past
the seal. Excessive pressure should be avoided to prevent
seal damage.
Use no more than three injections with a hand-operated
grease gun.
Lubrication Conditions Chart
Fan Class Fan Status
Fan Operating
Temperature (F°)
Maximum Interval
(operation hrs)
Inlet Vane Axial
Blowers
Normal
Conditions
(clean, dry &
smooth)
up to 120 4500
121–160 1500
161–200 700
201–400 (*) 200
Extreme
Conditions
(dirty/wet/rough)
up to 160 700
161–200 400
201–400 (*) 200
*Exceptions to the greasing interval chart:
Final Installation Steps
1. Inspect fasteners and setscrews, particularly fan mounting
and bearing fasteners then tighten according to the Recom-
mended Torque chart.
2. Inspect for correct voltage with a voltmeter.
3. Ensure all accessories are installed.
Operation
Pre-Start Checks
1. Lock out all the primary and secondary power sources.
2. Ensure fasteners and setscrews, particularly those used for
mounting the fan, are tightened.
3. Inspect belt tension and pulley alignment.
4. Inspect motor wiring.
5. Ensure belt touches only the pulleys.
6. Ensure fan and ductwork are clean and free of debris.
7. Inspect prop-to-inlet clearance. The correct prop-to-inlet
clearance is critical to proper fan performance.
8. Close and secure all access doors.
9. Restore power to fan.
Start-Up
Turn on the fan. In variable speed units, set the fan to its
lowest speed and inspect for the following:
• Direction of rotation
• Excessive vibration
• Unusual noise
• Bearing noise
• Improper belt alignment or tension (listen for squealing)
• Improper motor amperage or voltage
NOTICE! If a problem is discovered, immediately shut
o the fan. Lock out all electrical power and check
for the cause of the trouble. Refer to Troubleshoot-
ing, page 12.
Recommended Torque for Setscrews/Bolts (IN-LB)
Setscrews Hold Down Bolts
Size
Key Hex
Across
Flats
Recommended
Torque
Size
Recommended
Torque
Min. Max.
#8 5/64” 15 21 3/8”-16 324
#10 3/32” 27 33 1/2”-13 780
1/4 1/8” 70 80 5/8”-11 1440
5/16 5/32” 140 160 3/4”-10 2400
3/8 3/16” 250 290 7/8”-9 1920
7/16 7/32” 355 405 1”-8 2700
1/2 1/4” 560 640 1-1/8”-7 4200
5/8 5/16” 1120 1280 1-1/4”-7 6000
3/4 3/8” 1680 1920 - -
7/8 1/2” 4200 4800 - -
1 9/16” 5600 6400 - -
This table is not to be used for blade angle adjustment. Re-
fer to page 5.
Inspection
Inspection of the fan should be conducted at the rst 30
minute, 8 hour and 24 hour intervals of satisfactory op-
eration. During the inspections, stop the fan and inspect as
per the Conditions Chart.
30 Minute Interval
Inspect bolts, setscrews and motor mounting bolts. Adjust and
tighten as necessary.
8 Hour Interval
Inspect belt alignment and tension. Adjust and tighten as nec-
essary.
24 Hour Interval
Inspect belt tension, bolts, setscrews and motor mounting
bolts. Adjust and tighten as necessary.
 Loading...