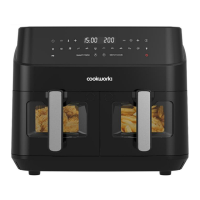
This document describes the Cookworks 5L Digital Air Fryer, Model No.: KDF-596D. It serves as a comprehensive care and instruction manual, providing essential information for safe and effective use of the appliance.
Function Description
The Cookworks 5L Digital Air Fryer is designed for hot air frying, offering a healthier alternative to traditional deep frying by using hot air to cook food. It features a digital control panel for easy operation and a 5-liter capacity, suitable for preparing various food items. The appliance is equipped with a timer and automatic switch-off function, enhancing convenience and safety during cooking. It supports a range of pre-set cooking modes for different food types, including fries, meat, drumsticks, steak, cake, shrimp, fish, pizza, and vegetables, allowing for quick and efficient meal preparation. The air fryer also includes a pre-heat/manual mode for flexible temperature and time adjustments.
Important Technical Specifications
- Model No.: KDF-596D
- Cat No: 1486623
- Rated Voltage & Frequency: 220-240V AC 50-60Hz
- Rated Power Input: 1600W
- Capacity: 5L
- Class rating: 1 (earthed)
- BS 1362 fuse: 13A
- Product dimensions (external): 330 x 270 x 290 mm
- Product weight (net): 5.08Kg
- Temperature Range: 50-200°C (user selectable)
- Timer Range: 1-60 minutes (user selectable)
Usage Features
The air fryer is designed for user-friendly operation with a digital control panel (G) that includes a numeric display (B), temperature plus/minus buttons (A), timer plus/minus buttons (C), start/pause button (D), and power button (E). It offers 10 pre-set cooking modes, each with default time and temperature settings that can be adjusted by the user.
To use the appliance:
- Power On: Plug the unit into a 220V-240V AC, 50Hz earthed socket. A beep sound will confirm power, and the power button will illuminate red. Press the power button to light up the control panel.
- Setting Time & Temperature: Select one of the 10 pre-set cooking modes by pressing the corresponding food icon. This will automatically input default time and temperature settings. Users can then adjust these settings using the Time and Temperature +/- buttons. The display alternates between temperature and cooking time to show current settings.
- Starting Cooking: Press the Start/Pause button (D) to begin the cooking cycle.
- Shaking/Flipping Ingredients: Some recipes require shaking or flipping ingredients halfway through the cooking time. To do this, pull the frying tray (A) out by its handle (D), shake it, and then slide it back into the air fryer. A warning is provided to avoid pressing the basket release button (C) while shaking, as this could detach the frying tray from the basket and handle assembly.
- Automatic Switch-Off: The appliance is equipped with a timer that, upon reaching "00," emits 10 "BEEPS" and automatically switches off. A 60-second cooling cycle follows, during which the fan continues to run. The unit can also be manually switched off by pressing the power button. Note that pressing "Start/Pause" only pauses the frying process, it does not switch off the unit.
- Removing Cooked Food: Once cooking is complete, pull the frying tray out and place it on a heat-resistant surface. Slide the clear Perspex button cover (B) away from you and press the basket release button (C) to lift the basket out and tip contents into a serving bowl.
- Pre-Heat/Manual Mode: The pre-heat button (O) functions as an additional pre-set mode, setting the time to 3 minutes and temperature to 180°C by default. This can also be freely edited.
- Using Oil: Adding a small amount of oil can make food crispier. Oil sprays are recommended for even application.
- Food Tips: The air fryer can cook frozen foods that are suitable for oven baking. For cakes, pies, or foods with fillings/batter, use a heat-safe container placed in the fry basket. Pat dry foods with marinades before cooking.
- Making Home-Made Fries: For best results, pre-baked fries are advised. For home-made fries: peel and cut potatoes into sticks, soak in water for 30 minutes, dry thoroughly, coat with ½ tablespoon of olive oil, and then place in the basket, ensuring excess oil is left behind.
- Reheating Foods: Simply set the temperature to 180°C for up to 10 minutes.
- Cooking Guide: A detailed cooking guide is provided with recommended times and temperatures for various chicken, beef, pork, lamb, fish, seafood, frozen foods, and vegetables. Users are advised to adjust settings based on ingredient size, shape, and brand, and to ensure food is cooked through and piping hot.
Maintenance Features
Regular cleaning is essential for maintaining the appliance and ensuring its longevity.
- Cool Down: Always unplug the appliance from the wall socket and allow it to cool down completely before cleaning. Removing the frying tray can expedite cooling.
- Exterior Cleaning: Wipe the outside of the appliance with a moist cloth.
- Frying Tray and Basket Cleaning: The frying tray and basket have a non-stick coating. Clean them with warm water, washing-up liquid, and a non-abrasive sponge. Avoid using metal kitchen utensils or abrasive cleaning materials to prevent damage to the non-stick coating. These parts are also dishwasher-proof.
- Stubborn Dirt: If dirt is stuck to the basket or the bottom of the frying tray, fill the frying tray with hot water and washing-up liquid, then place the basket inside and let it soak for approximately 10 minutes.
- Interior Cleaning: Clean the inside of the appliance with hot water and a non-abrasive sponge.
- Heating Element Cleaning: Use a cleaning brush to remove any food residues from the heating element.
Safety Precautions
The manual emphasizes several critical safety precautions due to the high operating temperatures of the appliance:
- Only plug into a 220V-240V AC, 50Hz earthed socket.
- Do not use an extension cord.
- Always switch off and unplug when not in use and before cleaning.
- Beware of hot surfaces; always wear protective, insulated oven gloves or mitts when handling hot components.
- Do not immerse the cord, plugs, or main body in water or other liquid.
- Close supervision is necessary when used by or near children.
- Do not leave food in the unit overnight.
- Unplug from the outlet and allow to cool before attaching or removing parts or cleaning.
- Do not use unrecommended accessory attachments.
- Do not let the cord hang over the edge of a table/counter or touch hot surfaces.
- Do not place on or near a hot gas/electric burner or heated oven.
- Children aged less than 8 years must be kept away from the appliance and its cord. Children aged 8 and above, and persons with reduced capabilities, can use the appliance under supervision and after understanding the hazards. Cleaning and user maintenance by children require supervision and must only be done by those older than 8.
- Use on a secure, stable, heat-resistant worktop, away from the edge.
- Do not place where it can fall or be submerged in liquid.
- Do not move the oven while in use.
- Avoid covering the oven or placing it near flammable materials (curtains, walls) during operation to prevent fire.
- Never leave unattended while in use.
- Do not place cardboard, plastic, paper, or similar materials in the oven. "Ready meals" for microwave/conventional ovens should not be cooked in an air fryer.
- Do not store materials other than manufacturer-recommended accessories in the oven when not in use.
- Do not operate near aerosol products.
- A slight odor may be emitted during first use due to lubricant burning off; this is normal and will subside. Ensure sufficient ventilation.
- Be cautious when preparing foods with fats and oil around heat, as they can catch fire or scold.
- The symbol "SSS" indicates a CAUTION: Hot Surface.
- Do not use if dropped or visibly damaged.
- Not intended for operation by external timer or remote-control system.
- If the supply cord is damaged, it must be replaced by the manufacturer, service agent, or similarly qualified persons.
- The outer surface may get hot during operation.
- Never cook stews, casseroles, or liquid-based foods like soup, as liquid splashes and vapor can damage the unit.
- Do not place in front of plug sockets due to the hot air vent at the rear.
- Do not cover the air inlet (top) or air exhaust openings (back) during operation.
- Do not fill the frying tray with oil to avoid fire hazard.
- During hot air frying, hot steam is released from the air exhaust opening. Keep hands and face at a safe distance. Be careful of hot steam and air when removing the frying tray.
- Immediately unplug if dark smoke comes out of the appliance. Wait for smoke emission to stop before removing the frying tray.
The manual also includes troubleshooting tips for common issues such as the air fryer not working, undercooked/overcooked results, unevenly fried ingredients, non-crispy snacks, difficulty sliding the tray, white smoke, and unevenly fried/non-crispy potato fries. It provides solutions for each problem, such as checking the plug, setting the timer, adjusting food quantity, correcting temperature/time settings, shaking ingredients, using appropriate snack types, cleaning greasy residues, and properly preparing potato sticks.
The product is guaranteed against manufacturing defects for a period of one year from the date of original purchase, subject to specific provisions outlined in the manual. It also includes information on the proper disposal of electrical products to promote recycling.