7 8
FINALIZING THE SETUP
ENGLISH
CONNECTING THE PUMP AND USING THE INTEGRATED DIGITAL
RGB ILLUMINATION
Figure 2
Figure 4
Figure 3
Figure 1
Figure 5
Direct Attach
(IN)
Daisy Chain
(to NEXT)
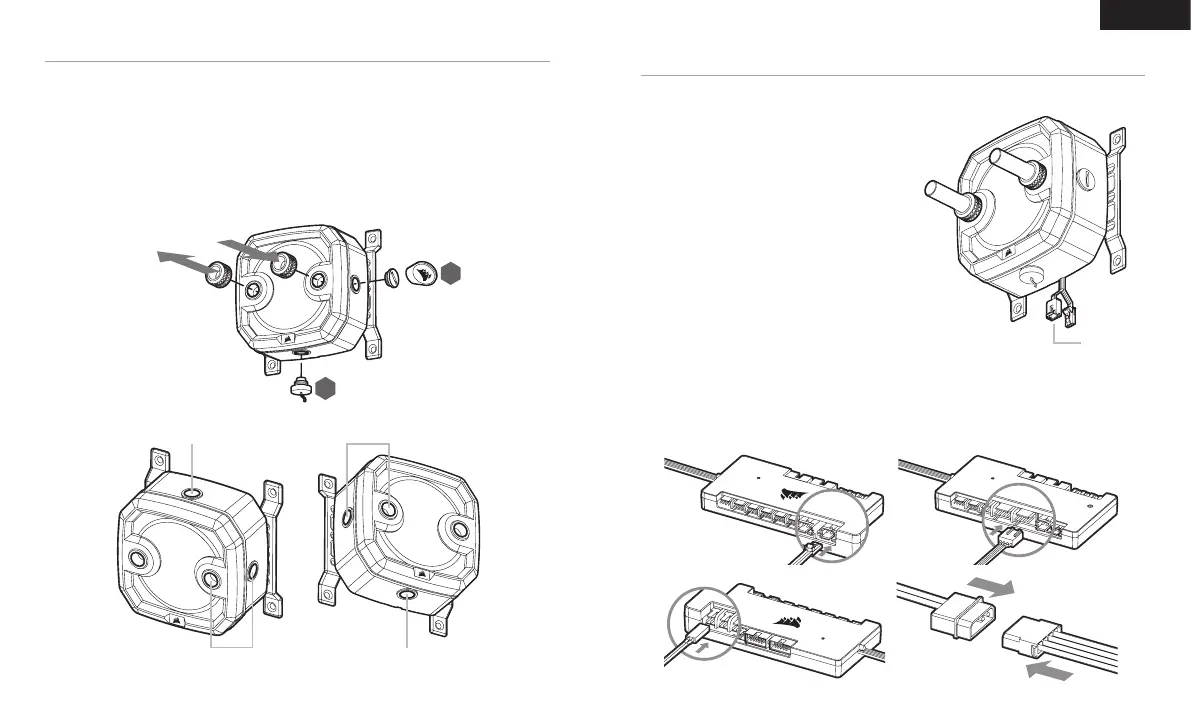
1. Install the two (2) appropriate CORSAIR XF G1/4 BSPP threaded-type fittings (not included) into the
reservoir ports and tighten them by hand. Do not use any tools (i.e. pliers) (Figure 1).
2. It is mandatory to use the front-left port as the OUTLET. The recommended INLET (return) port is marked
on the image below. Optionally, you can use the top G1/4 port as an INLET (return) line as well (Figure 2 and 3).
3. Install the CORSAIR G1/4 Temperature Sensor Plug (F) into the G1/4 port located on the base of the unit.
Do not install the temperature sensor on any of the top ports.
4. Close the remaining three (3) open (unused) ports with the included CORSAIR G1/4 plugs and tighten
them using a plug tool (L). Refrain from using a screwdriver as it may result in damage to the surface of
the plugs.
A CORSAIR iCUE Commander PRO or Lighting Node PRO (either)
is required in order to use the integrated RGB illumination on
the XD3 RGB. CORSAIR iCUE software is used to program the
visual effects. CORSAIR iCUE Commander PRO is required
for automatic control of the pump and for monitoring the liquid
temperature using iCUE software suite.
The XD3 RGB Pump/Reservoir can be connected to the
appropriate CORSAIR controller either directly or
"daisy"-chained with other CORSAIR addressable
RGB component(s).
1. Identify the correct RGB connector on the reservoir-pump
unit (Figure 1).
2. Insert the RGB connector in a CORSAIR iCUE Commander
PRO port or Lighting Node PRO port (Figure 2).
3. Download and install CORSAIR iCUE software suite from
the following website: https://www.corsair.com/icue.
Configure visual and lighting effects by following the
manual for iCUE software.
4. Connect the XD3 RGB’s pump 4-pin fan connector into Fan
Port #6 on your CORSAIR iCUE Commander PRO (Figure 3).
5. Connect the XD3 RGB’s temperature sensor into temperature
Port #1 on your CORSAIR iCUE Commander PRO (Figure 4).
6. Connect the XD3 RGB’s main power cable by plugging in a
4-pin Molex connector from your power supply (Figure 5).
PSU
XD3 RGB
OUTLET
FILL port
Must be used as
OUTLET port
Temperature
sensor
Can be used as
INLET port
F
L
Figure 1
Figure 2 Figure 3
INLET

 Loading...