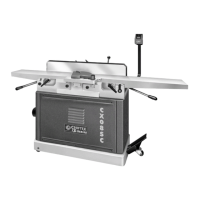
The Craftex CX06SC and CX08SC are 6" and 8" parallelogram jointers, respectively, equipped with a spiral cutter-head, designed for woodworking applications. These machines are professional tools that require proper care and adherence to safety procedures as outlined in the user manual.
Function Description:
The primary function of these jointers is to flatten and square lumber, preparing it for further woodworking operations such as planing, edge jointing, and bevel cutting. The parallelogram table adjustment system ensures precise alignment of the in-feed and out-feed tables, which is crucial for achieving accurate and smooth cuts. The spiral cutter-head, featuring German-made carbide inserts, is designed for efficient material removal and a superior finish.
Important Technical Specifications:
CX06SC (6" Jointer):
- Motor: 1 1/2 HP, 110/220 Volts, Single Phase, 15/7.5 Amps.
- Drive System: 3 'V' Belts.
- Max. Depth of Cut: 1/8".
- Max. Width of Cut: 6".
- Cutter-Head Type: Spiral Cutter-Head with German Made Carbide Inserts.
- Cutter Head Speed: 4,850 RPM.
- Number of Carbide Inserts: 32.
- Cuts per Minute: 19,400.
- Table Size: 6" Width, 55 1/2" Length.
- Height (from floor): 32 1/2".
- Cutter-Head Guard: Die Cast Metal.
- Table Adjustment: Parallelogram.
- Table Construction: Precision Ground Cast Iron In-feed and Out-feed.
- Body Construction: Powder Coated.
- Fence Stops: 45°, 90°, 135°.
- Mobility: Mobile Base with Locking Foot Pedal.
- Included Accessories: Push Blocks and Knife Setting Jig.
- Dust Hood: 4".
- Noise Level: Approx. 82dB.
- First Carton Size: 29" L x 18" W x 28" H.
- Second Carton Size: 62" L x 21" W x 14" H.
- Net Weight: 325 lbs.
- Warranty: 3 YEARS.
CX08SC (8" Jointer):
- Motor: 3 HP, 220 Volts, Single Phase, 15 Amps.
- Drive System: 3 'V' Belts.
- Max. Depth of Cut: 1/8".
- Max. Width of Cut: 8".
- Cutter-Head Type: Spiral Cutter-Head with German Made Carbide Inserts.
- Cutter Head Speed: 5,350 RPM.
- Number of Carbide Inserts: 40.
- Cuts per Minute: 21,400.
- Table Size: 8" Width, 76-3/8" Length.
- Height (from floor): 32-5/8".
- Cutter-Head Guard: Die Cast Metal.
- Construction: All Ball Bearing and Cast-Iron.
- Bearings: Shielded and Lubricated Ball Bearings.
- Table Construction: Precision Ground Cast Iron In-feed and Out-feed, Parallelogram Beds.
- Body Construction: Powder Coated.
- Fence Size: 1 1/4" Width, 36" Length, 5" Height.
- Fence Stops: 45°, 90°, 135°.
- Mobility: Mobile Base with Locking Foot Pedal.
- Dust Hood: 4".
- First Carton Size: 81 1/2" L x 25 1/2" W x 12 1/2" H.
- Second Carton Size: 38" L x 18" W x 27 1/2" H.
- Net Weight: 510 lbs.
- Warranty: 3 YEARS.
Usage Features:
- General Safety: Emphasizes reading the manual, connecting to the correct power source, wearing safety glasses, respirators, hearing protection, and safety shoes. It also warns against loose clothing/jewelry, operating unattended, reaching over the table, and using prescription/other drugs that impair judgment.
- Work-piece Inspection: Before cutting, users must inspect the work-piece for nails, staples, stone, or metal to prevent damage to the blade or injury to the operator. Unstable woods with excessive twisting, wrapping, or large knots should be handled with caution.
- Dust Collection: Both models feature 4" diameter dust ports for connection to a dust collector, which is essential to avoid respiratory illness due to the large amount of dust produced.
- Surface Planing: Recommended cutting depth is 1/32" with the fence set to 90°. Push blocks are mandatory for safety to keep hands away from the cutter head. Planing against the grain is warned against due to kickback and tear-out risks.
- Bevel Cutting: The fence can be tilted to desired angles (45°, 90°, 135° stops are provided). Recommended cutting depth for bevels is between 1/16" and 1/8". Push blocks are used to guide the stock over the cutter-head.
- Edge Jointing: For flattening edges, the cutting depth is set to 1/16" to 1/8" with the fence at 90°. Push blocks are used to feed the stock.
- Mobile Base: Both models include a mobile base with a locking foot pedal, allowing for easy repositioning of the heavy machine. The mobile base should always be locked during operation.
- Pedestal Switch: An ON/OFF pedestal switch is provided for convenient and safe operation.
- Table Adjustment Levers: Allow for precise movement of the in-feed and out-feed tables.
- Fence Lock and Tilt Knob: Secure the fence at the desired angle for consistent cuts.
- Cutter-Head Guard: A spring-loaded guard automatically covers the cutter-head, retracting only when stock is fed. It is a critical safety feature and must be installed and functioning correctly.
- Extension Table: An extension table can be attached to the in-feed table to support longer workpieces.
Maintenance Features:
- Rust Prevention: Unpainted surfaces are coated with waxy oil for rust prevention, which should be removed with a solvent cleaner before assembly and operation.
- Cutter-Head Knife Inspection and Adjustment: The cutter-head inserts must be at the same height as the out-feed table for optimal results. Users are instructed to disconnect power, remove the guard, and use a straight edge to check insert height. If inserts are too high or low, they need adjustment.
- Carbide Insert Replacement/Rotation: The spiral cutter-head uses square carbide inserts with four cutting edges. When one edge becomes dull, the insert can be rotated 90 degrees to expose a fresh edge. Once all four edges are used, the insert should be replaced. Cleaning dust and debris from the cutter-head body and inserts is crucial for proper alignment and cutting performance.
- Table Parallelism: The in-feed and out-feed tables must be parallel to the cutter-head and to each other for best cutting results. The manual provides detailed instructions for checking and adjusting table parallelism, which involves loosening screws on eccentric bushings under the tables. This is described as a complex task, and users are advised to confirm if adjustment is truly needed before proceeding.
- Out-Feed Table Height Setting: The out-feed table height must match the cutter-head knives. Adjustment involves disconnecting power, removing the guard and fence, loosening table locks, jam nuts, and positive stop bolts, then lowering the table until a straightedge resting on it just touches the cutter-head body.
- In-Feed Table Height Setting: Positive stop bolts at the back of the machine allow adjustment of the in-feed table height. The recommended depth of cut is 1/32" for minimum and 1/8" for maximum for most operations. Exceeding 1/8" cut per pass can lead to kickback and serious injury.
- V-Belt Installation/Maintenance: The V-belt connects the motor pulley to the cutter-head pulley. Installation involves loosening motor bracket fasteners, sliding the motor, placing the belt, and then re-tightening. During test runs, unusual noise or vibration may indicate issues with belts (slapping, worn, loose) or motor mounts, requiring replacement or tightening.
- Regular Servicing: The manual emphasizes maintaining and servicing the jointer regularly as instructed.