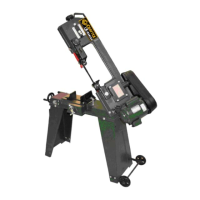
The Craftex CX117 is a 2HP metalcutting band saw designed for precision cutting of various metal materials. This robust machine is part of the Craftex metalworking equipment line, offering professional-grade performance for a range of tasks. Its primary function is to cut metal workpieces with accuracy and efficiency, making it suitable for workshops and industrial settings.
Function Description
The CX117 operates by utilizing a continuous band saw blade that moves around two wheels, with one wheel driven by a 2HP motor. The blade cuts through the workpiece, which is secured in an adjustable vise. A key feature of this band saw is its hydraulic down feed system, which allows for controlled and consistent cutting pressure, contributing to smoother cuts and extended blade life. This system also includes an auto shut-off feature, enhancing safety and convenience by stopping the machine once a cut is complete.
The machine is specifically designed for cutting metal only, emphasizing its specialized application. It features a headstock that can swivel, allowing for miter cuts at various angles, typically ranging from 0° to 60°. This adjustability is crucial for users needing to make angled cuts on their metal stock. The feed rate, which is the speed at which the blade cuts through the workpiece, is adjustable via a dedicated dial and an ON/OFF lever. This control allows operators to optimize cutting performance based on the material type, hardness, and desired finish.
A built-in cutting fluid system is integral to the CX117's operation. This system circulates cutting fluid to the blade and workpiece during operation, serving several critical functions: it cools the blade and workpiece, reduces friction, and flushes away chips. This not only extends the life of the band saw blade but also improves the quality of the cut and the overall efficiency of the machine. The cutting fluid pump can be switched ON/OFF, and the flow of fluid can be adjusted using valves on the hoses.
The CX117 includes a work stop, which is an adjustable rod and stop mechanism that allows for repeatable cuts of the same length. This feature is particularly useful for batch production or when multiple pieces of the same dimension are required. The vise itself is designed for quick tightening and release, accommodating various workpiece shapes and sizes. It can be adjusted to secure the material firmly, ensuring stability and safety during the cutting process.
Safety is a paramount consideration in the design and operation of the CX117. The machine is equipped with guards that must be in place during operation to protect the user from moving parts, especially the blade. An Emergency Stop button is readily accessible, allowing for immediate shutdown of the machine in case of an emergency. Proper grounding is also emphasized to mitigate the risk of electrical shock.
Usage Features
Setting up the CX117 involves assembling the cabinet and mounting the band saw unit securely. Before initial use, it is recommended to remove any rust prevention waxy oil from unpainted surfaces using a solvent cleaner. The machine requires connection to a specific 220-V single-phase power source, and proper grounding by a qualified electrician is essential.
Before operation, several adjustments should be verified, including blade tension, blade guide adjustment, and stop adjustments. A test run is advised to ensure the machine powers up and runs smoothly without excessive vibration or noise. During the test run, all safety features, including the start/stop button and emergency stop, should be checked for proper functionality.
To set the cutting angle, the headstock swivel lock lever is loosened, the headstock is rotated to the desired angle indicated on the scale, and then the lever is tightened to lock it in place. The work stop is installed by threading its rod into the base and then sliding the stop onto the rod, securing it at the desired position relative to the blade.
The vise is operated by first raising the band saw and locking it in position with the feed ON/OFF valve. The workpiece is then placed between the jaws, and the hand wheel is used to bring the jaws within 1/8" of the workpiece. Finally, the vise lock lever secures the workpiece. The upper blade guides are adjustable and should be positioned as close as possible to the workpiece to ensure straight cuts. This adjustment involves loosening a lock knob, sliding the guide assembly, and then re-tightening the knob.
Selecting the appropriate blade is crucial for optimal cutting performance. The CX117 uses a 1" wide x 97.5" long x 0.03" thick band saw blade. Blade selection depends on factors such as material type, hardness, shape, and desired tooth count. The feed rate is adjusted by raising the bow, locking it with the feed ON/OFF lever, and then setting the feed rate dial. The cutting fluid system is activated by turning on the pump and adjusting the flow valves. Observing the chips produced during cutting can help determine if the feed rate, blade speed, and cutting fluid type are correctly matched to the material. For instance, evenly shaped, slightly curled chips with a slight color change indicate optimal settings.
Maintenance Features
Regular maintenance is vital to ensure the CX117 operates at peak performance and to extend its lifespan. Daily checks include inspecting for loose mounting bolts, worn or damaged wires, damaged saw blades, and any other unsafe conditions. Proper blade tension and cutting fluid level should also be verified daily.
Monthly maintenance involves lubricating the vise screw and checking the cutting fluid level. After each use, it is recommended to vacuum all chips from the machine. If water-based cutting fluid is used, wiping down the liquid and lubricating areas prone to rust is important to prevent corrosion.
Blade changes are necessary when the blade becomes dull, damaged, or when a different blade type or tooth count is required for a specific material. Before changing the blade, the machine must be turned OFF, and the power cord disconnected to prevent serious injury. The process involves raising and locking the bow, sliding the blade guides out of the way, removing the wheel access cover and blade guide guards, loosening the blade tension handle, and then removing the old blade. The new blade is installed by sliding it through the blade guide bearings and onto both wheels, ensuring the teeth face the correct direction. After installation, the blade cover and guards are reinstalled, and the blade tension is adjusted.
Blade tension is critical for straight and efficient cuts. Incorrect tension can lead to the blade stalling, slipping, or breaking. To tension the blade, the lock nut on the blade tensioner lead screw is loosened, and the blade tension hand wheel is turned until the tension indicator shows the tension is within the green range for the specific saw. Once tensioned, the lock nut is tightened.
Blade guides, although factory-adjusted, should be re-adjusted after shipping or blade changes to ensure proper cuts. This involves disconnecting power, raising the bow, loosening cap screws on the blade guide guard and housing, and adjusting the housing so the back of the blade slightly touches the bearing without tilting the housing. The jam nuts on the guide bearing assembly are also adjusted to position the bearings against the sides of the blade.
The feed stop also requires adjustment to ensure the blade teeth are just below the vise table surface when a cut is complete, preventing the blade from resting or rubbing on the vise assembly. Additionally, an over-tilt stop can be adjusted to prevent the bow from being lifted past 40°. These adjustments contribute to both the safety and precision of the cutting operations.