EasyManua.ls Logo

Craftex CX230 - User Manual

Craftex CX230
9 pages
Print Icon
To Next Page IconTo Next Page
Loading...
MODEL CX230 / CX250
30” / 50" FENCE FOR TABLE SAW
USER MANUAL
Version 1.0

Questions and Answers

  • E
    Elizabeth SmithSep 12, 2025
    How to stop tools from grabbing on my Craftex Lathe?
    • H
      hunterannetteSep 12, 2025
      If tools on your Craftex Lathe tend to grab or dig in, the issue could be due to dull tools (sharpen them), the tool support being set too low (reposition its height), the tool support being too far from the workpiece (reposition it closer), or using the wrong tool for the operation (use the correct tool).
  • H
    Holly MooreAug 25, 2025
    Why does my Craftex CX230 Saw leave ridges on the cutting surface?
    • M
      Melissa PerezAug 25, 2025
      If your Craftex Saw is producing ridges on the cutting surface, several factors could be the cause. First, the disk diameter might be incorrect or too large; try decreasing the disk diameter to better match the part you're cutting. Also, ensure the part is gripped effectively in the vise. Reduce the advance and use less cutting pressure. If the disk teeth are worn, sharpen the tool. Check the level of lubricating refrigerant in the tank. Finally, make sure the blade has a larger tooth pitch to allow better unloading of shavings and hold more lubricating refrigerant.
  • J
    Justin ColeAug 25, 2025
    Why is my Craftex Saw disk vibrating?
    • T
      Timothy HenryAug 26, 2025
      If the Craftex Saw disk is vibrating, it could be due to several reasons. The tooth pitch or tooth profile might be unsuitable, so choose a suitable disk. Ensure the part is gripped effectively in the vise. If the dimensions of the solid section are too large, abide by the instructions. If the disk diameter is incorrect or too large, decrease the disk diameter to match the part being cut.
  • K
    Kevin PetersenSep 23, 2025
    What to do if the spindle on my Craftex Power Tool does not turn?
    • S
      Susan WilliamsSep 23, 2025
      If the spindle on your Craftex Power Tool isn't turning, here are a few things to check: the circuit breaker might have tripped (reset it), the branch circuit breaker might have tripped or a fuse blown (reset the breaker or replace the fuse), there could be an open wire in the switch circuit (repair the open circuit), the switch could be defective (repair the switch), or the drive belt might be broken (replace the drive belt).
  • T
    Tara ThorntonSep 12, 2025
    What to do if Craftex Lathe motor does not run when power switch is turned on?
    • K
      kimberlyhayesSep 12, 2025
      If the motor doesn't run when you turn on the power switch, it could be due to a burnt-out switch, in which case you should replace the switch. Another possible cause is a loose or damaged connection wire, which needs to be tightened or replaced.
  • J
    James DixonSep 15, 2025
    How to fix a Craftex Sander when the motor will not start?
    • R
      Richard SullivanSep 16, 2025
      If your Craftex Sander motor won't start, it could be due to a few reasons. First, a faulty or defective switch might be the issue; consider replacing it. Second, a faulty or blown capacitor could be the culprit, so replace the capacitor. Third, check for a blown fuse or tripped circuit breaker; if a fuse is blown, replace it with the required size, and if a breaker is tripped, reset it. Finally, low line voltage could be the cause; check the power supply for the correct voltage and adjust as needed.
  • J
    John TorresSep 5, 2025
    Why is the board edge curved after using my Craftex Power Tool?
    • J
      Joyce BartonSep 6, 2025
      This can happen if the board isn't held with the same pressure on the infeed and outfeed table during the cut; ensure you hold the board with consistent pressure as it moves over the cutterhead. Also, if the board has too much bow or coil along its length, take limited cuts to remove the high spots before a full pass. Surface plane one face so there is a good surface to place along the fence. It should take 3 to 5 passes to get a perfect edge depending on the state of the board and the depth of cut.
  • B
    brianrollinsSep 6, 2025
    Why is my Craftex Power Tool causing chipped or ripped out pieces?
    • C
      Courtney DavilaSep 6, 2025
      This issue can be caused by knots or incompatible grain direction in the wood. Check the workpiece for knots and grain; clean stock should be used. Also, nicked or broken cutter inserts can be the problem; turn or replace the cutter insert. Feeding the workpiece too fast can also cause this; reduce the feed rate. Finally, taking too deep of a cut can cause chipping; take a smaller depth in cut, especially when using hard wood.
  • H
    Henry SweeneyAug 29, 2025
    What to do if Craftex Air Cleaner motor does not run when power is switched on?
    • E
      Evan RomeroAug 29, 2025
      If the motor of your Craftex Air Cleaner doesn't run when you switch it on, the fuse may have blown and needs replacing. Alternatively, the switch could be burned out, requiring replacement. Another potential cause is a loose or damaged wire connection, which should be tightened or replaced.
  • A
    anthonymaryAug 30, 2025
    Why Craftex Air Cleaner motor will not reach full power?
    • J
      Jean BurnsAug 30, 2025
      If your Craftex Air Cleaner motor won't reach full power, the power wiring might be incorrect; replace or correct it. Another possibility is that an overload has tripped; reduce the load by cleaning the filters as necessary.

Overview

This document is a user manual for the Craftex CX-Series Model CX230 / CX250 fence system, designed for use with table saws. It details the physical features, installation, adjustment, and parts diagrams for both the 30" and 50" versions of the fence. The manual also includes a Craftex 3-year limited warranty policy.

Function Description:

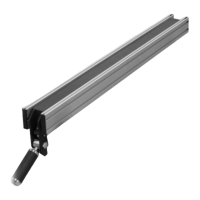
The Craftex CX230 / CX250 fence system provides a precise and stable guide for cutting operations on a table saw. Its primary function is to ensure that the workpiece is held parallel to the saw blade, allowing for accurate and repeatable cuts. The system includes a fence body, front and rear fence rails, and a scale for precise positioning. The fence can be locked into position using a lock lever, and its parallelism to the miter slot can be adjusted using levelling set screws. The scale allows users to set the fence at specific distances from the blade, enhancing cutting accuracy.

Important Technical Specifications:

The manual outlines two models: CX230 and CX250, corresponding to 30" and 50" fence capacities, respectively.

  • CX230: Requires twelve hex bolts for installation into the open slot on the fence rail. The parts list for the CX230 includes 42 distinct components, with varying quantities. Key components include:

    • Rear Rail (1)
    • Rear Rail End Cover (2)
    • Bolt M8x25 (8)
    • Nut M8 (16)
    • Bolt M6x12 (6)
    • Washer (6)
    • Nut M6 (6)
    • Fence End Cover (1)
    • Nut M12 (2)
    • Shaft (1)
    • Bearing (1)
    • Screw M6x12 (1)
    • Fence Assembly (1)
    • Side Plate (2)
    • End Cover (4)
    • Bolt M8x85 (1)
    • Handle Cover (1)
    • Handle Sleeve (1)
    • Screw Rod 1 (1)
    • Eccentric Wheel (1)
    • Screw M8x8 (3)
    • Compression Spring (1)
    • Steel Ball (1)
    • Scale Label(Left) (1)
    • Screw (2)
    • Bolt M8x25 (8)
    • Front Rail End Cover (Right) (1)
    • Front Rail (1)
    • Front Rail End Cover (Left) (1)
    • Pointer Plate (2)
    • Screw M6x8 (4)
    • Bolt M10x45 (1)
    • Nut M10 (1)
    • Bolt M6x12 (1)
    • Nut M6 (1)
    • Spring Washer (1)
    • Washer (1)
    • Spring Plate (2)
    • Thin Nut M10 (1)
    • Screw M10 (1)
    • Screw M10x17 (2)
    • Nut M10 (2)
  • CX250: Requires eight hex bolts for installation into the open slot on the fence rail. The parts list for the CX250 also includes 42 distinct components, with some differences in quantities and bolt specifications compared to the CX230. Key components include:

    • Rear Rail (1)
    • Rear Rail End Cover (2)
    • Bolt M8x30 (12)
    • Nut M6 (24)
    • Bolt M6x12 (6)
    • Washer (14)
    • Nut M6 (6)
    • Fence End Cover (1)
    • Nut M12 (2)
    • Shaft (1)
    • Bearing (1)
    • Screw M6x12 (9)
    • Fence Assembly (1)
    • Side Plate (2)
    • End Cover (4)
    • Bolt M8x85 (1)
    • Handle Cover (1)
    • Handle Sleeve (1)
    • Screw Rod 1 (1)
    • Eccentric Wheel (1)
    • Screw M8x8 (3)
    • Compression Spring (1)
    • Steel Ball (1)
    • Scale Label(Left) (1)
    • Screw (2)
    • Bolt M8x30 (12)
    • Front Rail End Cover (Right) (1)
    • Front Rail (1)
    • Front Rail End Cover (Left) (1)
    • Pointer Plate (2)
    • Screw M6x8 (4)
    • Bolt M10x45 (1)
    • Nut M10 (1)
    • Bolt M6x40 (1)
    • Nut M6 (1)
    • Spring Washer (1)
    • Washer (1)
    • Spring Plate (2)
    • Thin Nut M10 (1)
    • Screw M10 (1)
    • Screw M10*15 (2)
    • Nut M10 (2)

Usage Features:

  • Easy Installation: The manual provides clear, step-by-step instructions for installing the front and rear fence rails, including how to insert hex bolts and secure end caps.
  • Quick Locking Mechanism: The fence features a lock lever that allows users to quickly secure the fence in position on the rails.
  • Precise Scale and Cursors: A scale is provided for accurate measurement, with cursors to indicate the cutting position. The scale can be adjusted to ensure the "0" mark aligns with the cursor hairline for precise cuts.
  • Adjustable Parallelism: The fence's parallelism to the miter slot can be adjusted using levelling set screws, ensuring consistent and accurate cuts. This is a critical feature for maintaining woodworking precision.
  • Model-Specific Bolt Quantities: The manual specifies different bolt quantities for the CX230 (twelve hex bolts) and CX250 (eight hex bolts) during installation, indicating tailored designs for each model.

Maintenance Features:

  • Adjustment Procedures: The manual outlines specific adjustment procedures for fence parallelism and scale installation/adjustment. These procedures are crucial for maintaining the accuracy and functionality of the fence system over time.
    • Fence Parallelism Adjustment: Involves disconnecting power, aligning the fence with the miter slot, locking it, checking alignment, unlocking, flipping the fence, and adjusting set screws. This ensures the fence remains parallel to the blade.
    • Scale Installation and Adjustment: Requires the machine to be off and unplugged, raising the blade, positioning the fence against the blade, carefully positioning the scale, aligning the "0" mark with the cursor hairline, and performing a test cut to verify accuracy.
  • Parts Diagrams and Lists: Detailed exploded diagrams and comprehensive parts lists for both the CX230 and CX250 models are provided. These resources are invaluable for identifying specific components, facilitating ordering of replacement parts, and understanding the assembly of the fence system.
  • Warranty Information: Craftex offers a 3-year limited warranty on parts and 90 days on labour for the original purchaser, covering defects in materials. This provides assurance for potential repairs or replacements. The warranty details the conditions for returns, repairs, and replacements, including requirements for proof of purchase and pre-authorization for returns. It also specifies that consumable products are not covered and outlines procedures for contacting Busy Bee Tools for parts and service.

Craftex CX230 Specifications

General IconGeneral
BrandCraftex
ModelCX230
CategorySaw
LanguageEnglish

Related product manuals