
F
Frank HerreraSep 23, 2025
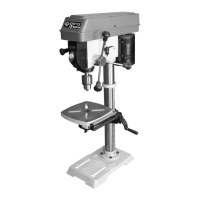
Why the table on my Craftex Power Tool cannot be raised?
- NNathan GonzalezSep 23, 2025
If the table on your Craftex Power Tool cannot be raised, it is likely due to a lack of lubrication. Make sure to lubricate it.
Why the table on my Craftex Power Tool cannot be raised?
If the table on your Craftex Power Tool cannot be raised, it is likely due to a lack of lubrication. Make sure to lubricate it.
Why doesn't my Craftex Lathe start?
If your Craftex Lathe does not start, or the power supply fuse/breaker trips immediately after start-up, there could be several reasons: * The OFF button might not have been pressed before toggling the spindle direction switch. Press the OFF button before toggling the spindle direction switch. * The motor brushes might be worn or faulty. Remove and replace the brushes. * The fuse might be blown. Replace the fuse and ensure there are no shorts. * The power supply circuit breaker might have tripped, or the fuse might be blown. Ensure the circuit is sized correctly and free of shorts. Reset the circuit breaker or replace the fuse. * The motor wires might be connected incorrectly. Correct the motor wiring connections. * The wiring might be open or have high resistance. Check and f...
Why is my Craftex Lathe stalling?
If your Craftex Lathe stalls or is underpowered, consider the following: * The machine might be undersized for the task. Use sharp chisels and reduce the feed rate/depth of cut. * The workpiece material might not be suitable for the machine. Only cut wood and ensure the moisture content is below 20%. * The feed rate/cutting speed might be too fast. Decrease the feed rate/cutting speed. * The variable-speed potentiometer might be faulty. Test and replace it if it is faulty. * The belt might be slipping. Tension or replace the belt; ensure the pulleys are aligned, and the belts are clean and not damaged. * The motor brushes might be worn or faulty. Remove and replace the brushes. * The circuit board might be faulty. Inspect and replace it if it is faulty. * The pulley might ...
Why does my Craftex Power Tool leave lines or ridges on the board?
A nicked, blunt, or chipped cutter insert can cause this. Turn or get a new cutter insert.
What to do if the Craftex Saw blade sticks in the cut?
If the Craftex Saw blade is sticking in the cut, it could be due to several reasons. You might be advancing too quickly, so try decreasing the advance and using less cutting pressure. Alternatively, the cutting speed might be too low, so try increasing the speed. Ensure you're using a disk with a suitable tooth pitch. Check the blend of lubricating coolant and consider using a better quality disk if there's a sticky accumulation of material. Also, verify the level of lubricating refrigerant in the tank. If the issue persists, increase the flow of lubricating refrigerant, making sure the hole and liquid outlet pipe aren't blocked.
Why is my Craftex Saw disk vibrating?
If the Craftex Saw disk is vibrating, it could be due to several reasons. The tooth pitch or tooth profile might be unsuitable, so choose a suitable disk. Ensure the part is gripped effectively in the vise. If the dimensions of the solid section are too large, abide by the instructions. If the disk diameter is incorrect or too large, decrease the disk diameter to match the part being cut.
What causes a Craftex CX230 disk to chip?
If your Craftex Saw disk is chipping, it could be due to hardness, shape, or flaws in the material, so reduce the cutting pressure and/or the advance. The cutting speed might be wrong, so change the disk speed and/or diameter. Also, the tooth pitch might be wrong, so choose a suitable disk. Check the gripping of the part if there are vibrations. If the disk is incorrectly sharpened, replace it with one that is more suitable and correctly sharpened. Using a better quality disk might also solve the problem. Finally, check the percentage of water and oil in the emulsion if the lubricating refrigerant is incorrect.
What causes premature disk wear on a Craftex Saw?
If the Craftex Saw disk is experiencing premature wear, several factors could be responsible. Ensure the disk was correctly run in, referring to the relevant chapter for guidance. The cutting speed might be incorrect, so adjust the disk speed and/or diameter. An unsuitable tooth profile or pitch could also be the cause, so select a suitable disk. Using a better quality disk may help. Also, ensure there is sufficient lubricating refrigerant by checking the level of the liquid in the tank. If the issue persists, increase the flow of lubricating refrigerant, ensuring that the hole and liquid outlet pipe are not blocked.
How to prevent tooth breakage on my Craftex Saw?
If your Craftex Saw is experiencing tooth breakage, it could be due to several factors. You might be advancing too fast, so decrease the advance and use less cutting pressure. The cutting speed could be wrong, so change the disk speed and/or diameter. Ensure you're using a disk with the correct tooth pitch and of better quality. Check the gripping of the part in the vise. Remove any broken tooth parts left in the cut. Avoid resuming cutting on a previously made groove by turning the part. Check the level of lubricating liquid in the tank. Increase the flow of lubricating refrigerant, checking that the hole and the liquid outlet pipe are not blocked, and ensure the lubricating coolant is properly blended.
What to do if Craftex Air Cleaner has insufficient suction?
If your Craftex Air Cleaner isn't providing enough suction, the inlet port might be blocked, so try cleaning it. Also, the filter bag could be full; in that case, empty it. Finally, check if the outlet port is blocked and clean it, or adjust the outlet's direction.
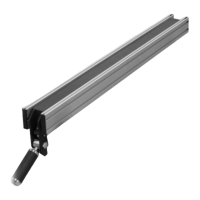
This document is a user manual for the Craftex CX-Series Model CX230 / CX250 fence system, designed for use with table saws. It details the physical features, installation, adjustment, and parts diagrams for both the 30" and 50" versions of the fence. The manual also includes a Craftex 3-year limited warranty policy.
The Craftex CX230 / CX250 fence system provides a precise and stable guide for cutting operations on a table saw. Its primary function is to ensure that the workpiece is held parallel to the saw blade, allowing for accurate and repeatable cuts. The system includes a fence body, front and rear fence rails, and a scale for precise positioning. The fence can be locked into position using a lock lever, and its parallelism to the miter slot can be adjusted using levelling set screws. The scale allows users to set the fence at specific distances from the blade, enhancing cutting accuracy.
The manual outlines two models: CX230 and CX250, corresponding to 30" and 50" fence capacities, respectively.
CX230: Requires twelve hex bolts for installation into the open slot on the fence rail. The parts list for the CX230 includes 42 distinct components, with varying quantities. Key components include:
CX250: Requires eight hex bolts for installation into the open slot on the fence rail. The parts list for the CX250 also includes 42 distinct components, with some differences in quantities and bolt specifications compared to the CX230. Key components include: