Do you have a question about the Craftsman 113.213853 and is the answer not in the manual?
Understand tool application, limitations, and potential hazards before use.
Ensure tools are properly grounded using a 3-conductor cord and plug.
Maintain all guards in working order, adjusted and aligned.
Develop habit to remove all tools before operation.
Cluttered areas invite accidents; ensure floor is not slippery.
Do not use in damp/wet locations; keep area well-lighted.
All visitors should be kept a safe distance from the work area.
Use padlocks, master switches, or remove starter keys.
Use the tool for its intended purpose and rate.
Do not force tool or attachment for jobs it was not designed for.
Avoid loose clothing, jewelry; tie back long hair; wear nonslip footwear.
Wear ANSI Z87.1 compliant goggles at all times.
Use clamps or vise to hold work securely for safer operation.
Maintain proper footing and balance at all times.
Keep tools sharp, clean, and lubricated for best performance.
Disconnect power before servicing or changing accessories.
Ensure switch is in "OFF" position before plugging in.
Consult manual for recommended accessories.
Avoid injury from tipping or accidental contact with cutting tool.
Inspect guards or parts for damage before further use.
Feed work into blade/cutter against rotation direction only.
Turn power off; do not leave until tool stops completely.
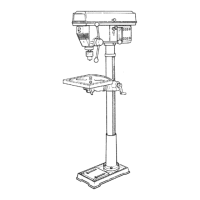
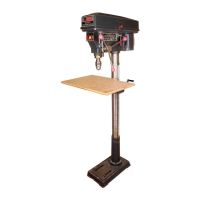
Familiarize yourself with the drill press components and their functions.
Follow instructions for best results and minimize personal injury.
Learn how to make necessary adjustments for proper tool performance.
Perform regular upkeep to ensure tool longevity and safety.
Secure the drill press to the floor or a stable base for safety.
Position the drill press in a well-lit area, away from tripping hazards.
Understand kickback causes and how to prevent workpiece ejection.
Essential personal protective measures during operation.
Use only approved accessories to prevent hazards.
Adhere to specific safety instructions located on the drill press head.
Understand and utilize the correct spindle speeds for various tasks.
Maintain constant alertness and common sense during operation.
List of tools required for assembling the drill press.
Detailed list of all components included in the packaging.
Details about the drill press motor's power and voltage requirements.
Instructions for safely connecting the drill press to electricity.
Guidance on proper grounding and selecting extension cords.
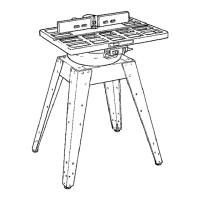
Steps for attaching the column support and table mechanism.
Procedure for mounting the drill press table onto its support.
Steps to securely attach the head assembly to the column.
Instructions for installing the motor onto the drill press.
Procedure for fitting the motor pulley onto the motor shaft.
Steps to install and adjust the drive belt tension.
How to attach the upper belt guard for safety.
Wiring instructions for the drill press motor.
Steps to attach the feed handles for quill movement.
Procedure for mounting the drill bit chuck onto the spindle.
Instructions for fitting a light bulb into the drill press head.
How to align the table perpendicular to the spindle.
Procedure for setting the depth stop pointer accurately.
Visual guide to identify all parts of the drill press.
Information on available spindle speeds and their uses.
Key safety guidelines to follow while operating the drill press.
Proper method for inserting drill bits into the chuck.
How to set up the table and workpiece for drilling.
Instructions for setting the table to a specific angle for bevel cuts.
Method for marking the precise spot for drilling a hole.
Technique for moving the quill and applying feed pressure.
How to adjust the spring that returns the quill.
Routine tasks to keep the drill press in good working order.
Specific areas requiring periodic lubrication for smooth operation.
Common problems, their probable causes, and remedies.
Detailed list of parts shown in Figure 1.
Detailed list of parts shown in Figure 2.
Detailed list of parts shown in Figure 3.
Detailed list of parts shown in Figure 4.
Information on contacting Sears for service and assistance.
Guidance on the process for ordering necessary parts.
| Brand | Craftsman |
|---|---|
| Model | 113.213853 |
| Category | Power Tool |
| Language | English |