EasyManua.ls Logo

Craftsman 139.54930 User Manual

Craftsman 139.54930
75 pages
To Next Page IconTo Next Page
Page #1 background imageLoading...
Page #1 background image
ENGLISH ESPAÑOL
Read and follow all safety rules and operating
instructions before first use of this product.
Fasten the manual near the garage door after
installation.
Periodic checks of the opener are required to
ensure safe operation.
DO NOT install on a one-piece door if using
devices or features providing unattended
close. Unattended devices and features are to
be used ONLY with sectional doors. See
page3
Leer y seguir todas las reglas de seguridad y
las instrucciones de operación antes de usar
este producto por primera vez.
Guardar este manual cerca de la puerta de la
cochera.
Se deben realizar revisiones periódicas del
abridor de puertas para asegurar su operación
segura.
NO usarlo para puertas de una sola pieza si
utiliza dispositivos de cierre automático. Los
dispositivos y funciones automáticas deben
usarse ÚNICAMENTE con puertas seccionales.
Vea la página3.
Sears Brands Management Corporation, Hoffman Estates, IL 60179 U.S.A.
Owner’s Manual/Manual Del Propietario
Garage Door Opener/Abridor de puerta de cochera
For Residential Use Only/Sólo para uso residencial
MODEL/MODELO 139.54930

Table of Contents

Question and Answer IconNeed help?

Do you have a question about the Craftsman 139.54930 and is the answer not in the manual?

Craftsman 139.54930 Specifications

General IconGeneral
TypeChain Drive
Horsepower1/2 HP
Remote ControlYes
Frequency60 Hz
Battery BackupNo
Voltage120V

Summary

Unattended Operation

Garage Door Preparation and Tools

Safety Warnings for Preparation

Critical safety warnings to prevent serious injury or death during garage door setup.

Cautionary Notes for Preparation

Key cautions to prevent damage to the garage door and opener during preparation.

Required Tools for Installation

Lists the essential hand tools needed for the assembly and installation process.

Assembly Steps 1 & 2

Assemble Rail and Install Trolley

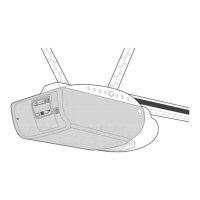
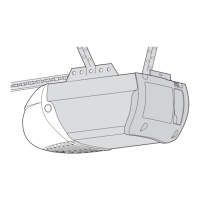
Instructions for assembling the opener rail and installing the trolley assembly.

Fasten Rail to Motor Unit

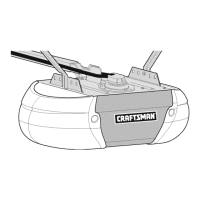
Procedure for securely attaching the assembled rail to the motor unit.

Assembly Step 3: Install Idler Pulley

Assembly Step 4: Install Chain/Cable

Assembly Step 5 & Installation Safety Warnings

Tighten the Chain

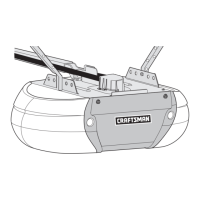
Procedure to adjust the garage door opener chain tension for proper operation.

Important Installation Safety Warnings

Critical safety warnings and instructions for installing the garage door opener safely.

Installation Step 1: Header Bracket Location

Header Bracket Installation Warnings

Warnings regarding secure header bracket mounting to prevent operational failure.

Installation Step 2: Install Header Bracket

Header Bracket Installation Warnings

Warnings regarding secure header bracket mounting to prevent operational failure.

Installation Step 3: Attach Rail to Header Bracket

Installation Step 4: Position the Opener

Opener Positioning Caution

Cautionary note on correctly positioning the opener rail relative to the garage door.

Installation Step 5: Hang the Opener

Opener Hanging Warnings

Warnings about securely fastening the opener to structural supports to prevent falling.

Installation Steps 6 & 7: Light and Emergency Release

Install the Light Bulb and Lens

Procedure for installing the opener's light bulb, including cautions.

Attach Emergency Release Mechanism

Instructions for attaching the emergency release rope and handle, with safety warnings.

Installation Step 8: Fasten the Door Bracket

Door Bracket Installation Cautions

Cautions regarding door bracket installation, especially for lightweight doors requiring reinforcement.

Installation Step 9: Connect Door Arm to Trolley

Installation Step 10: Attach Warning Labels

Installation Step 11: Install the Door Control

Door Control Installation Warnings

Warnings regarding safe installation and connection of the door control unit.

Installation Step 12: Install The Protector System®

Safety Reversing Sensors Installation Warnings

Critical warnings for installing and aligning safety reversing sensors to prevent injury.

Protector System® Bracket Installation Methods

Garage Door Track Installation

Procedure for mounting protector system brackets on garage door tracks.

Wall Installation

Procedure for mounting protector system brackets on the garage wall.

Floor Installation

Procedure for mounting protector system brackets on the garage floor.

Protector System® Mounting and Wiring

Sensor Mounting and Wiring Options

Details on mounting sensors and wiring methods, with and without pre-wiring.

Connect Sensors to Garage Door Opener

Instructions for connecting the safety sensor wires to the garage door opener terminals.

Installation Step 13: Electrical Requirements

Electrical Connection Warnings

Warnings regarding electrical connections, grounding, and compliance with codes.

Installation Step 14: Aligning the Safety Reversing Sensors

Troubleshooting Sensor Alignment

Guidance on diagnosing and fixing issues with safety reversing sensor LEDs.

Adjustment Introduction and Controls

Adjustment Overview

Introduction to garage door opener setup and adjustment for travel limits and force.

One-Piece Door Adjustment Note

Specific note regarding UP travel adjustment for one-piece garage doors.

Programming Buttons Overview

Description of the location and function of the UP, DOWN, and Adjustment buttons.

Adjustment Step 1: Program the Travel

Travel Programming Warnings

Warnings related to programming travel limits and the safety reversal system.

Adjustment Step 2: Test Safety Reversal System

Safety Reversal System Testing Procedure

Procedure and warnings for testing the safety reversal system with an obstruction.

Adjustment Step 3: Test Protector System®

Protector System Testing Warning

Warning regarding testing the Protector System and sensor alignment.

Operation Safety Instructions

Opener Features Overview

Remote Controls and Door Controls

Information on remote control compatibility and memory capacity.

The Protector System® (Safety Reversing Sensors)

Explanation of how the safety reversing sensors detect obstructions.

Energy Conservation Features

Details on the opener's sleep mode and energy saving functions.

Opener Lights

Information on the opener's light bulb usage and operation.

Using Your Garage Door Opener

Using the Door Control

Instructions for operating the garage door using the wall-mounted door control.

Remote Control Operation and Programming

Adding or Reprogramming Remote Controls

Steps for adding, reprogramming, or changing remote control/keyless entry PINs.

Erasing Remote Control Memory

Procedure to erase all programmed remote controls and keyless entries.

Manual Door Operation and Opener Care

Manual Door Operation Procedures

Instructions for disconnecting and reconnecting the trolley for manual door operation.

Opener Maintenance Schedule

Recommended maintenance tasks for the garage door opener, including monthly and annual checks.

Remote Control Battery Replacement

Guide for replacing the battery in the remote control, including warnings.

Troubleshooting Diagnostic Chart

Troubleshooting and Repair Protection

Troubleshooting Diagnostic Chart Continued

Further diagnostic codes and solutions for opener issues.

Repair Protection Agreements

Information on purchasing extended service and repair agreements for the opener.

Repair Parts Identification

Rail Assembly Parts

Diagram and list of parts for the garage door opener rail assembly.

Installation Parts

Diagram and list of parts used during the installation process.

Motor Unit Assembly Parts

Accessories and Warranty Information

Available Accessories

List and description of optional accessories for the garage door opener.

Product Warranty Information

Details on the limited warranty for the garage door opener, parts, and motor.

Related product manuals