Do you have a question about the Craftsman ROUTER MOUNTING KIT and is the answer not in the manual?
Read and understand all instructions and safety rules before operating the tool.
Always wear safety glasses with side shields for eye protection during operation.
Always disconnect the saw from the power supply before making adjustments or adding accessories.
Feed the workpiece against the rotation of the cutter for safe operation.
Always use the dust cover for overhead guarding during cutting operations.
Only use accessories recommended for this tool to avoid injury or damage.
Separate all parts and check them against the parts list before starting assembly.
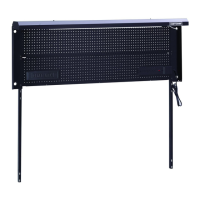
Mount the router extension to the main table, ensuring proper alignment and secure fastening.
Assemble and attach the guide fence to the mounting bars and fence for accurate cuts.
Mount the guard/dust cover assembly over the router table opening for safety and dust collection.
Securely mount the router upside down to the extension table using the correct screws.
Install the router bit and select the appropriate throat plate for the bit size.
Move the switchbox to a more convenient location on the table for easier operation.
Adjust guard, set workpiece feed direction, and fence alignment before beginning operation.
A visual and textual list of all components included in the router mounting kit.
| Brand | Craftsman |
|---|---|
| Model | ROUTER MOUNTING KIT |
| Category | Accessories |
| Language | English |