Connect the Device
Make the necessary connections as called out in the illustrations. A
miniature flathead screwdriver (not supplied) may be required to attach
thinner gauged wires to the backplate terminals. Press the terminal
release with the flathead screwdriver while inserting the wires.
Apply power after all connections have been made.
CAUTION: To avoid a possible short circuit, ensure excess wire is
pushed back through the hole in the backplate.
NOTES:
l
This device is rated for 24VAC operation.
l
For installations without a common wire, the
HZA-CONV-THSTAT-2WIRE 2-wire power adapter (sold
separately) may be used. Refer to the Connect the Device section
for wiring details.
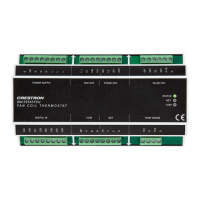
R CONNECTIONS Switch
The thermostat pulls power from both R terminals and the C terminal.
The position of the R Connections switch decides which R connection is
routed to the heat calls (W/W2).
NOTES:
l
When using the HZA-CONV-THSTAT-2WIRE, always make
connections to the R/RC terminals and set the switch to R/RC
ONLY.
l
When power is not available from the HVAC system, a separate
24VAC transformer can be connected between the RH and C
terminals to provide power to the thermostat. Set the R
Connections switch to R/RC ONLY to ensure all calls use the R/RC
reference.
Before attaching the thermostat, note the position of the R
CONNECTIONS switch.
l
For one R connection (24VAC reference), wire to the R/RC terminal
and set the switch to R/RC ONLY.
l
For two R connections (24VAC reference), wire to the R/RC and RH
terminals and set the switch to SEPARATE.
7
HZ-THSTAT
QuickStart
Horizon® Wireless Thermostat

 Loading...