Commercial Audio Series Mixer-Amplifiers
Operation Manualpage 10
Commercial Audio Series Mixer-Amplifiers
Operation Manual page 11
2 Setup
2.4 Choose Output Wire and Connectors
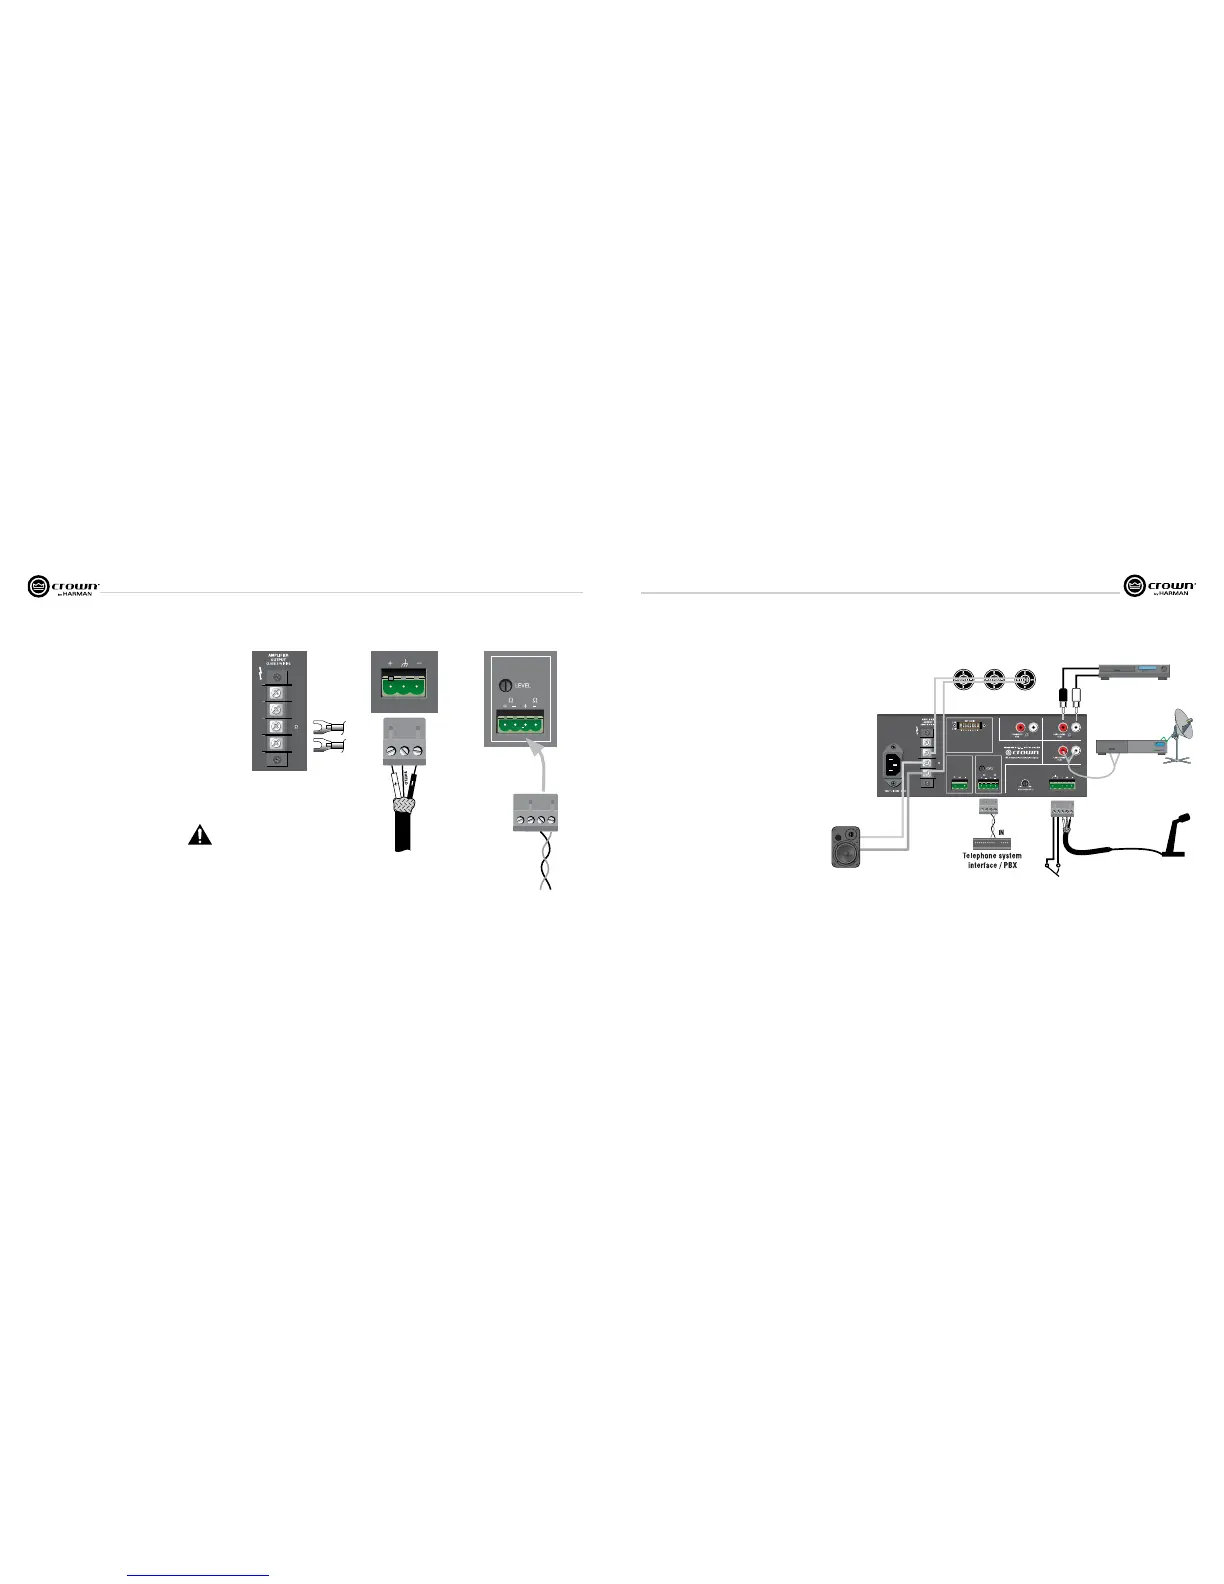
Amplifier Output Connections: Slip the cable lugs under the output
screw terminals and tighten (Figure 2.6). Slide the supplied non-touch
cover over the output connections from top to bottom to cover them.
Crown recommends using pre-built or professionally wired, high-qual-
ity, two-conductor, heavy gauge speaker wire and connectors. You may
use crimp-on spade lugs for your output connectors. To prevent the pos-
sibility of short-circuits, wrap or otherwise insulate exposed loudspeaker
cable connectors. Cover the output connections with the supplied clear
non-touch cover by sliding the cover on.
Using the guidelines below, select the appropriate size of wire based
on the distance from amplifier to speaker. The wire sizes apply to the
8-ohm tap.
Distance Wire Size
up to 25 ft. 16 AWG
26-40 ft. 14 AWG
41-60 ft. 12 AWG
61-100 ft. 10 AWG
101-150 ft. 8 AWG
151-250 ft. 6 AWG
NOTE: Custom wiring should only be performed by qualified
personnel. Class 2 wiring is required.
CAUTION: Never use shielded cable for output power wiring.
Use 2-conductor shielded cable and a 3-pin Phoenix-type connector for
Preamp Line Output (Figure 2.7).
Music-On-Hold Connections
If you have an external music source connected to the 135MA or
160MA, you can play its music over a phone line while the caller is on
hold. Use the connection shown in Figure 2.8 (either 8 ohms or 600
ohms) to connect the mixer-amp to the Music-On-Hold input on your
telephone system interface/PBX.
If your phone system needs to be electrically isolated from the 135MA
or 160MA, you can order an accessory isolation transformer from your
Crown dealer, part no. IST. It connects either to the MOH output or to
Input 1.
Figure 2.6 Amplifier Output Connections
Figure 2.7 Connections to the
Preamp Output Connector
2.4 Wire Your System
Typical input and output wiring is shown in Figure 2.9.
INPUTS: For Input 1, connect a microphone or balanced line-level
signal to the Input 1 balanced input. Set the Mic/Line switch (DIP
switch #1) accordingly. For the other inputs, connect unbalanced
line-level signals to the RCA input connectors.
OUTPUTS: Maintain proper polarity (+/–) on amplifier output
connectors.
Connect the Amplifier Output screw terminals to the loudspeaker
loads. Use terminals marked COM and 70V or 100V for constant-
voltage loudspeaker loads. Use terminals marked COM and 8
ohms for an 8-ohm speaker.
Connect the COM terminal to speaker negative (–) lead; connect
one of the other terminals to speaker positive (+) lead.
Cover the output connections with the supplied clear non-touch
cover by sliding the cover on.
2.6 Phantom Power
Condenser mics require phantom power to operate. If you are
using a condenser microphone on Input 1, turn on DIP switch #8
on the back of the mixer-amp. The microphone must be able to
work on 15V phantom power, which the mixer-amp’s mic input
connector provides.
TELEPHONE
(MOH)
8 600
To telephone system
interface/PBX input
Figure 2.8 Connections to the
Telephone (MOH) Connector
2 Setup
Figure 2.9 Input-Output Wiring
100V
70V
8
COM
100V
70V
8
COM
TELEPHONE
(MOH)
PREAMP
OUTPUT
8 600
Input 3Input 4
Input 2
Input 1
1 - CH1
MicOn/LineOff
2 - CH1 Normal
3 - CH1 Priority
4 - CH1 VOX
5 - CH1 to MOH
6 - CH2 to MOH
7 - CH3 to MOH
8 - Phantom
PRIORITY
Speakers with 70V transformers
+
–
+
–


 To Next Page