EasyManua.ls Logo

Cuckoo CBM-AAB161S - User Manual

Cuckoo CBM-AAB161S
24 pages
Print Icon
To Next Page IconTo Next Page
Loading...
Multi-Functional
Bread Maker
USER MANUAL
CBM-AAB161S
OCEANIA PTY. LTD.

Questions and Answers

Summary

Important Safeguards

Specifications

Parts & Panel Descriptions

Parts Identification

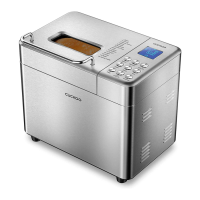
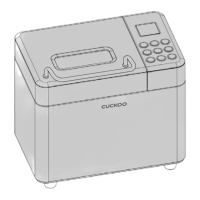
Identifies the various external parts of the bread maker and its components.

Included Accessories

Lists and illustrates the accessories provided with the bread maker.

Quick Function Guide

Menu Options Overview

Details the 15 different menu functions available on the bread maker.

Control Panel Buttons Explained

Describes the function and operation of each button on the control panel.

LCD Display Icons Guide

Illustrates and explains the meaning of various icons displayed on the LCD screen.

Icon and Button Explanations

Provides detailed explanations for the bread maker's display icons and panel buttons.

Quick Guide

Using the Baking Pan

Step-by-step instructions on how to install and use the baking pan correctly.

Automatic Fruit & Nut Dispenser Operation

Explains how to load and use the automatic dispenser for add-ins.

Removing the Baked Bread

Instructions for safely removing the bread loaf from the baking pan.

Cleaning and Maintenance

Provides detailed instructions for cleaning the bread maker and its components.

Recommended Use Environment

Specifies the optimal room temperature range for operating the bread maker.

Function Introduction

Warning Displays Explained

Explains error codes or warning messages shown on the LCD display.

Preparation Before First Use

Guides on initial setup and preparation before operating the bread maker for the first time.

How to Use

Adding Ingredients to the Baking Pan

Details the correct order and method for adding ingredients into the baking pan.

Securing the Baking Pan

Instructions for correctly inserting and locking the baking pan into the unit.

Selecting Functions and Starting the Process

Guide to selecting menu options, weight, color, and initiating the baking cycle.

Completing the Baking Process and Loaf Removal

Steps for handling the bread maker after baking, including cooling and removing the loaf.

Kneading Paddle Handling and Storage

Advice on removing stuck kneading paddles and proper storage of the appliance.

Common Ingredients

Flour Types and Their Properties

Details different types of flour used in bread making and their characteristics.

Sugars Role in Bread Making

Explains the function of sugar in sweetness, color, and the rising process.

Understanding and Using Yeast

Information on yeast types, storage, freshness testing, and its role in bread making.

Other Key Ingredients and Liquids

Details the role of salt, eggs, fats, leavening agents, and liquids in bread making.

Measurement and Ingredient Addition Tips

Provides essential tips on accurate measurements and the correct sequence for adding ingredients.

Troubleshooting

Environment Friendly Disposal

Guidance on responsible disposal of non-working electrical equipment.

Recipes

Home Made Program Settings

Details default and adjustable time settings for the Home Made program.

Bread Maker Program Cycle Processes

Visual representation of the cycle stages for each bread maker program.

Detailed Program Cycle Timings

Specific timings for various programs like Dessert, Dough, Jam, Cake, Bake, and Home Made.

Overview

This document is a user manual for the Cuckoo Multi-Functional Bread Maker, model CBM-AAB161S. It provides comprehensive instructions for operating, maintaining, and troubleshooting the appliance, along with various recipes.

Function Description

The Cuckoo Multi-Functional Bread Maker is designed to automate the bread-making process, from kneading and rising to baking. It offers 15 distinct menu options, allowing users to create a wide variety of breads and other confections.

Menu Options:

  • Basic: Ideal for white and mixed breads using basic bread flour.
  • French: Features longer kneading, rising, and baking times for a fluffy bread with a crispy crust.
  • Whole Wheat: Specifically for recipes using whole wheat flour, resulting in higher fiber and nutritional content.
  • Quick: Produces a denser loaf with shortened kneading, rising, and baking phases, completing within 2.5 hours.
  • Sweet: Perfect for breads high in sugar, fat, and protein, yielding a thin crust.
  • Sandwich: Creates loaves with a crumbly texture, suitable for sandwiches.
  • Gluten Free: Designed for breads made with flours free of wheat gluten.
  • Mix: Manually initiates mixing for dough or batter, and can also be used for homemade ice cream.
  • Yogurt: Provides low-temperature heating for homemade yogurt or other dairy-based confections.
  • Dessert: For sweet, moist loaves with high fat and protein content.
  • Dough: Mixes and kneads dough without rising, suitable for rolls, pizza, or specialty breads that require manual shaping.
  • Jam: Utilizes a provided paddle to mix fruit purée, perfect for fresh fruit/vegetable spreads.
  • Cake: For recipes using baking soda or powder instead of yeast, ideal for traditional cake mixes, corn bread, and other light, fluffy breads.
  • Bake: Manually preheats the bread maker to bake custom "Home Made" loaves or pre-prepared dough.
  • Home Made: A fully customizable option allowing users to control the duration of each baking phase, the start time of baking/mixing, loaf size, crust color, and a preset timer.

The bread maker features an automatic fruit and nut dispenser, which adds chopped fruits, nuts, and other add-ins at optimal stages during the baking process. This ensures even distribution and prevents over-mixing.

In the event of a temporary power outage (less than 10 minutes), the bread maker will resume its initiated function. If the outage exceeds 10 minutes, the unit will revert to standby mode, requiring the user to restart the process.

Usage Features

The bread maker is designed for ease of use with a clear LCD display and intuitive control panel.

Control Panel Buttons:

  • Menu: Cycles through and selects one of the 15 menu options. The selected function's number appears on the LCD.
  • Weight: Adjusts the desired loaf size (500g, 750g, or 1000g) for menu options 1-7.
  • Color: Selects the desired crust color (light, medium, or dark) for menu options 1-7.
  • Time+/Time-: Adjusts the delay time for a function or sets times within the "Home Made" function.
  • Bake: Manually starts the preheating and baking process for custom or pre-prepared dough.
  • Mix: Manually starts mixing dough or batter, or for making homemade ice cream.
  • Start/Pause/Stop: Initiates or resumes a function with a single press, pauses by pressing and holding, or stops a function/phase by pressing twice.
  • Home Made: Activates the custom programming mode.

Display Icons: The LCD display provides visual cues for the current status of the bread maker, including:

  • Loaf Size (500g, 750g, 1000g)
  • Preset Timer (indicating a delay is set)
  • Mix (mixing stage)
  • Rest (dough resting stage)
  • Ferment (fermentation stage)
  • Selected Menu Option (1-15)
  • Preheat (preheating stage)
  • Bake (baking stage)
  • Keep Warm (keeping baked loaf warm)
  • Complete (baking finished)
  • Phase (Stir, Rest, or Fermentation stages: 1, 2, or 3)
  • Crust Color (light, medium, dark)
  • Countdown Timer (time remaining for current function/phase)

Operating Procedure:

  1. Prepare the Baking Pan: Turn the baking pan handle counter-clockwise and pull it out to remove the pan from the baking cavity.
  2. Insert Kneading Paddle: Press the kneading paddle onto the drive shaft at the bottom of the baking pan.
  3. Add Ingredients: Add liquids first, followed by dry ingredients (sugar, salt, shortening, flour), and finally yeast. Create a small indentation in the flour for the yeast to prevent premature contact with wet ingredients. Pre-measure all ingredients, including add-ins.
  4. Secure Baking Pan: Place the baking pan back into the baking cavity, ensuring it is firmly locked in place. Close the lid.
  5. Power On: Plug the power cord into an outlet. The unit will beep, and the LCD will default to menu option 1.
  6. Select Function: Press the "Menu" button to choose the desired function.
  7. Adjust Settings: Use "Weight" and "Color" buttons to select loaf size and crust color (if applicable for the chosen menu option).
  8. Set Delay Timer (Optional): Use "Time+/Time-" buttons to set a delay timer. Note: Avoid using the delay timer with perishable ingredients like dairy or eggs.
  9. Start: Press the "Start/Pause/Stop" button to begin the selected function. The kneading paddle will start mixing.
  10. Completion: Once baking is complete, the bread maker will beep 10 times and automatically switch to "Keep Warm" mode for 1 hour. To manually end "Keep Warm" mode, press and hold "Start/Pause/Stop" for 3 seconds.
  11. Remove Bread: Allow the pan to cool slightly. Use oven mitts or gloves to turn the pan counter-clockwise to unlock and remove it. Invert the pan onto a heat-resistant surface and tap until the loaf releases.
  12. Cool Loaf: Allow the loaf to cool for at least 10 minutes before slicing.
  13. Remove Kneading Paddle: If the paddle is stuck in the bread, use the provided paddle remover to gently pry it out.

Important Ingredient Notes:

  • Yeast: Must be kept refrigerated. Check expiration dates. To test freshness, mix yeast with warm water and sugar; active yeast will bubble.
  • Adding Sequence: Always add ingredients in the order specified in recipes: liquids, then dry ingredients, then yeast.
  • Measurements: Use exact measurements. Stir flour to aerate it before measuring. Level off dry ingredients with a knife.
  • Water Temperature: Generally, water should be between 20°C and 25°C.

Maintenance Features

Proper cleaning and care ensure the longevity and optimal performance of the bread maker.

Cleaning Instructions:

  1. Unplug and Cool: Always unplug the appliance and allow it to cool completely before cleaning.
  2. Clean Baking Pan and Knead Blades:
    • After removing the bread and allowing the pan to cool, fill it halfway with warm water and a small amount of dish soap.
    • Let it soak for 5-20 minutes until the knead blades can be lifted off the shafts.
    • Twist the knead blades slightly to loosen if needed. If difficult to remove, secure the cross bar on the underside of the pan while twisting the blades.
    • Wash the inside of the pan and knead blades with a soft cloth, rinse, and dry. Use a mild detergent.
    • DO NOT use chemical cleaning agents, oven cleaners, abrasive scouring pads, or cleansers on the bread pan or knead blades, as this can damage the coating.
    • Replace the knead blades on the shaft.
  3. Avoid Immersion: Never immerse the bread pan in water or wash it in an automatic dishwasher, as this can damage the bearing that turns the knead blade.
  4. Clean Oven Chamber and Exterior: Wipe the inside of the oven chamber and the outside surfaces of the bread maker with a damp cloth.
  5. Lid: The lid cannot be removed for cleaning. Do not dip the appliance or fill the baking compartment with water.

Troubleshooting: The manual includes a detailed troubleshooting chart to address common issues such as:

  • Odor or burning smell
  • Ingredients not blending
  • "HHH" display (overheating)
  • Cloudy window/condensation
  • Kneading paddle coming out with bread
  • Dough not blending thoroughly
  • Bread rising too high or not rising enough
  • Crust color issues (too light/dark)
  • Lopsided bread
  • Hollow/holey bottom
  • Underbaked/sticky dough
  • Bread mashing down when slicing
  • Heavy, thick texture
  • Spotted base of bread pan (normal after dishwasher use, though dishwasher use is not recommended for the pan itself)

Environment Friendly Disposal: Users are reminded to dispose of non-working electrical equipment according to local regulations at an appropriate waste disposal center.

The bread maker is designed for household use only and should not be operated with external timers or separate remote-control systems. Children should be supervised to ensure they do not misuse the appliance.

Cuckoo CBM-AAB161S Specifications

General IconGeneral
Model nameCBM-AAB161S
Power supply220-240V~, 50/60Hz
Power consumptionHeating: 500W, Motor: 100W, Class I
Power cord length1m
Baking capicity (Bread pan)1, 000g
Weight and Dimensions IconWeight and Dimensions
Dimension350mm (W) x 225mm (D) x 290mm (H)
Weight5.6kg

Related product manuals