9
Stage 1
Laying the deck
Preparing the deck
When laying decking, it is important to remember that the decking board will absorb moisture if in contact with water. Any moisture trapped
within the roof will cause board movement, delamination and possibly failure. Ensure that conditions are dry before decking the roof. After
removingtheolddecking,checkthatallroongjoistsaresoundandfreefromrot.Replacetheseasrequired.Any'play'inthejoistsshouldbe
addressed at this stage. Re-bed loose joists or use noggins to ensure the joists are all stable. This is important to prevent issues with noise in
thenishedroof.Ensurealljoistspansarelessthan600mm.Ifpossible,buildafallintothesubstratesothattheroofcandraincompletelyand
remain free from standing water.
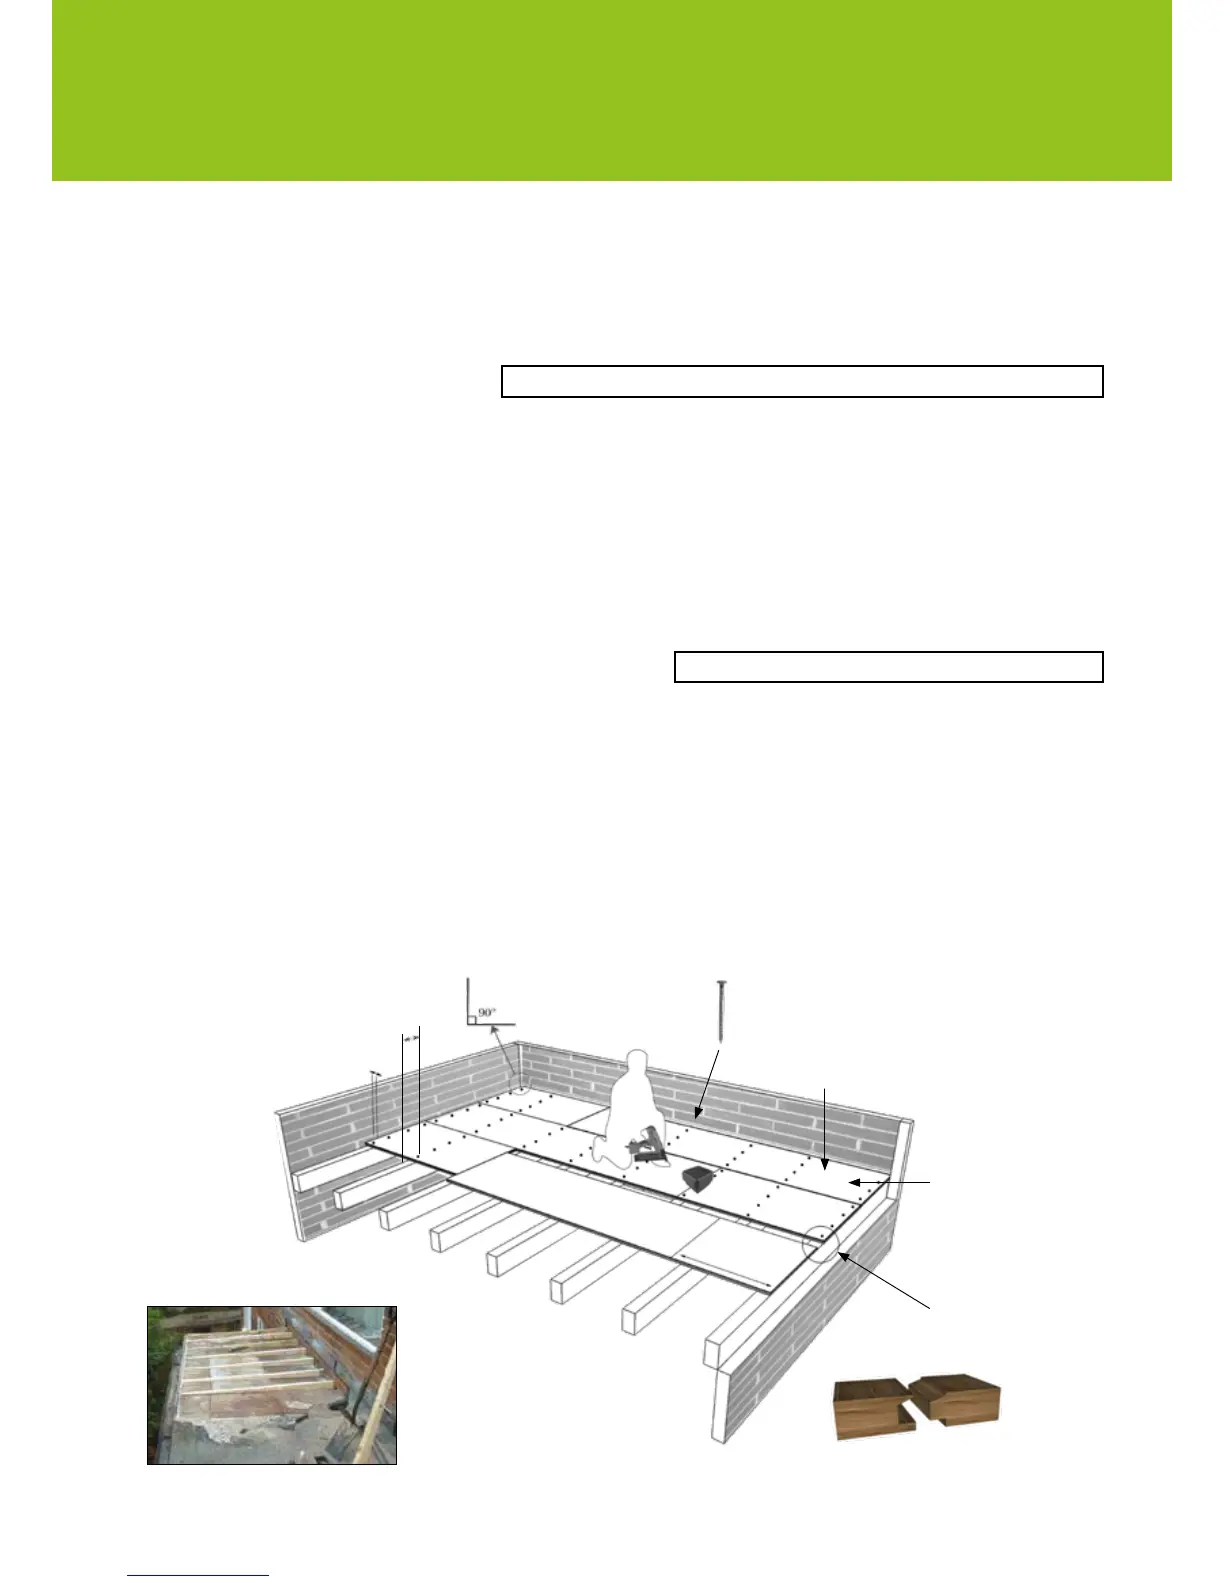
Laying the deck
18mm OSB3 tongue and groove boards are laid at 90° to the roof joists. The boards must be laid with the gap side of the tongue and groove
joinuppermost.Notonlydoesthisgiveabetterkeyforthelaminate,italsoallowstheresintoowintotheboardjointtoeffectivelygluethe
boards together.
Start to lay the boards at the furthest edge from the drip. If the board is laid along a wall, an expansion gap of 25mm should be left. Align the
endoftheboardwiththefascia,layingtheboardsfromendtoend.Trimthelastboardintherowushwiththefascia.Usingtheoff-cut(if
greaterthan400mm,)starttolaythenextrowofboardsbyttingthetonguermlyintothegrooveoftherowalreadylaid.Ensureeachrunof
decking is staggered with at least a 400mm off-set between the joints in each row.
When two rows have been laid the boards can be aligned to run straight. Fix the boards to the joists using a ring shank nail or screw with
40mm joist penetration at 200mm centres. Continue to lay each row in turn using the off-cut from one row to start the next row. The last row
is simply cut off in line with the fascia.
Fixing the deck to different substrates
Timber
WhenxingtheOSB3boardtotimberjoists,thepreferredmethodiswithanailgun.Thisisthemostefcientwayofxingthedecking;it
alsominimisesdamagetotheceilingbelow.A63mm(orlongerforawarmroof)galvanisedringshanknailshouldbexedat200mmcentres,
whichequatesto4nailsacrossa600mmboard.ThenailsMUSTbedrivenintoajoist.Someinstallersmaywishtousescrewguns.Thisis
acceptable providing the screws have a minimum of 40mm penetration into the joist. The boards can also be nailed using a hammer. This is
obviously time consuming and WILL lead to internal damage of the ceiling. All nails must be non-rusting (galvanised or sheradised).
Steel
Fixing to steel is easily achieved with the use of self-drilling/self-tapping screws of the appropriate length.
Firringsxedtoaatrooftoaidrun-off
25mm spacing between
walls and boards
200mm
Board laid at
90° to joists.
Ringshank nails or
screws with 40mm
joist penetration.
63mm galvanised
ringshank shown
Alignthersttworowsofboardsbeforexing.
Theremainingboardscanbexedrowbyrow
Joists should
bewellxed
and sound
18mm 2400mm x 600mm
OSB3 boards recommended.
Laid with the gap between the
tongue and groove face up
Off cut must be
400mm minimum
IT IS ESSENTIAL THAT THE DECK IS LAID CORRECTLY
FOR A WARM ROOF CONFIGURATION REFER TO THE GUIDANCE ON PAGE 24