Do you have a question about the Dahua KTA02 and is the answer not in the manual?
Introduces structure, installation, wiring, and menu operations of the analog 4-wire video intercom.
Explains safety signal words, revision history, and general notes regarding the manual's use and accuracy.
Guidelines for device placement, environmental conditions, and usage to prevent damage or malfunction.
Specifications for power cables and power supply units, ensuring safe and compliant operation.
Instructions on how to handle power during device updates to avoid errors or damage.
Overview of the analog 4-wire video intercom system components and their key functionalities.
Details and identification of components and controls on the indoor monitor's front panel.
Identification of ports and connections available on the rear panel of the device.
Step-by-step guide for mounting and installing the indoor monitor unit.
Instructions for installing the outdoor door station, including bracket mounting.
Guidelines for connecting ports between indoor monitors for data communication.
Recommended RVV4 cord specifications based on transmission distance for optimal performance.
Detailed wiring diagram for a basic system with one door station and one indoor monitor.
Wiring diagram for a system configuration with three door stations and one indoor monitor.
Wiring diagram for a complex system with two door stations and three indoor monitors.
Essential steps for securing device network access, including password strength and firmware updates.
Additional measures for improving device network security, such as physical protection and secure configurations.
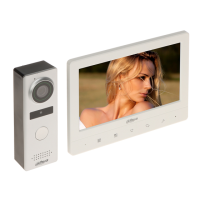
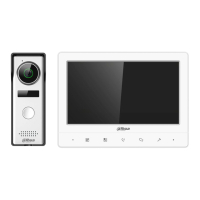
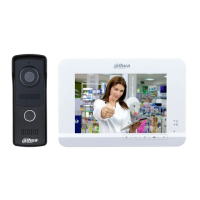
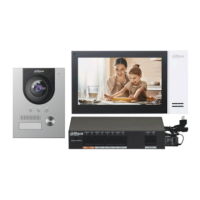
This document describes an analog 4-wire video intercom system, designed for residential buildings to facilitate voice and video communication. The system comprises a door station, typically installed outdoors, and an indoor monitor, installed indoors.
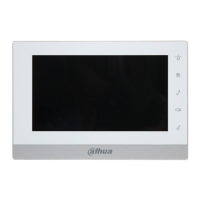
The indoor monitor offers real-time video and voice communication capabilities. It is versatile, allowing connection to up to three door stations, and can also integrate with cameras that support CVBS (Color, Video, Blanking, Sync) signals. A key feature of the indoor monitor is its plug-and-play functionality, simplifying setup and use. The front panel of the indoor monitor includes a microphone for voice input, a button to hang up incoming calls, and a menu button to access settings. For communication, there's a dedicated button: pressing it once during an incoming call initiates voice communication, while pressing it twice quickly hangs up. When no one is calling, this button can be pressed multiple times (once, twice, three, or four times) to view live video feeds from door station 1, door station 2, analog camera 1, and analog camera 2, respectively. Another button allows users to open the door where the door station is installed when a call is active. The monitor also features a power indicator, an LCD screen, and a speaker for audio output.
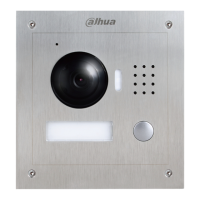
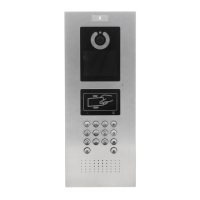
The door station provides real-time voice communication and is equipped with self-adaptive IR illumination for clear visibility in various lighting conditions. It includes a built-in camera with a resolution of 720 × 576 at 50 frames per second. The front panel of the door station features a microphone, a built-in camera, a power indicator, and a call button. Pressing the call button once calls the indoor monitor. Holding the call button for 10 seconds changes the bell type of the door station, indicated by a flashing power indicator. Holding it for 15 seconds adjusts the bell volume; the power indicator will flash, and the volume cycles from maximum to minimum. Holding it for 20 seconds switches the door station between DWDR (digital wide dynamic range) and normal mode, also indicated by a flashing power indicator. The door station also has a speaker for audio output.
Installation of both the indoor monitor and door station involves fixing a bracket or cover to the wall with screws, then hanging the device onto it. After installation, silicone sealant should be applied to the gaps between the device and the wall to ensure a secure and weather-resistant fit.
Wiring is a crucial aspect of the system. The indoor monitor has specific port connection rules: Port A can connect to Port C of another indoor monitor for data communication, and Port B can connect to Port D of another indoor monitor for data communication. However, Port A cannot connect to Port B or D, and Port C cannot connect to Port B or D of another indoor monitor. The choice of RVV4 cord specification depends on the transmission distance between the door station and indoor monitor: 0.3 mm² for distances up to 10 m, 0.5 mm² for 10 m to 30 m, and 0.75 mm² for 30 m to 50 m. For distances exceeding 50 m, coaxial cables are recommended. During wiring, it's important not to pull cords violently and to wrap cord joints with insulated rubber tape to prevent short circuits. The system supports various wiring configurations, including one door station with one indoor monitor, three door stations with one indoor monitor, and two door stations with three indoor monitors. The recommended analog cameras (CVBS) for integration are from the HAC 1230 series.
Menu operations on the indoor monitor allow users to adjust various settings. The menu can be accessed to wake up the screen. Users can navigate through options to turn down or turn up volume, brightness, contrast, and bell volume. They can also change the bell type and toggle the DND (do not disturb) mode on or off. An item can be selected for adjustment or change, and there's an option to exit the menu and lock the screen.
Regarding cybersecurity, the manual emphasizes several mandatory and recommended actions. Users are urged to use strong passwords that are at least 8 characters long, include at least two types of characters (uppercase, lowercase, numbers, symbols), and do not contain account names, continuous characters, or overlapped characters. Keeping firmware and client software updated is essential to ensure the system has the latest security patches. Enabling "auto-check for updates" is recommended when connected to a public network.
"Nice to have" recommendations for enhanced security include physical protection of devices, especially storage components, by placing them in secure locations with access control. Regular password changes are advised to reduce guessing risks. Setting and timely updating password reset information, such as an end user's mailbox and security questions, is important. Enabling the account lock feature, which is on by default, helps prevent unauthorized access by locking accounts after multiple failed login attempts. Changing default HTTP and other service ports to numbers between 1024 and 65535 reduces the risk of outsiders guessing active ports. Enabling HTTPS ensures secure web service communication. MAC address binding for the gateway's IP and MAC addresses helps reduce ARP spoofing risks. Assigning accounts and privileges reasonably, giving users only the minimum necessary permissions, is also crucial. Disabling unnecessary services like SNMP, SMTP, and UPnP, or using their secure modes (e.g., SNMP v3 with strong encryption, TLS for SMTP, SFTP for FTP, WPA2-PSK for AP hotspot), is recommended. For sensitive audio and video data, enabling encrypted transmission is advised, though it may cause some loss in transmission efficiency. Secure auditing practices, such as regularly checking online users for unauthorized logins and reviewing device logs for suspicious IP addresses and operations, are important. Due to limited device storage, enabling network log function to synchronize critical logs to a network log server for long-term tracing is suggested. Finally, constructing a safe network environment involves disabling router port mapping to prevent direct external access to intranet devices, partitioning and isolating networks using VLAN, network GAP, or other technologies, and establishing an 802.1x access authentication system to reduce unauthorized access to private networks. Enabling IP/MAC address filtering further limits the range of hosts allowed to access the device.
| Model | KTA02 |
|---|---|
| Category | Intercom System |
| System | Embedded Linux |
| Network Protocol | TCP/IP |
| Installation | Wall-mounted |
| Tamper Switch | Yes |
| Card Type | IC card |
| Network | 10/100M Ethernet |
| Power Supply | DC 12V |
| Operating Humidity | 10%–90% (RH), non-condensing |
| Unlock Mode | Card, password, remote |
| Exit Button | 1 |
| Door Contact Detect | 1 |
| Lock Control | 1 |