DEVItector™ II V2User Guide
BC421332622232en-010101 2022.07 | FEC | ©Danfoss | 23
Guidelines for tracing an area
We propose a guideline for tracing which is
independent of the layout of the heating element.
Often you will have no documentation (drawings or
photos) of the layout of the heating element(s). Even
if you have a drawing, there is a possibility that the
installer has chosen his own layout. So you cannot use
your eyes and you have to rely on the magnetic tracer
and / or your ears.
In the following, we assume that the fault will bridge
at least two conductors within the cable thus making
a current path for the tracing signal. The bridge is
either a shortcircuit or a carbon bridge created by the
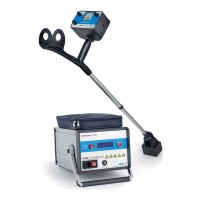
devitector II burner device. We also assume that the
fault is not located near the end termination of a twin
cable.
We suggest the procedure below to minimize the
duration of the tracing.
Preparations
a. Connect the cold tail of the faulty cable to the
output cables of the burner.
b. Activate the tracing signal using the Trace menu.
Step 1
First, trace the faulty cable from its supply terminal
within a radius equal to the length of the cold tail as
shown on Fig. 21. The search circle is shown shaded at
the lower left corner of the sketch. If the fault resides
in the cold-warm connection, you will thus have found
it quickly. If it does not, then proceed to Step 2.
Step 2
Trace the oor along parallel lanes as shown on
Fig. 24, starting at the cold tail. It doesn’t matter
which direction you choose as seen on Fig. 24. The
lanes should be no wider than 50 cm apart. For this
coarse tracing, you may prefer the tracer mounted on
the crutch. At every point, where the tracing signal
disappears or reappear, place a mark on the oor,
shown as X on the sketches. Also place a mark along
a new lane if its neighboring lane was opposite in the
signal sense, that is if the new lane gives a signal and
its neighboring lane did not, and vice versa. Be careful
to follow parallel lanes of equal separation. You should
trace enough of the oor area to be sure to cover the
faulty cable.
Step 3
Trace the area surrounding the marks made in step
2, shown as yellow areas on Fig. 25. In doing this you
may prefer to trace along narrow lanes of say 15 cm,
thus narrowing in on the fault. In this way you will
nd a more precise boundary between active and
nonactive heating cable. For this ne tracing, you may
prefer to use the handheld tracer.
Depending on the oor construction (concrete and
tiles, wood on joists, etc.) you may be able to hear
the more precise location of the fault. This requires
switching OFF the tracing signal and switching ON the
High Voltage Pulse and making sure the DC Voltage
is zero. Using the high voltage signal may destroy the
carbon bridge temporarily.