1
DKCD 013R9431 VIUYB402 © Danfoss 05/2011 1
2
Size Danfoss code B
stål- og kobberrør
steel and copper tubes
Stahl- und Kupferrohre
tubes en cuivre et
en acier doux
staal en koper buis
plieniniams ir variniams
vamzdžiams
ocelové a měděné trubky
8 013G4108 18 mm
10 013G4110 18 mm
12 013G4112 18 mm
14 013G4114 18 mm
15 013G4115 20 mm
16 013G4116 20 mm
VPE PEX
12 x 1.1 013G4143 16 mm
12 x 2 013G4142 16 mm
14 x 2 013G4144 16 mm
15 x 2.5 013G4147 16 mm
16 x 2 013G4146 16 mm
Alupex
12 x 2 013G4172 16 mm
14 x 2 013G4174 16 mm
16 x 2 013G4176 16 mm
3
4
5
6
B
A
A + B A + B
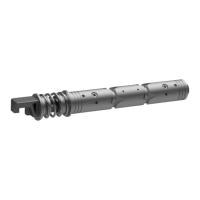
M4 Hex
Klemringsfittings for
Comp. fittings for
Klemmverbinder für
Raccords à bicônes pour
Knelfittingen voor
Tvirtinimo detalės
Svěrné spojky pro
Montagevejledning Danfoss VHX-DUO ventilsæt til vægforbindelse
Mounting guide Danfoss VHX-DUO valve set for wall connection
Montageanleitung Danfoss VHX-DUO 50 mm Ventilgarnitur Eck für Wandanschluss
Instructions de montage Danfoss VHX-DUO 50 mm garniture de vanne équerre pour raccordement mural
Montage-instructie Danfoss VHX-DUO design onderblok voor wandaansluiting
Danfoss VHX-DUO ventilių komplekto jungimui prie sienos montavimo instrukcija
Montážní návod Sada ventilu Danfoss VHX-DUO určená k připojení ze stěny
Valgfri tilslutning, V eller H. Vigtigt: Returflow nærmest termostaten.
Free connection (left or right) - return always on thermostat side.
Fühlerelement wahlweise rechts oder links montierbar.
Wichtig: Rücklaufanschluss immer auf der Fühlerseite!
Montage libre de l’élément thermostatique (gauche ou droit).
Retour toujours du côté de l’élément thermostatique.
Vrije keuze van plaatsing thermostatisch element (links of rechts)
- retour altijd aan thermostaatzijde!
Laisvai pasirenkamas prijungimas (iš kairės arba iš dešinės)
- grąžinimas visuomet iš termostato pusės.
Libovolný způsob připojení (zprava nebo zleva)
- zpátečka vždy na straně termostatu.
Monter ventilen løst på radiatoren og mål afstand A fra ventil til væg.
Place radiator on floor, with mounted brackets, - fit valve (loose) and
measure distance A from valve to floor.
Montieren Sie das Ventil am Heizkörper und messen Sie den Wandabstand A.
Déposez le radiateur sur une surface plane (sol). Placez la vanne (ne pas
fixer) et mesurez la distance A entre la vanne et le sol.
Leg de radiator op een vlak oppervlak (vloer). Plaats het kraanhuis (los) en
meet de afstand A van kraanhuis tot vloer.
Padėkite radiatorių ant žemės, su pritvirtintais laikikliais, - pritvirtinkite ventilį
(iki galo neprisukite) ir pamatuokite atstumą A nuo ventilio iki grindų.
Radiátor s namontovanými nožkami položte na podlahu. Přiložte ventil a
změřte vzdálenost A od ventilu k podlaze.
Montér vægtilslutningsrørene og afkort til afstand A+B.
Fit cu-tube in wall and cut. Length = A+B.
Montieren Sie die Wandanschlussverbindungen und kürzen Sie auf das
benötigte Maß A+B.
Placez les tubes de liaison dans le mur et coupez à partir de distance A+B.
Plaats de verbindingsbuizen in de muur en snij afstand A+B.
Pritvirtinkite prie sienos varinį vamzdelį ir nupjaukite. Ilgis = A+B.
Připevněte trubku do stěny a zařízněte ji na rozměr = A+B.
Anbring radiatoren så ventilen styres på tilslutningsrørene.
Use hexagon pads in valve inlets to align radiator on pipes.
Setzen Sie den Heizkörper mit dem Ventil auf die Anschlussrohre.
Montez la vanne sur les tubes de liaison et fixez-là.
Breng het kraanhuis aan op de verbindingsbuizen en maak vast.
Norint priderinti radiatorius prie vamzdžių, ventilių įėjimuose naudokite
šešiakampius tarpiklius.
Pomocí šestihranných podložek ve vstupních otvorech ventilu použijte k
vyrovnání radiátoru k potrubí.
Markér position og fastgør radiator på væg.
Mark position and mount radiator on wall.
Zeichnen Sie die Wandhalterung an und montieren Sie den Heizkörper.
Marquez les fixations du radiateur.
Markeer de radiatorbevestigingen.
Pažymėkite padėtį ir montuokite radiatorių ant sienos.
Vyznačte si správnou polohu podpěr a radiátor přimontujte ke stěně.