Do you have a question about the Deif XDi 144 and is the answer not in the manual?
Explains six different ways of sourcing measured data into an XDi for presentation.
Explains TPDO/RPDO as CAN inputs and their use for sensor data transmission.
Explains XDi-net as a broadcast method for data sharing via CANopen without complex NodeID setup.
Details analogue inputs via the AX1 extension module, configurable via VI-setup profiles.
Describes digital inputs via the DX1 module, configurable as data or control inputs for indicators.
Describes the fall-back function allowing up to 3 input sources for indicator elements.
Details the automatic setup wizard that starts at power-up until the XDi unit is configured.
Details how XDi is mounted from the front using mounting clamps, allowing any angle installation.
Provides a step-by-step guide for mounting the XDi unit, including frame removal and final installation.
Guides on installing a CAN bus system, covering ports, wiring, backbone, and termination.
Details CAN bus wiring via drop cable to backbone or daisy-chaining between units.
Explains CAN bus backbone requirements and the use of built-in 120 Ohm termination resistors.
Covers cable shield interconnection and grounding recommendations to prevent noise and interference.
Details the XDi base unit connectors for power supply and CAN connections, including terminal assignments.
Details the automatic setup wizard that initiates upon first power-up for initial configuration.
Guides through the 5 main setup steps for manual configuration when the wizard is not used.
Describes assigning a CAN Node ID, essential for XDi accessibility on the CAN bus.
Explains the auto scan function for detecting and selecting relevant NMEA sentences and channels.
Describes automated XDi setup using the CAN bus by a 'CAN setup controller' for auto-configuration.
Highlights XDi-net for plug and play data sharing via CANopen, requiring minimal setup.
Lists critical restrictions for XDi-net, including RPDO1 reservation and NodeID 127 usage.
Details XDi error alerts via buzzer, pop-up messages, and pointer blinking for missing data.
Explains extending XDi capability with AX1 (analogue) and DX1 (digital I/O) modules for inputs/outputs.
Details the AX1 module's two analogue inputs, configurable for voltage, current, or potentiometer.
Details analogue input scaling, showing a 2-point calibration example for RPM input.
Explains multi-point linearisation for analogue inputs, allowing up to 7 calibration points for accuracy.
Explains common mode potential limits between inputs and AGND for AX1 to ensure measurement accuracy.
Provides a detailed table for connecting signals to AX1 module terminals for voltage and current inputs.
Explains configuring AX1 analogue input ports as indicator inputs or dimmer inputs via VS and PP profiles.
Covers configuring AX1 High Voltage inputs for optimal potentiometer performance with correction.
Details the dimmer input function on AX1, configurable via PP and user menu, using voltage or potentiometer.
Explains sharing analogue input data via CAN using XDi-net or standard CANopen TPDO.
Details the DX1 module, providing two galvanic separated digital inputs and two relay outputs.
Lists pin assignments for the DX1 module connector, detailing relay outputs and digital inputs.
Explains configuring DX1 digital inputs for RPM measurements, dimmer control, or other control purposes.
Guides on connecting NPN and PNP type RPM sensors to the DX1 digital inputs.
Details configuring virtual indicators for bidirectional RPM using input pairs and sensor offsets.
Describes configuring DX1 inputs as push-button dimmer inputs for level or colour shift control.
Explains the DX1 relay output function for customized indicators with warning or control functions.
Explains NMEA0183 output capability for sharing data with external systems like VDR or navigation systems.
Introduces the NMEA setup menu for configuring NX1 (output) and NX2 (input/output) modules.
Guides on configuring COM ports for NX1/NX2 modules, including NMEA and RS485 settings.
Guides on setting up XDi to transmit internal data in NMEA0183 sentence format via NX module.
Details NMEA input setup for NX2 module, accessed via installation menu for source or parameter adjustments.
Explains changing NMEA input source via installation menu, requiring auto scan for updated data sources.
Provides troubleshooting steps for NMEA auto scanning issues, including wiring, sentence format, and data validity.
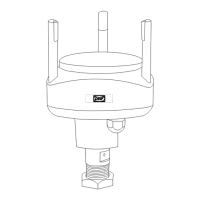
Covers manual input configuration, including adjusting wind sensor misalignment via menu.
Guides on correcting wind sensor misalignment by adjusting the offset in the NMEA input configuration.
Explains the NMEA monitor function to present all received (RX) and transmitted (TX) NMEA sentences.
Lists common NMEA input faults, their results on the XDi, and potential causes for troubleshooting.
Introduces display colour calibration, addressing backlight aging and colour temperature changes.
Describes a new menu function for colour adjustment and max backlight level at 100% dimmer.
Shows the calibration screen for adjusting red, green, and blue colours, and max backlight level.
Explains adjusting red, green, and blue colours individually using front buttons and 'smart function'.
Explains using master reset to return unit to factory settings, with an option to preserve colour calibration.
Provides a step-by-step example of display calibration, matching colours and backlight levels of indicators.
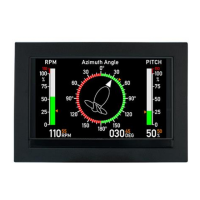
Details a CAN-based azimuth system using CAN angle transmitter, TPDO, and XDi-net for data transmission.
Describes an azimuth system with CANopen and analogue inputs, using AX1 modules for data.
Describes an azimuth and RPM system using analogue inputs and DX1, with XDi-net for data sharing.
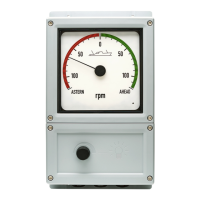
Describes a CAN-based rudder system using DEIF Standard XDi Dual rudder library for angle presentation.
Guides through the initial setup procedure for XDi rudder system, including wizard, zero set, and calibration.
Details a rudder system using analogue angle transmitter and XDi-net for data sharing.
Guides through the initial setup procedure for analogue rudder system, including wizard and calibration.
Explains dimmer control independent of virtual indicator, managed by product profile and dimmer groups via CAN.
Describes group dimmer control for indicators in bridge control panel and overhead console via CAN.
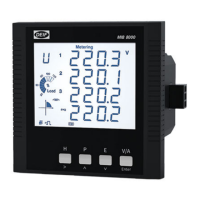
| Accuracy | ±0.5% of reading ±1 digit |
|---|---|
| Power supply | 85-265 VAC or 24 VDC |
| Frequency Range | 50/60 Hz |
| Power Consumption | Approx. 5 VA |
| Relative Humidity | 5% to 95% (non-condensing) |
| Measurement Range | 0-9999 |