Do you have a question about the Deif XDi 96 and is the answer not in the manual?
Covers warnings, legal information, safety issues, and ESD awareness for XDi unit.
Highlights safety concerns during installation and operation of the XDi unit.
Explains the structure of XDi virtual indicators, product profiles, and VI-setup profiles.
Describes product profiles (PP) containing system-related parameters and default settings.
Defines virtual indicators (VI) which contain graphical elements and indicator layouts.
Details VI-setup profiles (VS) containing predefined parameters for indicator setup.
Instructions for uploading new libraries via USB using the XDi update tool.
Explains using CANopen Transmit/Receive Process Data Objects (TPDO/RPDO) for data input.
Details XDi-net as a simple broadcasting method for data sharing via CANopen.
Explains Destination Address Mode Multiplexed PDO (DAM-MPDO) for transmitting multiplexed data.
Covers analogue data input using the AX1 extension module.
Details digital data input using the DX1 Digital I/O module for data or control inputs.
Explains NMEA serial data input using the NX2 NMEA input/output extension module.
Describes NMEA serial data output capabilities using NX1 or NX2 interface modules.
Illustrates fall-back function using a standard heading indicator library with multiple sources.
Details the automatic installation wizard that guides setup until the XDi unit is configured.
Details the unpacking process for the XDi indicator to protect it from dust and damage.
Explains how to mount the XDi unit from the front, considering space and airflow.
Provides panel cut-out dimensions and required depth for XDi with and without extension modules.
Details waterproof mounting considerations, focusing on critical areas for IP protection.
Explains connecting XDi units to the CAN bus via drop cables or daisy-chaining.
Details CAN bus backbone requirements and built-in termination resistors.
Provides recommendations for selecting shielded CAN bus cables for optimal performance.
Explains cable shielding interconnection and single-point grounding for CAN bus cables.
Explains the XDi's dual supply voltage inputs and the monitoring function for low voltage alerts.
Details how warnings and alerts can be sent via CANopen or activate relay outputs.
First step in manual setup: assigning a CAN Node ID for XDi accessibility on the CAN bus.
Second step: selecting a predefined Product Profile (PP) containing various system settings.
Third step: selecting a virtual indicator (VI) from the installed DEIF or custom library.
Fourth step: selecting a VI-setup profile (VS) with pre-set parameters for input, scaling, and behaviour.
Fifth step to finish the wizard and proceed to normal operation or access detailed setup menus.
Fifth step for NX2 module users: configuring NMEA setup for input and output.
Scans input channels to find and select relevant NMEA sentences for configuration.
Provides an example of NMEA auto setup for a main XDi-N wind indicator.
Finalizes NMEA setup, verifying data and returning to the wind indicator display.
Details the XDi's standard equipment of two galvanic separated CAN ports.
Highlights XDi-net for plug-and-play data sharing via CANopen.
Explains the requirement for unique NodeIDs on a CAN bus and the XDi's NodeID.
Guidance on selecting NodeIDs based on CAN communication types and priority.
Lists critical restrictions for XDi-net, especially regarding RPDO1 and NodeID 127.
Explains CAN bus modes: Single CAN, 2 x Single CAN, and Redundant CAN.
Explains the AX1's stable reference voltage output for potentiometer applications.
Describes the XDi's function to compensate for load impact from potentiometers.
Lists analogue input types (voltage, current, potentiometer) and their setup in VS/PP.
Explains how analogue input signals are scaled to correct output values using VS profiles.
Details the multi-point linearisation function for calibrating non-linear input signals.
Shows an incorrect current sink configuration and its solutions for common mode problems.
Provides a solution for common mode problems by changing dimmer configuration to use Vref.
Offers solutions to reduce common mode voltage by adjusting supply voltage or using a Zener diode.
Suggests using two separate AX1 modules for solving common mode issues in systems.
Describes SIN/COS dual input configuration using a potentiometer with +/-10V supply.
Details SIN/COS dual input using +24V as potentiometer supply for stable analogue centre value.
Explains SIN/COS dual input using Vref as potentiometer supply for stable analogue centre value.
Describes double triangle input using an external +10V supply for potentiometers.
Explains double triangle input using Vref as supply for potentiometers, setting analogue centre value.
Details input lost detection for dual potentiometer inputs using resistors for error voltage detection.
Describes single high voltage inputs on AX1, configuration ranges, and resolution.
Details AX1 high current inputs, ranges, and overcurrent protection.
Explains various methods for controlling the XDi backlight dimming and colour shift.
Details controlling dimmer levels for groups of XDi units via CAN or local control.
Explains Auto Day/Night colour shift that controls backlight and display colour based on dimmer value.
Adds an extra step for dusk in the auto colour shift function.
Opens menu for editing elements within a virtual indicator, such as headlines and units.
Explains setting up restricted bands for warning sectors on indicator scales.
Details a new menu function for colour adjustment and max backlight level tuning.
Explains the display calibration screen and its functions for colour and backlight adjustment.
Explains using Master Reset to restore factory settings, noting 'Reset' preserves colour calibration.
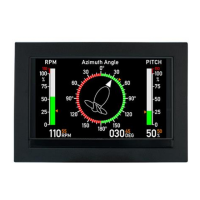
Details a fully CAN-based azimuth indicator system using CANopen and XDi-Net.
Details an azimuth system using CANopen and analogue inputs via AX1 modules.
Describes an azimuth system using analogue inputs and XDi-net for data sharing.
Describes an azimuth/RPM system using analogue pickup and XDi-net.
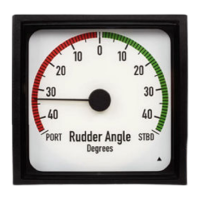
Describes a CAN-based rudder system using CANopen and XDi-net.
Describes an XDi rudder system using analogue angle transmitter and XDi-net.
Explains dimmer control options for virtual indicators, managed by product profile and dimmer groups.
Describes group dimmer control for multiple XDi units in bridge control and overhead panels.
| Dimensions | 96 x 96 mm |
|---|---|
| Mounting | Panel mount |
| Frequency Range | 45-65 Hz |
| Display | LCD |
| Power Consumption | < 5 VA |
| Operating Temperature | -10°C to +55°C |
| Storage Temperature | -20 to +70 °C |
| Relative Humidity | Up to 95% (non-condensing) |
| Weight | Approx. 0.3 kg |
| Input | Voltage |