Do you have a question about the Delta Industrial 23-710 and is the answer not in the manual?
Defines DANGER, WARNING, and CAUTION safety alert symbols.
Emphasizes reading instructions, understanding hazards, and machine limitations.
Warns about dust from construction activities and required protection.
Covers PPE, apparel, work area safety, and alertness.
Details safe setup, guards, maintenance, workpiece handling, and power disconnection.
Addresses preventing unintentional starts and using proper extension cords.
Ensures machine is fully assembled and installed correctly before operation.
Covers grinding wheel handling, mounting, and tool rest adjustments.
Details startup, workpiece handling, and general operational precautions.
Covers circuit, extension cords, and safe operation locations.
Explains why grounding is essential and how to connect properly.
Provides a guide for selecting appropriate gauge extension cords.
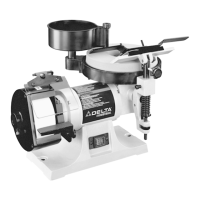
Introduces the sharpening center and lists its main components.
Instructions for unpacking, removing protective coating, and initial cleaning.
Advises applying household floor paste wax to unpainted surfaces.
Step-by-step instructions for assembling and adjusting the eyeshield.
Details assembling and adjusting the tool rest for the dry wheel.
Describes how to install and use the wrench holding bracket.
Instructions for assembling the tool and chisel holder base.
Details how to adjust the height and angle of the tool and chisel holder.
Instructions for positioning and tilting the tool and chisel holder.
Details how to level the tool and chisel holder base with the wet grinding wheel.
Instructions for installing and adjusting the water tank and spigot.
Explains controlling water flow from the spigot and the drain function.
Details how to secure the machine to prevent tipping or sliding.
Step-by-step guide for using the tool and chisel holder for sharpening.
Covers power switch operation and splash guard adjustments.
Steps for using the tool holder for sharpening on the dry wheel.
Instructions for assembling the 23-715 sliding tool rest for wet wheel use.
Details leveling and adjusting the height of the sliding tool rest.
Steps for using the sliding tool rest for sharpening on the dry wheel.
Warns about sharp edges and recommends protective gloves.
Details securing knives and performing grinding operations.
Covers adjusting knife height, parallelism, and tilt for grinding.
Step-by-step instructions for replacing the wet grinding wheel.
Step-by-step instructions for replacing the dry grinding wheel.
Explains how to use the dresser stick to maintain the dry grinding wheel.
Advises on cleaning procedures and cautions against solvents.
Provides steps to troubleshoot if the machine fails to start.
Information on available accessories and the importance of using recommended ones.
Provides contact information for parts, service, and warranty assistance.
Details the terms and conditions of the product warranty.
Lists US locations for parts and repair service.
Lists Canadian locations for parts and repair service.
Lists registered trademarks associated with Delta products.
The Delta Industrial Sharpening Center Model 23-710 is a versatile power tool designed for sharpening various woodworking tools. It features a 1/5 HP motor and comes equipped with both a dry and a wet grinding wheel, allowing for both rough grinding and fine sharpening.
The Sharpening Center is primarily used for sharpening wood chisels, plane irons, some lathe turning tools, jointer knives, and planer knives. It offers a dual-wheel system: a 5-inch diameter, 120-grit aluminum oxide dry wheel for initial rough grinding and an 8-inch diameter, 1000-grit wet wheel for fine sharpening. The wet wheel system includes a water tank with an adjustable spigot to direct water onto the grinding wheel, ensuring a cool grinding process and preventing overheating of the tool's edge. A drain is provided underneath the wet grinding wheel housing to dispose of water.
The device includes a tool and chisel holder, which is a standard accessory, designed to securely hold tools at the correct angle for sharpening. This holder can be used with both the wet and dry wheels. For specialized tasks like sharpening jointer and planer knives, an optional accessory, the 23-715 Sliding Tool Rest, is available. This sliding tool rest provides enhanced support and precision for sharpening longer blades.