Do you have a question about the Denver WCT-8010 and is the answer not in the manual?
Overview of the digital trail camera's automatic surveillance and image/video capture capabilities.
Details the camera's I/O interfaces: USB connector, SD-card slot, and TV output.
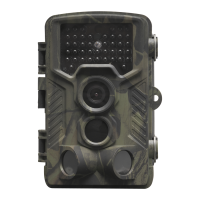
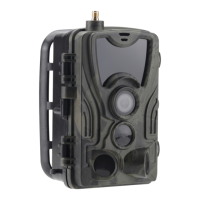
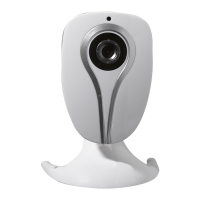
Identifies and labels the physical components and features of the camera.
Explains the shooting information displayed on the camera's monitor when turned on.
Lists the supported file formats for photos (JPG) and videos (AVI).
Details the requirements for powering the camera, including battery types and installation.
Instructs on the correct method for inserting the Micro SD card into the camera.
Explains the initial steps and considerations before switching the camera to ON mode.
Guides on how to switch to TEST mode for custom settings, manual capture, and preview.
Provides instructions on how to properly turn off the camera and battery removal for long-term storage.
Explains how to access the settings menu in TEST mode for camera customization.
Details settings for photo resolution, interval, multi-shot, and ISO.
Details settings for video resolution, length, and voice recording.
Covers mode, language, TV mode, date/time, timer, format, password, and version.
Lists the default values for various camera settings.
Details operating steps for Camera Mode, Photo Size, Video Size, and Timer.
Explains how to set the camera mode to Camera, Video, or Camera + Video.
Provides instructions on how to format the SD card, warning about data loss.
Details how to select the photo resolution (12MP, 8MP, 5MP).
Details how to select the video resolution (1080P, 720P, WVGA).
Explains how to set the date and time, important after battery changes.
Details how to set the number of photos taken per trigger (1, 3, 6, or 9).
Explains how to set ISO values (100, 200, 400) for better night photos.
Details how to set the duration for video recordings (e.g., 10s, 30s, 60s, 90s).
Explains how to enable or disable the sound recording for videos.
Details how to set the PIR interval to disable the sensor after a trigger.
Explains how to set a daily time window for camera triggering.
Describes how to enable and set a password for camera access.
Covers viewing and deleting captured images and videos on the camera or TV.
Explains how images and videos are named and numbered sequentially in folders.
Provides step-by-step instructions for updating the camera's firmware.
Lists detailed technical specifications of the camera's hardware and performance.
Provides a list of the components included with the camera package.
This document describes the DENVER WCT-8010 Wild Camera, a digital trail camera designed for surveillance and outdoor use.
The DENVER WCT-8010 is an automatic surveillance camera that triggers upon detecting movement from humans or animals within a specified region of interest. It utilizes a highly sensitive Passive Infrared (PIR) motion sensor to detect activity. Once triggered, the camera automatically captures high-quality pictures, up to 12 megapixels, or records 1080p HD video clips.
During daylight hours (sunrise to dusk), the camera captures color photos and videos. When light levels are insufficient (dusk onwards), it automatically switches to infrared (monochrome) mode for night vision photography and video recording. The camera also includes a sound recording function, embedding audio into video clips.
The camera operates in three main modes:
The DENVER WCT-8010 is designed for ease of use with a 2.0-inch colorful LCD display. It is resistant to water and snow, making it suitable for outdoor applications.
Power Supply: The camera requires either 4 or 8 AA batteries for operation. High-density, high-performance alkaline batteries are recommended, but rechargeable NiMH batteries can also be used. The battery compartment is accessed by sliding the power switch to the OFF position. The camera will automatically shut down in TEST mode if there's no operation within 3 minutes to conserve power, and also when in a low-battery state.
Micro SD-card: A Micro SD-card (8MB to 32GB) is required for storing images and videos. It should be inserted with the marked side upwards while the power switch is in the OFF position. The write-protect on the card must be unlocked before insertion. The camera supports FAT32 file format.
Entering Modes:
Custom Settings (in TEST Mode): Pressing the MENU button in TEST mode allows access to the settings menu. Here, users can customize various camera settings, which are displayed on the camera's LCD screen or an external TV monitor. Settings include:
Manual Capturing (in TEST Mode): Press the "SHOT" button to manually capture photos or record videos.
Viewing Images or Videos (in TEST Mode): Captured media can be viewed on the camera's LCD screen or an external TV monitor connected via a TV cable.
Password Protection: The camera supports password protection. If enabled, a password must be entered on the LCD screen after switching on the camera. The default password is off, but it can be set to a 4-digit number.
SD-card Management:
File Numbering: Images and videos are saved in a pre-named folder (104MEDIA). Files are numbered sequentially (e.g., PTDC0001.JPG or PTDC0001.AVI), with suffixes indicating whether it's an image (.jpg) or a video (.avi).
Firmware Upgrade: The camera has an automatic firmware upgrade function. If an improved firmware is available:
FWF900.bin file to the Micro SD-card.FWF900.bin file. Failure to do so will cause the camera to re-enter update mode upon subsequent power-ons.Power Off: To power off the camera, slide the power switch to the OFF position. For long periods of non-use, it is advisable to remove the batteries, as the camera still consumes a small amount of power even when off.
Environmental Considerations: When placing the camera, avoid areas with temperature and motion disturbances (e.g., trees exposed to direct sunlight) that could cause false triggers. The recommended height for placing the camera is 1 to 2 meters from the object.
Troubleshooting Note: Heavy rain, fog, and drizzle in the dark may result in white photos without a clear motive; this is not an error with the camera.
| Maximum frame rate | - fps |
|---|---|
| Supported video modes | 720p, 1080p |
| Maximum video resolution | 1440 x 1080 pixels |
| Display type | LCD |
| Product color | Camouflage |
| LED indicators | Yes |
| Display diagonal | 2 \ |
| Country of origin | China |
| Built-in speaker(s) | No |
| Protection features | Waterproof |
| PIR sensing distance range | 1 - 25 m |
| International Protection (IP) code | IP65 |
| Photo mode | - |
| Sensor type | CMOS |
| Total megapixels | 8 MP |
| Battery type | AA |
| Battery technology | Alkaline |
| Storage media | Memory card |
| Compatible memory cards | MicroSD (TransFlash) |
| Maximum memory card size | 32 GB |
| Cables included | Micro-USB |
| Memory card included | MicroSD |
| Field of view (FOV) angle | 108 ° |
| Trigger speed | 0.3 s |
| Optical sensor size | - \ |
| Number of batteries supported | 8 |
| LED type | IR |
| Number of illumination LEDs | 42 |
| Pallet height | 1720 mm |
| Pallet length | 1200 mm |
| Quantity per pallet | 408 pc(s) |
| Master (outer) case width | 350 mm |
| Quantity per pallet layer | 68 pc(s) |
| Master (outer) case height | 130 mm |
| Master (outer) case length | 255 mm |
| Master (outer) case weight | 2500 g |
| Number of layers per pallet | 6 pc(s) |
| Quantity per master (outer) case | 4 pc(s) |
| Maximum number of stacking cartons | 12 pc(s) |
| Quantity per intermodal container (20ft) | 10000 pc(s) |
| Quantity per intermodal container (40ft, HC) | 24400 pc(s) |
| Pallet weight | 293000 g |
| Pallet net width | 800 mm |
| Pallet net weight | 278000 g |
| Master (outer) case GTIN (EAN/UPC) | 5706751038600 |
| Depth | 138 mm |
|---|---|
| Width | 96 mm |
| Height | 81 mm |
| Weight | 550 g |
| Package depth | 122 mm |
| Package width | 163 mm |
| Package height | 106 mm |
| Package weight | 576 g |