When manual o
i
is selected, the detector is tested
either by pressing and holding the manual o
i
button
(if installed) or by shining a W867 Test Lamp into the
detector viewing windows. The “Startup and
Checkout Procedure (Manual o
i
Test)” section of this
manual explains this procedure. For problems
encountered during the manual o
i
test, refer to Table
6 - Manual o
i
Troubleshooting.
AUTOMATIC o
i
SELECTED
The Automatic o
i
feature (if selected) tests the detec-
tor approximately once each minute, checking the
cleanliness of the optical surfaces, sensor sensitivity,
and proper functioning of the electronic circuitry.
Proper operation of the detector is indicated by simul-
taneous blinking of both the UV and IR sensor LEDs
every 5 seconds. If a problem is detected for three
consecutive automatic o
i
tests, a fault signal is gen-
erated. If the detector passes three consecutive
automatic o
i
tests, the fault signal will then be
cleared. If a detector fault is indicated, observe the
detector LEDs as well as the status of the detector
relays, then refer to Tables 1 and 7 for status and
troubleshooting information.
Perform the “Startup and Checkout Procedure
(Manual o
i
Test)” in this manual to verify the proper
operation of the Fire relay and LEDs.
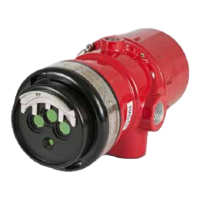
FIELD TESTING UV/IR DETECTORS
Det-Tronics UV/IR flame detectors contain sensitive
electronic components (ICs, transistors, etc.) that can
be damaged by electrostatic discharge (ESD).
Common causes of damage include improper han-
dling during installation/service, ground faults, power
supply transients, and lightning strikes. All Det-
Tronics systems are designed with extensive protec-
tion circuitry, however, damage can still occur.
The following field test procedure has been devel-
oped to test Det-Tronics UV/IR flame detectors for
ESD-damaged components:
1. Disable (bypass) all automatic fire extinguishing
and shutdown equipment prior to testing. If the
detector is part of a Det-Tronics controller-based
system, simply move the controller key switch to
the Test mode.
11 95-8385
Condition Indication Corrective Action
Normal operation with Fault relay de-energized Check the operation of the power source and the
manual o
i
test not LEDs not blinking continuity of the detector wiring. If the detector appears
initiated to be “dead” with power applied, remove power and
(Manual o
i
Selected) replace the motherboard.
Manual o
i
Test Fire relay did not energize The other sensor has failed to respond.
and the LEDs of only one • Check the cleanliness of the viewing window and
sensor are illuminated repeat the test.
• If the sensor fails to respond again, replace the sensor
module.
• If the sensor still does not respond, replace the
motherboard.
Manual o
i
Test Fire relay did not energize Both sensors have failed to respond.
and the LEDs of neither • Check input power and external wiring.
sensor are illuminated • Check the cleanliness of both viewing windows.
If the detector still does not respond:
• If using a test lamp, check the battery, window, etc. to
be sure that the test lamp is working properly.
• If using the manual o
i
switch, check the switch for
proper operation and wiring.
If the detector still does not respond, replace the
motherboard.
Table 6—Manual o
i
Troubleshooting