SB-2-163-M (11/2014) 1 / 8
SERVICE MANUAL
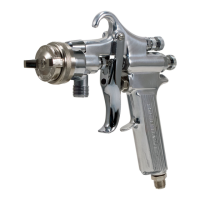
EGA-503 SPRAY GUN
(SPRAY PISTOL)
*Repair Kit No. KK-5044
(190681)
Important: Before using this equipment,
read all safety precautions and instructions.
Keep for future use.
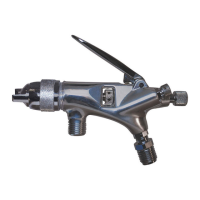
DESCRIPTION
The EGA-503 is an external mix, touch-up
gun. The gun has a long needle taper mak-
ing detail work easy. The forefinger trigger
gives added control for delicate applica-
tion. Can be used for touch-up, shading,
edging or any type of precision painting.
Use as either suction or pressure feed
application.
Note
Wetted surfaces are stainless steel
and aluminum. Please see Warn-
ing on Page 2 regarding explosion
hazard.
SPECIFICATIONS
Air Inlet: 1/4" NPS (M)
Fluid Inlet: 1/4" NPS (M)
Type Feed: Suction or Pressure
Wetted Parts: Aluminum & Stainless Steel
P1 = Maximum Air Pressure 100 PSI (7 bar)
P2 = Maximum Fluid Pressure 10 PSI (.68 bar)
OPERATION
Prepare and strain material according to the
paint manufacturer's instructions. Attach
container to fluid inlet and tighten. Adjust
incoming air pressure to gun to achieve
desired spray results.
Note
To minimize overspray, only use as
much pressure as required to atom-
ize material.
PREVENTIVE MAINTENANCE
To clean fluid passages, remove excess
material at source, then flush with a suit-
able solvent.
To clean air cap and fluid tip, brush with a
stiff bristle brush. If necessary, use a broom
straw or toothpick. Never use a wire or hard
instrument. This may scratch or burr holes
causing a distorted spray pattern.
Note
Worn parts can cause fluid leakage.
When replacing fluid tip or fluid
needle, replace both at the same
time. Lapped sets are available.
Also replace the fluid tip gasket and
needle packing at this time.
To prevent damage to the fluid tip or
fluid needle, be sure to either 1) push
the trigger and hold while tightening
the fluid tip or 2) remove the fluid
needle adjusting screw to relieve
spring pressure.
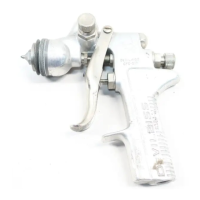
Figure 1
*Government NSN No. 4940-01-182-6975
= KK-5044
LUBRICATION
For best results, lubricate the points in-
dicated in Figure 1 daily using Gun Lube
SSL-10.
A. Trigger points
B. Packings
C. Adjusting valves
D. Needle/Air valve springs
(occasionally)
B
A
C
D