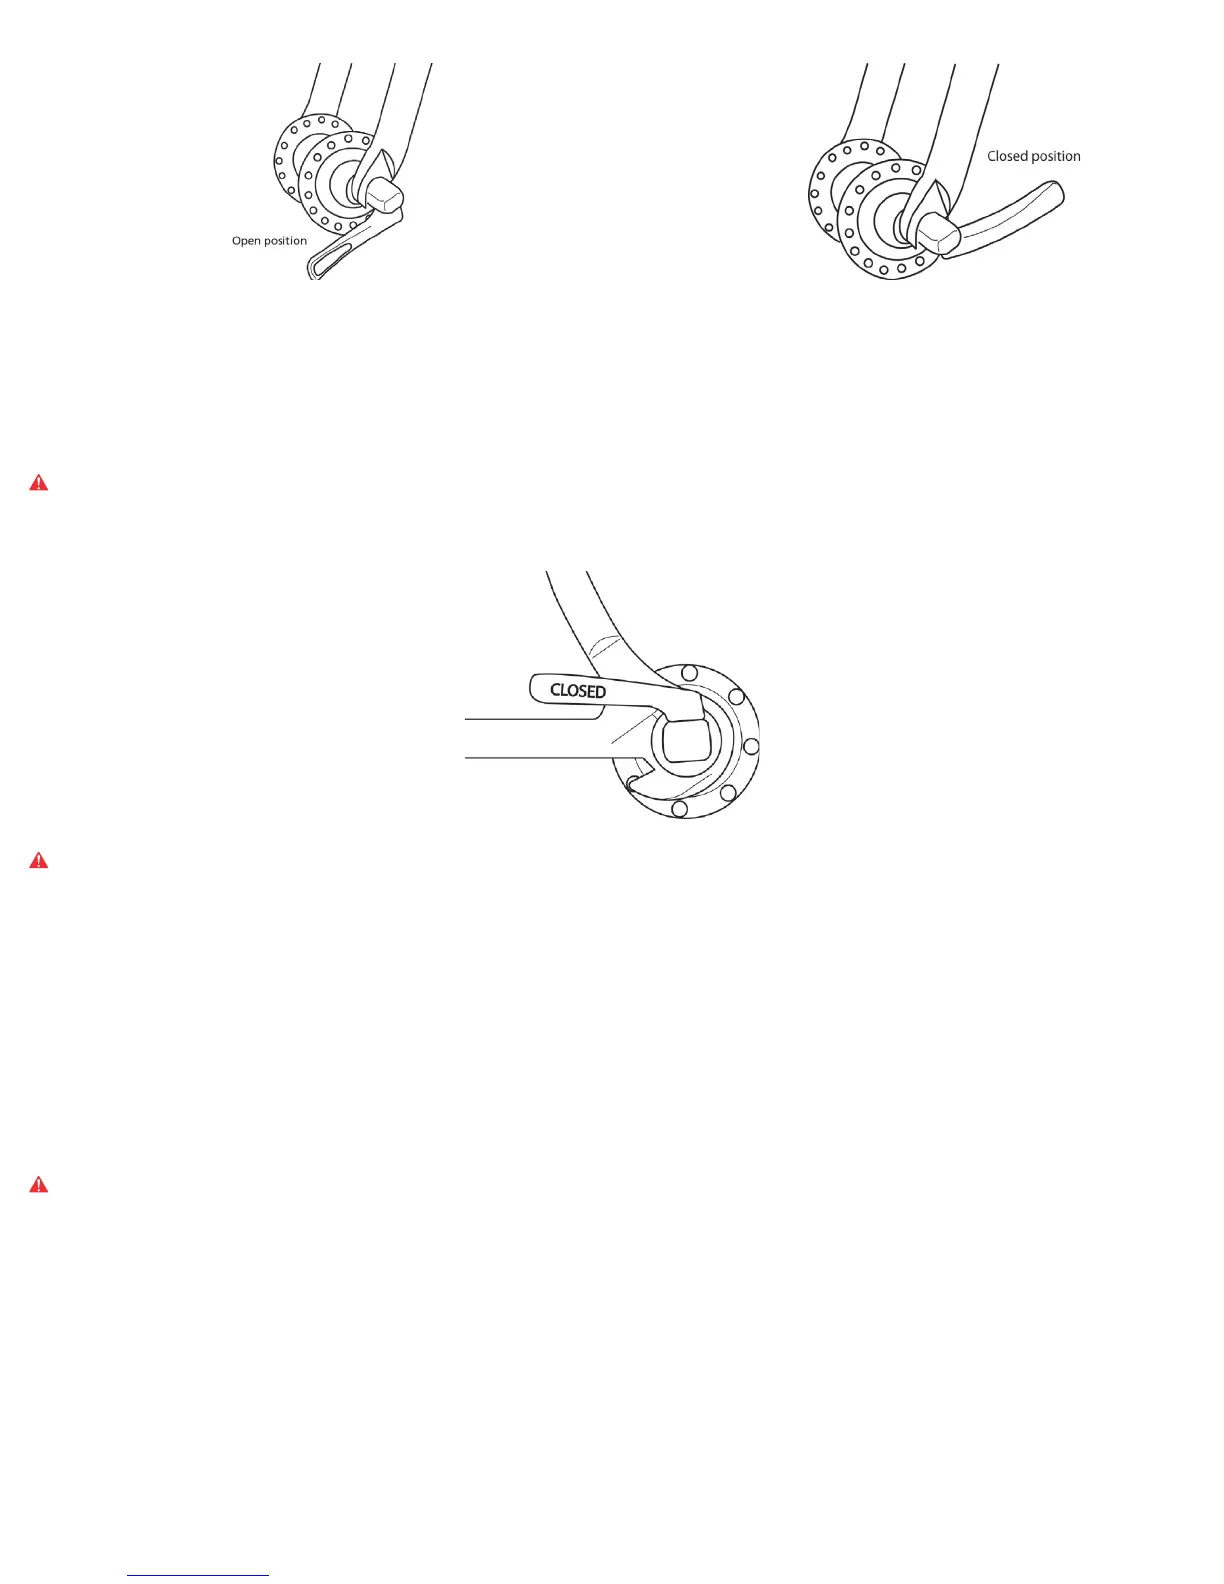
Figure 12
Figure 13
b. Front wheel assembly
Notice: If your bike has disc brakes, make sure you do not damage the disc, the calipers or the pads in the process of removing the front wheel. Be particularly careful when inserting the disc
between the brake pads and the calipers.
i. Turn the quick release lever into the opened position as shown on figure 12;
ii. Place the fork straight with respect to the bike and insert the wheel between the fork dropouts. The axel must firmly rest in the dropouts;
iii.Maintain the quick release lever at the opened position with one of your hands. Manually tighten the quick release adjusting nut until you feel an adequate resistant torque;
iv.Press the wheel firmly into the dropouts, align the wheel with respect to the fork, align the quickrelease lever with the fork arm and then switch it to the closed position. Make sure the quick
release lever ends up being parallel to the fork arm as shown on figure 13;
WARNING: In order to place the quick release lever into the closed position, you must use leverage with the fork arm. Also, the lever should leave a clear imprint in the palm of
your hand for a few seconds. If this is not the case, place the lever back to the opened position and turn the adjusting nut a quarter of a turn clockwise and try again.
v. If you cannot tighten the quick release lever to the closed position, you need to loosen the adjusting nut a quarter of a turn. Then try again;
vi.Reconfigure the brakes back in place and make sure the wheel is properly centered, so that it turns freely without touching the brake pads.
Figure 14
WARNING: The auxiliary retention system is not intended to replace adequate tightening of the quick release. If you use your bike and the quick releases are not tightened
enough, you risk losing the wheels, damaging your bike and suffering serious injury or even death.
c. Rear wheel disassembly
i. Shift the rear derailleur onto the highest gear corresponding to the smallest sprocket;
ii. If your bike has v-brakes, spread the brake calipers as shown in section 7.3;
iii.Turn the quick release lever to the opened position as illustrated in figure 12;
iv. Lift the rear of the bike a few centimeters and push the wheel Lift the rear of the bike a few centimeters and push the wheel disengage it.
d. Rear wheel assembly
Notice: If your bike has disc brakes, make sure you do not damage the disc, the calipers or the pads in the process of replacing the front wheel. Be particularly careful when inserting the disc
between the brake pads and the calipers.
i. Shift the rear derailleur on to the highest gear which corresponds to the smallest sprocket;
ii. Shift the rear derailleur on to the highest gear which corresponds to the smallest sprocket;
Turn the quick release lever to the opened position, referring to figure 12. Place the wheel with the quick release positioned on the rear derailleur’s opposite side;
iii.Bring the derailleur body towards the back with one of your hands;
iv.Place the chain on the smallest sprocket of the cassette. Position the wheel axel in the dropouts and push vigorously as shown on figure 14;
v. Turn the adjusting nut clockwise until it touches the dropout. Turn the quick release lever towards the closed position, making sure the lever is parallel to the seat stay;
WARNING: The auxiliary retention system is not intended to replace adequate tightening of the quick release. If you use your bike, and the quick releases are not tightened
enough, your wheels risk to disengaging, damaging your bike and leading to serious injury or even death.
vi.If you cannot tighten the quick release lever to the closed position, you need to loosen the adjusting nut a quarter of a turn. Then try again;
vii. Place the rear derailleur back in place;
viii. Reconfigure the brake back in place and make sure the wheel is properly centered so that it turns freely without rubbing the brake pads.
D. Assembly and disassembly of wheels without quick release
a. Front wheel disassembly
i. If your bike has v-brakes, spread the brake calipers as elaborated in section 7.3;
iii.Lift the front of the bike a few centimeters and hit the wheel downward with your hand to disengage it from the fork.
b. Front wheel assembly
i. Place the fork straight with respect to the bike and insert the wheel between the fork dropouts. The axel must firmly rest in the dropouts. The washers should be on the outside of the
dropouts, before the nuts;
ii. Press the wheel firmly in the dropouts and align the wheel with respect to the fork. Tighten the nuts firmly on the axel with a 15mm wrench;
iii.Reconfigure the brake back in place and make sure the wheel is properly centered, so that it turns freely without touching the brake pads.
 Loading...