c. Rear wheel disassembly
i. Shift the rear derailleur to the highest gear which corresponds to the smallest sprocket;
ii. If your bike has v-brakes, spread the brake calipers as shown in section 7.3;
iii.With a 15mm wrench, loosen the axel nuts;
iv.Lift the rear of bike a few centimeters and push the wheel forward then downward to disengage it.
d. Rear wheel assembly
i. Shift the rear derailleur to the highest gear which correspond to the smallest sprocket;
ii. Bring the derailleur body towards the back with one of your hands;
iii.Place the chain on the smallest sprocket of the cassette. Position the wheel axel in the dropouts and push vigorously as shown on figure 14;
iv.Tighten the axel nuts firmly with a 15mm wrench;
v. Place the rear derailleur back in place;
vi.Reconfigure the brake back in place and make sure the wheel is properly centered, so that it turns freely without rubbing the brake pads.
7.2 Seatpost
Most bikes have a quick release to clamp the seatpost. These work exactly like the wheel quick releases as explained before. Even though it looks like a bolt with a nut and a lever, it is
actually a cam mechanism that clamps your seatpost tightly and that facilitates adjusting its height.
WARNING: If you use your bike and its seatpost quick release is not tightened enough, your seat could move and turn. This could result in a loss of control, leading to
serious injury or even death. It is, therefore, essential that you:
1. Ask your authorized Devinci dealer to explain how your quick release works so that you can safely adjust your seat;
2. Learn how to safely use a quick release so that you can apply this knowledge;
3. Make sure your seat is properly clamped before every ride.
A. Quick release adjustments
It is the power of the cam that maintains the seatpost in place. It squeezes it inside the seat tube when switching the lever from the opened to the closed position. The tightening force
depends on the torque applied on the adjusting nut. To increase the tightening force, you need to turn the adjusting nut clockwise while holding the lever with the other hand. To reduce it, turn
the adjusting nut counterclockwise while hold ing the lever. Less than half a turn can make the difference between a safe and an unsafe clamping.
WARNING: You need to use the cam mechanism when clamping your seatpost with a quick release to achieve proper clamping force, by switching the lever from the opened
to the closed position. If you hold the nut in one hand and you turn the lever to tighten the wheel, the seatpost is never going to be safely clamped. Instead, you
need to switch the lever from the opened to the closed position with significant restriction force. The nut helps you adjust the amplitude of that force by screwing
or unscrewing it.
WARNING: To place the quick release lever into the closed position, you must use leverage with the seat tube. Also, the lever should leave a clear imprint in the palm of your
hand for a few seconds. If this not the case, place the lever back to the opened position and turn the adjusting nut a quarter of a turn clockwise and try again.
7.3 Brakes
Notice: In order to achieve the optimal braking power, use both front and rear brakes simultaneously.
WARNING: If you brake suddenly and excessively, you risk falling over your bike and that could cause serious injury or even death.
7.3.1 Brake functioning
First of all, for safety purposes, it is essential you instinctively associate each brake lever with the brake it controls. In North America, the right lever controls the rear brake while the left one
controls the front one. On a bicycle, it is the friction between the brake pads and the rims that allows braking, by transforming kinetic energy into heat. There are also disc brakes that uses the
same principle but with a disc instead of the wheel rim. In both cases, for the best braking, clean the brake pads and the rim or the disc and make sure there are no traces of lubricant or wax.
Furthermore, you should check that the brakes are easy to reach with your hands. If you feel your hands are too small, that the position is uncomfortable or if you are unable to brake with full
power, ask your authorized Devinci dealer. Most of the time, they will be able to tune the reach of the brake levers or install specific grips to solve the problem.
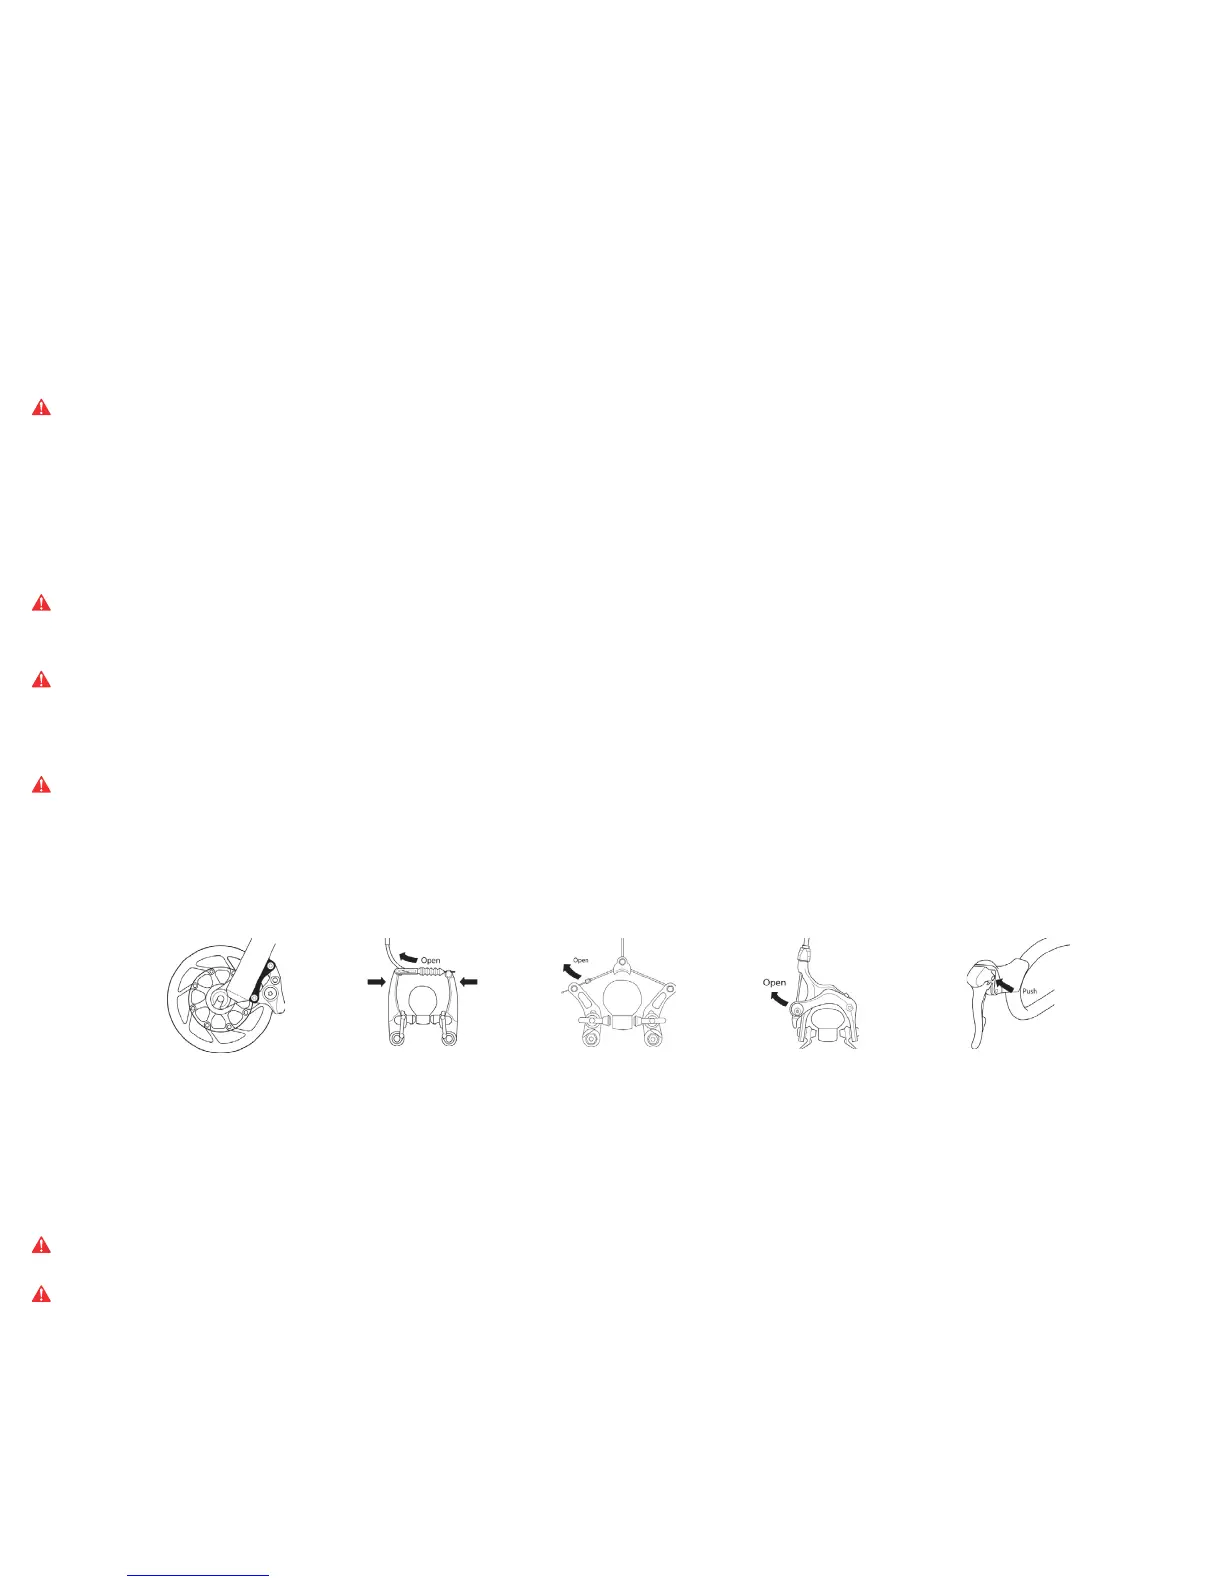
Figure 15 Figure 16 Figure 17 Figure 18 Figure 19
Most brakes possess a mechanism that allows disengaging the brake from the rim when you want to assemble or remove the wheel. Once disengaged, it is impossible to brake. Ask your
authorized Devinci dealer to explain clearly how to disengage the brakes on your bike according to the mechanism you have (refer to figures 15 to 19). Always check that your brakes are
operational before using your bike. Brakes are not intended for the sole purpose of stopping your bike, they are also intended to help you slow down. The maximal stopping power can be
achieved just before the wheel starts skidding. When the wheels are locked up, a large amount of the breaking power is lost and you tend to loose control. You must learn to slow down and
brake efficiently without locking up your wheels. This technique is known as progressive braking modulation. Pull the brake lever by progressively increasing the braking power instead of
pulling suddenly and excessively. If you feel your wheels starting to lock, smoothly release the lever until you get a normal wheel rotation back. It is very important to adjust the braking force
on the wheels according to the surface on which you’re riding. To thoroughly understand this technique, we recommend you try walking beside your bike to visualize the effect of pulling the
brake levers. You are likely to perceive more easily the moment your wheels lock up and stop rotating.
WARNING: The disc and linear pull brakes on certain models are extremely powerful. If you have this kind of brakes, familiarize yourself carefully by trying to brake
progressively at first. Pull the lever too suddenly could result in loss of control and a fall.
CAUTION: Disc brakes become very hot after intensive or prolonged use. Be careful not to burn yourself by touching the disc or the caliper.
When braking, the bike starts slowing down, but your body inertia tends to continue forward at the same pace, causing a weight transfer towards the front wheel. If you brake by suddenly
locking up the wheels, this weight transfer could throw you over the handlebars. This phenomenon will even be accentuated if you have a front suspension. Indeed, the suspension will
compress downward, increasing the weight transfer.
 Loading...