ENGLISH
9
3. Place outer clamp washer
16
on saw spindle with the
large flat surface against the blade with beveled side
facingout.
4. Thread blade clamping screw
9
into saw spindle by
hand (screw has left-hand threads and must be turned
counterclockwise totighten).
5. Depress the blade lock button
12
while turning
the saw spindle with the blade wrench
14
counterclockwise until the blade lock engages and the
blade stopsrotating.
6. Tighten the blade clamping screw firmly with the
bladewrench.
NOTE: Never engage the blade lock while saw is running,
or engage in an effort to stop the tool. Never turn the saw
on while the blade lock is engaged. Serious damage to your
saw willresult.
To Replace the Blade (Fig. A, D)
WARNING: Remove battery before service,
adjustment, installing or removingaccessories.
1. To loosen the blade clamping screw
9
, depress the
blade lock button
12
and turn the saw spindle with
the blade wrench
14
until the blade lock engages and
the blade stops rotating. With the blade lock engaged,
turn the blade clamping screw clockwise with the
blade wrench (screw has left-hand threads and must be
turned clockwise toloosen).
2. Remove the blade clamping screw
9
and outer clamp
washer
16
only. Remove oldblade.
3. Clean any sawdust that may have accumulated in the
guard or clamp washer area and check the condition
and operation of the lower blade guard as previously
outlined. Do not lubricate thisarea.
4. Select the proper blade for the application (see
Blades). Always use blades that are the correct size
(diameter) with the proper size and shape center hole
for mounting on the saw spindle. Always assure that the
maximum recommended speed (rpm) on the saw blade
meets or exceeds the speed (rpm) of thesaw.
5. Follow steps 2 through 6 under To Install the
Blade, making sure that the blade will rotate in the
properdirection.
Blades
CAUTION: Burn hazard. Do not touch the the blade
immediately after use. Contact with the blade may
result in personalinjury.
WARNING: To minimize the risk of eye injury, always
use eye protection. Carbide is a hard but brittle
material. Foreign objects in the workpiece such as wire
or nails can cause tips to crack or break. Only operate
saw when proper saw blade guard is in place. Mount
blade securely in proper rotation before using, and
always use a clean, sharpblade.
WARNING: Do not cut ferrous and or non-ferrous
metals (steel), glass, masonry-type planking, or tile
with thissaw.
Do not use abrasive wheels or blades. A dull blade will
cause slow inefficient cutting, overload on the saw motor,
excessive splintering, and could increase the possibility of
kickback. Please refer to the table below to determine the
correct size replacement blade for your modelsaw.
Blade Diameter Teeth Application
DWA412TCT 4-1/2" (115 mm) 24 Wood cutting
If you need assistance regarding blades, please call
1–800–4-
(1–800–433–9258).
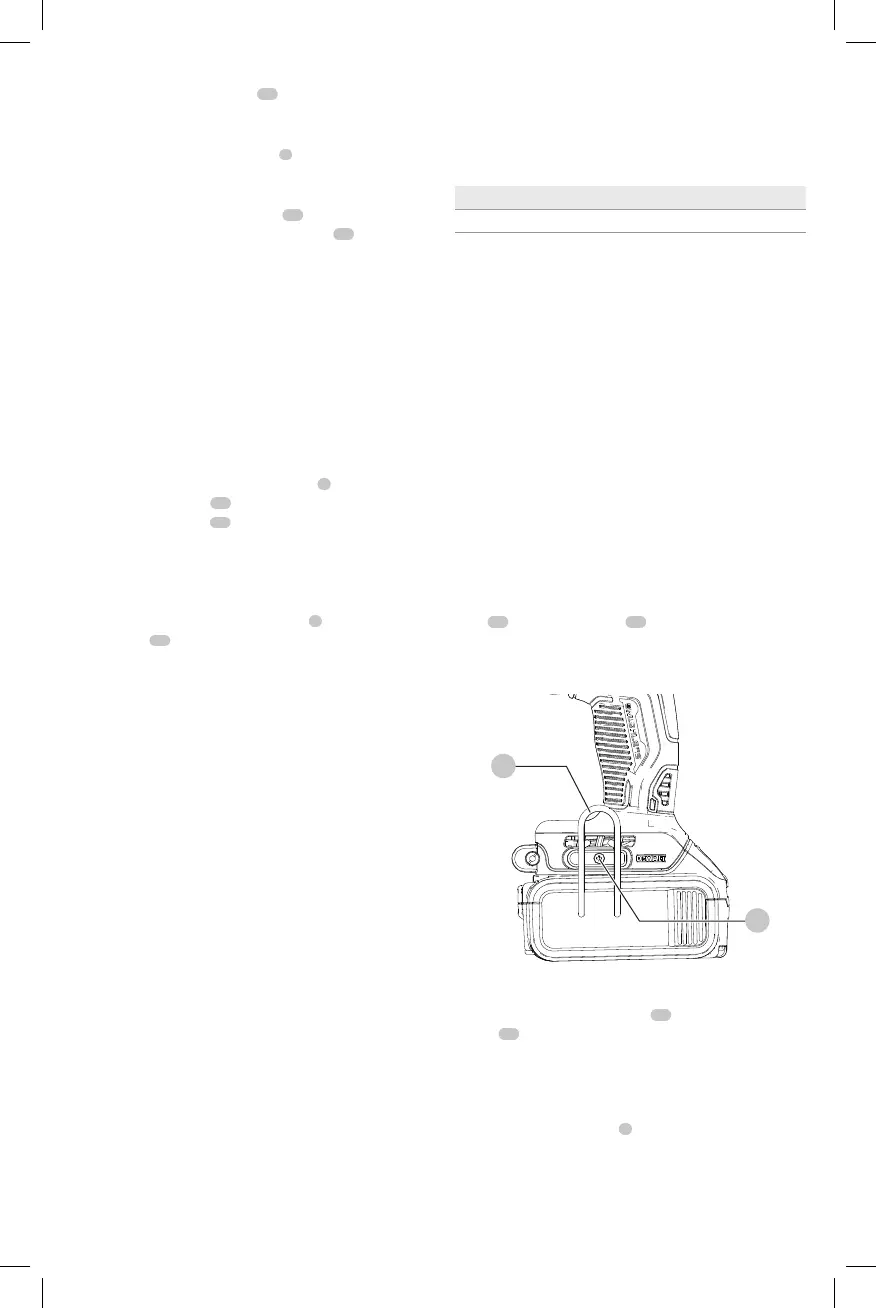
Installing the Belt Hook (Fig. E)
WARNING: To reduce the risk of serious personal
injury, turn unit off and remove the battery pack
before making any adjustments or removing/
installing attachments or accessories. An
accidental start-up can causeinjury.
WARNING: To reduce the risk of serious personal
injury, ONLY use the tool’s belt hook to hang
the tool from a work belt. DO NOT use the belt
hook for tethering or securing the tool to a person or
object during use. DO NOT suspend tool overhead or
suspend objects from the belthook.
WARNING: To reduce the risk of serious personal
injury, ensure the screw holding the belt hook
issecure.
IMPORTANT: When attaching or replacing the belt
hook
20
, use only the screw
21
that is provided. Be sure to
securely tighten thescrew.
If the hook is not desired at all, it can be removed from
thetool.
Fig. E
20
21
Installing the Auxiliary Handle (Fig. A)
Using the supplied blade wrench
14
screw the auxiliary
handle
13
into place as shown in Figure A. The saw can be
used with or without the auxiliary handle inplace.
Cutting Depth Adjustment (Fig. F)
1. Hold the saw firmly and loosen (counterclockwise) the
depth adjustment knob
5
and move shoe to obtain the
desired depth ofcut.
2. Make sure the depth adjustment knob has been
retightened (clockwise) before operatingsaw.
 Loading...