ENGLISH
11
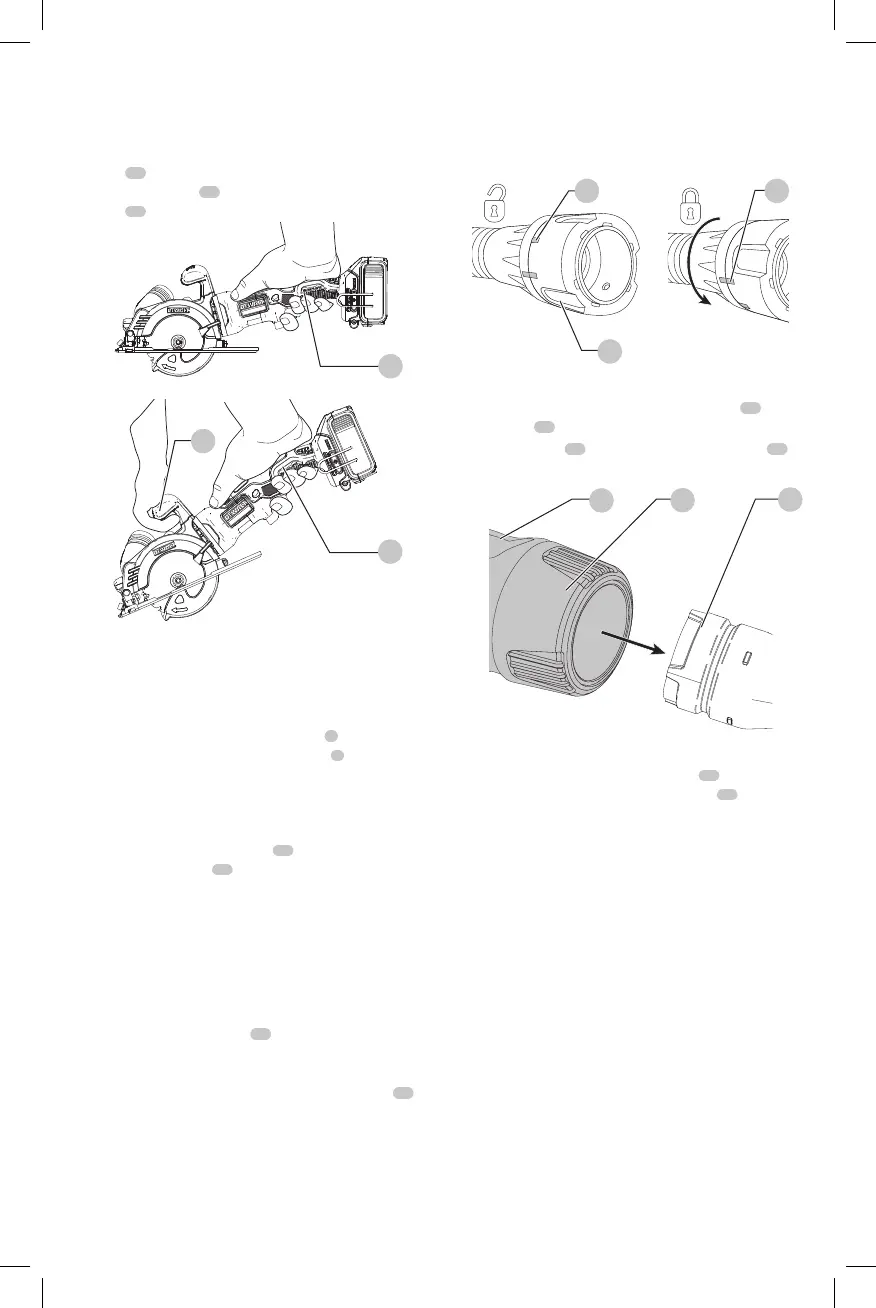
WARNING: To reduce the risk of serious personal
injury, ALWAYS hold securely in anticipation of a
suddenreaction.
Proper hand position requires one hand on the main
handle
18
or, if the auxiliary handle is attached, one hand
on the main handle
18
and one hand on the auxiliary
handle
13
.
18
18
13
Fig. J
Trigger Switch (Fig. A)
WARNING: This tool has no provision to lock the
trigger switch in the ON position and should never be
locked ON by any othermeans.
Release the trigger switch lock-off button
1
by pressing
the lock-off button. Pull the trigger switch
2
to turn the
motor on. At this time you can let go of the lock-off button.
Releasing the trigger switch turns the motor off.
Dust Extraction (Fig. K, L)
Your saw has a built-in dust port
22
which allows either
the supplied dust bag
25
or a shop vacuum system to
be connected. The built-in dust port utilizes the
AirLock connection making it compatible with the
dustextractors.
To Attach a Dust Extractor (Fig. K)
Your D
WALT circular saw is fitted with the D
WALT
AirLock® connection system. The AirLock® allows for a fast,
secure connection between the dust extractor and power
tool. The AirLock® connector
23
connects directly to
D
WALT compatibletools.
1. Ensure the collar on the AirLock® connector is in the
unlock position. (Refer to FigureK.) Align notches
24
on
collar and AirLock® connector as shown for unlock and
lockpositions.
2. Push the AirLock® connector onto the adapter
connectorpoint.
3. Rotate the collar to the lockedposition.
NOTE: The ball bearings inside collar lock into slot and
secure the connection.The power tool is now securely
connected to the dustextractor.
Fig. K
23
2424
To Attach the Dust Bag (Fig. L)
1. While holding the saw, fit the dust bag collar
26
to the
dust port
22
as shown in FigureL.
2. Turn the collar
26
clockwise to lock the dust bag
25
inplace.
Fig. L
22
26
25
To Empty the Dust Bag (Fig. L)
1. While holding the saw, turn the collar
26
counterclockwise to unlock the dust bag
25
.
2. Remove dust bag from the saw and gently shake or tap
the dust bag toempty.
3. Reattach the dust bag back onto the dust port and lock
into place by turning the dust bag collarclockwise.
You may notice that all the dust will not come free from
the bag. This will not affect sanding performance but will
reduce the saw’s dust collection efficiency. To restore your
saw’s dust collection efficiency, depress the spring inside
the dust bag when you are emptying it and tap it on the
side of the trash can or dustreceptacle.
Lower Blade Guard
WARNING: The lower blade guard is a safety
feature which reduces the risk of serious
personal injury. Never use the saw if the lower
blade guard is missing, damaged, misassembled
or not working properly. Do not rely on the
lower blade guard to protect you under all
circumstances. Your safety depends on following
all warnings and precautions as well as proper
operation of the saw. Prior to use, the check
lower guard operation by manually opening the
 Loading...