9
ENGLISH
8
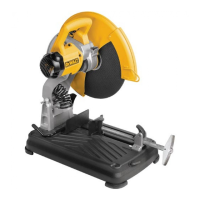
Mounting holes
9
Cutting table
10
Hex key
Intended Use
Your professional D
WALT multicutter has been designed for
the cutting of variously shaped metal materials: water and gas
pipes, angular iron, U-profiles, T-bars, rods, bolts, etc. Using the
appropriate cutting blade, it can cut hot and cold rolled carbon
steel, construction steels according to DIN 1700 (ST33, ST37–2,
ST52–3), non-ferrous metals (i.e. aluminum, brass, copper),
stainless steel and synthetic materials (i.e. PVC). This tool is not
intended to be used in cast-iron, brick, tile or ceramic materials.
The tool is never to be used for cutting magnesium work pieces
DO NOT use under wet conditions or in the presence of
flammable liquids orgases.
These multicutters are professional powertools.
DO NOT let children come into contact with the tool.
Supervision is required when inexperienced operators use
thistool.
• Young children and the infirm. This appliance is not
intended for use by young children or infirm persons
withoutsupervision.
• This product is not intended for use by persons (includng
children) suffering from diminished physical, sensory or
mental abilities; lack of experience, knowledge or skills
unless they are supervised by a person responsible for their
safety. Children should never be left alone with thisproduct.
ASSEMBLY AND ADJUSTMENTS
WARNING: To reduce the risk of serious personal
injury, turn tool off and disconnect tool from power
source before making any adjustments or removing/
installing attachments or accessories. An accidental
start-up can causeinjury.
Bench Mounting (Fig. A)
Mounting holes
8
have been provided to facilitate
benchmounting.
Removing and Fitting a Cutting Blade
(Fig.A, B1,B2)
1. With the arm in the rest position, use the lip
42
to slide the
guard
4
back. Leave the guard retracted (Fig. B1).
2. Press and hold down the spindle lock
5
(Fig. B2).
3. Rotate the cutting blade until itlocks.
4. Rotate the bolt cover
11
out of the way (Fig. B1).
5. Using the hex key
10
, remove the bolt
12
by turning
counterclockwise and then remove the lock washer
29
, the
flat washer
27
and the retaining flange
28
(Fig.B2).
6. Replace the cutting blade
13
. Make sure that the the
new blade is placed onto the flange
30
in correct
rotationaldirection.
7. Secure the blade with the retaining flange
28
, the flate
washer
27
and lock washer
29
and the bolt
12
.
8. Move the guard back down and release the spindle lock
5
.
WARNING: The teeth of a new blade are very sharp and
can bedangerous.
Clamping the Workpiece in Position
(Fig.A,C1–C6)
The tool is equipped with a material clamp
6
(Fig. A).
1. Pull the lever
14
toward the handle
31
(Fig. C1).
2. Push the clamp shaft
32
forward until the jaw
33
is almost
touching theworkpiece.
3. Press the lever
14
toward the jaw
33
until it engages with
the clamp shaft
32
.
4. Rotate the handle
31
clockwise and clamp the
workpiecesecurely.
5. To release the workpiece, rotate the
handle
31
counterclockwise.
WARNING:
• Clamp the workpiece as far towards the operator
aspossible.
• Set the clamping position for cutting downstroke as
long as the thickness of the workpiece is not exceeding
the maximum downstroke cutting capacity (Fig. C2).
- The maximum downstroke cutting capacity is
marked by slot
36
.
- Continue setting the clamping position as
describedbelow.
• Always attemp to clamp the workpiece in a way to
minimize the number of teeth cutting through the
material (Fig. C4).
• Support long workpieces using a piece of wood
15
(Fig. C3). Do not clamp the cut off end
34
.
Vertical Clamp (Fig. C5, C6)
The vertical clamp
16
is used for upstroke cutting of wide and
irregular shaped materials (Fig. C5).
1. Insert the vertical clamp in the hole
17
in the base (Fig.C6)
until the clamp
16
rests on the workpiece (Fig.C5).
2. Pull the lever
18
down to clamp theworkpiece.
3. Lift the lever
18
to release the clamp
16
.
WARNING: Always use the vertical clamp when
cuttingupstroke.
Quick Travel Feature (Fig. C1)
The clamp has a quick travelfeature.
• To release the clamp, rotate the handle
31
one or two
turns counterclockwise and pull the lever
14
toward the
handle
31
.
Setting the Clamping Position (Fig. C1,C6)
The clamping position can be set to match the cuttingblade.
1. Pull the clamp lever
19
toward the handle
31
(Fig. C1) and
pull out the location pin
20
to release the fence
7
(Fig. C6).
2. Move the fence
7
asrequired.

 Loading...