English
12
INSIDE CORNER OUTSIDE CORNER
Left side
Bevel left 33.9°
Miter table set at right 31.62°
Save left end of cut
Bevel right 33.9°
Miter table set at left 31.62°
Save left end of cut
Right side
Bevel right 33.9°
Miter table set at left 31.62°
Save right end of cut
Bevel left 33.9°
Miter table set at right 31.62°
Save right end of cut
When setting bevel and miter angles for all compound miters, remember that:
The angles presented for crown moldings are very precise and difficult to set exactly.
Since they can easily shift slightly and very few rooms have exactly square corners, all
settings should be tested on scrap molding.
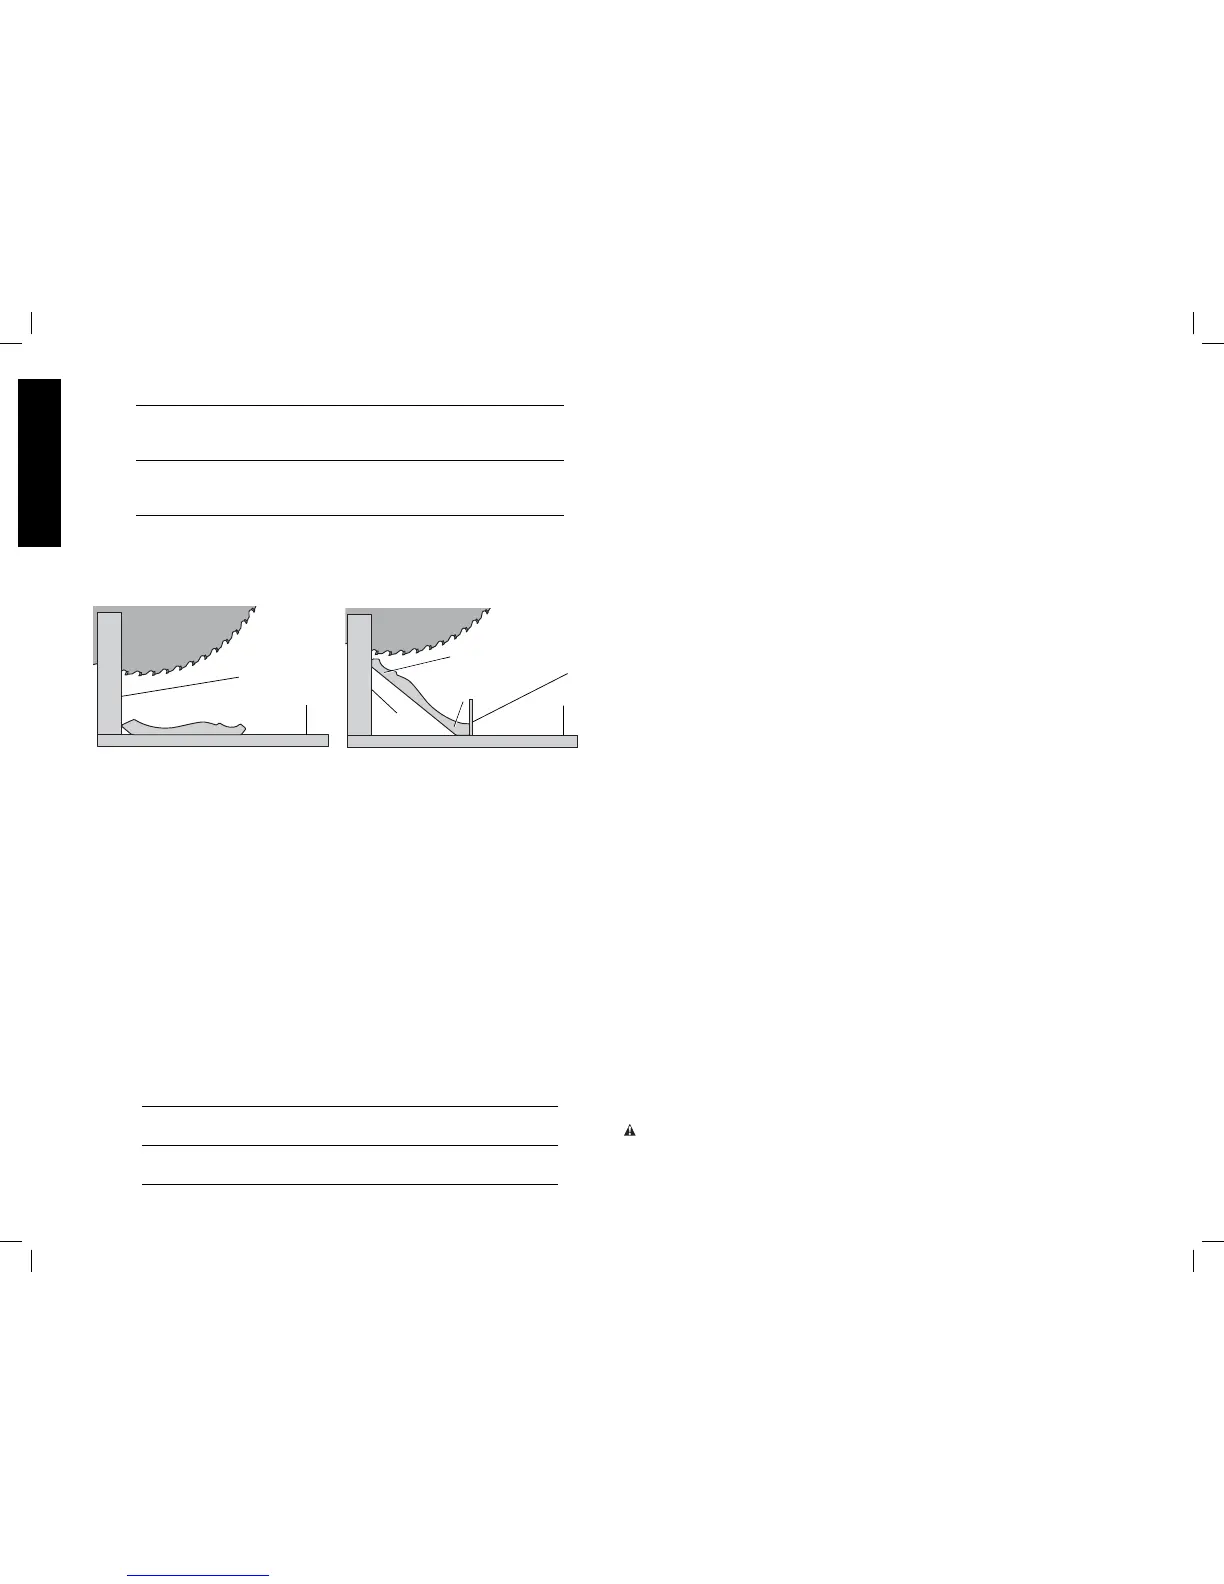
FIG. 15
FENCE
TABLE
CROWN MOLDING FLAT ON TABLE
AND AGAINST FENCE
CROWN MOLDING BETWEEN
FENCE AND TABLE
TABLE
FENCE
BOTTOM SIDE
OF MOLDING
TOP SIDE
OF MOLDING
FIG. 16
DW7084
CROWN
MOLDING
FENCE
PRETESTING WITH SCRAP MATERIAL IS EXTREMELY IMPORTANT!
ALTERNATIVE METHOD FOR CUTTING CROWN MOLDING
Place the molding on the table at an angle between the fence and the saw table, as shown
in Figure 16. Use of the crown molding fence accessory (DW7084) is highly recommended
because of its degree of accuracy and convenience (Fig. 1). The crown molding fence
accessory is available for purchase from your local dealer.
The advantage to cutting crown molding using this method is that no bevel cut is required.
Minute changes in the miter angle can be made without affecting the bevel angle. This way,
when corners other than 90º are encountered, the saw can be quickly and easily adjusted
for them. Use the crown molding fence accessory to maintain the angle at which the molding
will be on the wall.
INSTRUCTIONS FOR CUTTING CROWN MOLDING ANGLED BETWEEN THE
FENCE AND BASE OF THE SAW FOR ALL CUTS
1. Angle the molding so the bottom of the molding (part which goes against the wall when
installed) is against the fence and the top of the molding is resting on the saw table, as
shown in Figure 16.
2. The angled “flats” on the back of the molding must rest squarely on the fence and saw
table.
INSIDE CORNER OUTSIDE CORNER
Left side
Miter right at 45°
Save right side of cut
Miter left at 45°
Save right side of cut
Right side
Miter left at 45°
Save left side of cut
Miter right at 45°
Save left side of cut
Special Cuts
NEVER MAKE ANY CUT UNLESS THE MATERIAL IS SECURED ON THE TABLE AND
AGAINST THE FENCE.
ALUMINUM CUTTING (FIG. 17, 18)
ALWAYS USE THE APPROPRIATE SAW BLADE MADE ESPECIALLY FOR CUTTING
ALUMINUM. These are available at your local D
EWALT retailer or DEWALT service center.
Certain workpieces, due to their size, shape or surface finish, may require the use of a clamp
or fixture to prevent movement during the cut. Position the material so that you will be cutting
the thinnest cross section, as shown in Figure 17. Figure 18 illustrates the wrong way to cut
these extrusions.
Use a stick wax cutting lubricant when cutting aluminum. Apply the stick wax cutting lubricant
directly to the saw blade before cutting. Never apply stick wax to a moving blade. The
wax, available at most hardware stores and industrial mill supply houses, provides proper
lubrication and keeps chips from adhering to the blade.
Be sure to properly secure workpiece.
Refer to Saw Blades under Optional Accessories for correct saw blade.
BOWED MATERIAL (FIG. 19, 20)
When cutting bowed material always position it as shown in Figure 19 and never like that
shown in Figure 20. Positioning the material incorrectly will cause it to pinch the blade near
the completion of the cut.
CUTTING PLASTIC PIPE OR OTHER ROUND MATERIAL
Plastic pipe can be easily cut with your saw. It should be cut just like wood and CLAMPED
OR HELD FIRMLY TO THE FENCE TO KEEP IT FROM ROLLING. This is extremely
important when making angle cuts.
CUTTING LARGE MATERIAL (FIG. 21)
Occasionally you will encounter a piece of wood a little too large to fit beneath the lower
guard. To clear the guard over the wood, with the motor off and your right hand on the
operating handle, place your right thumb outside of the upper portion of the guard and roll
the guard up just enough to clear the wood, as shown in Figure 21. Release the guard prior
to starting the motor. The guard mechanism will function properly during the cut. Only do
this when necessary. NEVER TIE, TAPE, OR OTHERWISE HOLD THE GUARD OPEN WHEN
OPERATING THIS SAW.
SPECIAL SET-UP FOR WIDE CROSSCUTS (FIG. 22, 23)
Your saw can cut very wide (up to 13-3/8" [340 mm]) workpieces when a special set-up is
used. To set the saw up for these workpieces, follow these steps:
1. Remove both left and right sliding fences from the saw and set aside. To remove them,
unscrew the fence adjustment knobs several turns and slide each fence outward. Adjust
and lock the miter control so that it is at 0º miter.
2. Make a platform using a piece of 1.5" (38 mm) thick particleboard or similar flat strong
1.5" thick wood to the dimensions: 12" x 24" (305 x 610 mm). The platform must be flat,
otherwise the material could move during cutting and cause injury.
3. Mount the 12" x 24" (305 x 610 mm) platform to the saw using four 3" (76.2 mm) long
wood screws through the holes in the base fence (Fig. 22). Four screws must be used to
properly secure the material. When the special set-up is used, the platform will be cut into
two pieces. Ensure the screws are tightened properly, otherwise material could loosen and
cause injury. Ensure the platform is firmly flat on the table, against the fence, and centered
evenly from left to right.
WARNING: Ensure the saw is mounted firmly to a stable flat surface. Failure to do so
could cause the saw to be unstable and fall causing personal injury.
4. Place the workpiece to be cut on top of the platform mounted to the table. Ensure the
workpiece is firmly against the back of the base fence (Fig. 23).