EDGEVIS HD-IP150 HARDWARE INSTALLATION GUIDE
ISSUED: 10 NOVEMBER 2020 PAGE 6
Default LAN port IP Addresses
For ease of deployment each LAN port on the HD-IP150 device is pre-configured with a static IP address:
!
!
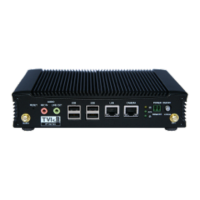
Connecting IP cameras
The HD-IP150 allows for connection of two IP cameras via either of the LAN ports located on the front of the unit. Each
camera should be connected to the device using standard Ethernet cable and it should be powered by its own power
supply. Two ports are provided to allow separate connections between the HD-IP150 and the IP Cameras and internet
connection (e.g. an ADSL or SatCom router).
Refer to Section 1 of the IP Series, HD-Q800, 4K-R800 - Setup Guide for details on configuring the Ethernet ports and
IP cameras to work together. The list of specific cameras supported on the IP Series of products can be found on the
Support site: http://tvi-support.digitalbarriers.com
Storage medium
The HD-IP150 supports either an internal solid state disk (SSD) or hard disk drive (HDD). An SSD drive is recommended
for greater reliability, particularly if using the HD-IP150 for vehicle-based applications. The disk can be removed only
when the unit is powered off.
Additionally, it is possible to use external USB disks to store recordings. For further details, refer to Section 2 of the IP
Series, HD-Q800, 4K-R800 - Setup Guide v8.0.
Updating the software on the unit
Once notified of a new software release by Digital Barriers, updates are available for download from the EdgeVis
support site (see below for link) for installation onto the device.
There are three ways to update the firmware:
• To update remotely, upload the new firmware to the Firmware tab within the EdgeVis Server web interface
and then, from the Encoder tab, select Upgrade Firmware from the Select Action menu on the desired
encoder.
• Using the Upgrade Firmware option when logged into the encoder’s local web interface.
• Copy the firmware onto a USB flash drive and insert into a USB port on the front of the unit. The flash drive
can be inserted into a running unit or before the unit is powered up. The update procedure will take
approximately ten seconds, and then the encoder will beep four times. At this point it is safe to remove the
pen and the unit will automatically reboot. If the update fails the encoder will beep continually.
To access or register for the Digital Barriers Support Site, visit tvi-support.digitalbarriers.com