5
INSTALLATION INSTRUCTIONS
This section describes how to install and set up your re. Before you start:
• Ensure that all packing items are removed (read any warning labels carefully) and retain all packing for possible
future use.
• Before connecting the appliance, check that the supply voltage is the same as that stated on the appliance.
BUILDING THE PRODUCT SURROUND/ENCLOSURE
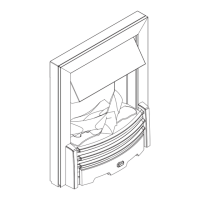
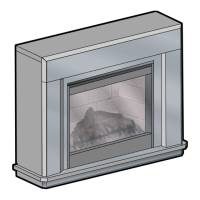
This product can be built into a wall, surround or structure. Please take note of the product dimensions (Fig.1) and build
your wall, surround or structure accordingly. Suitable clearance should be provided to allow the product to be installed
easily.
You are required to leave a minimum of 400mm from the base of the fuel bed to any shelf/enclosure above the product
(Fig 2). This will allow enough space above the product to allow the ame eect to form fully and not to be obstructed.
When determining a location for the product, ensure that the unit will not be susceptible to drafts, vents, ceiling fans and
other air currents. Similar to a candle, large movements of air will aect the unit’s ability to create and maintain the ame
eect. If the desired location is susceptible to signicant air movement, i.e. air vents, the dierent installation options
illustrated in (Fig 2) can be used.
VENTILATION
This product needs free ventilation from underneath to operate correctly (Fig 3). There are slots on the underside and
side walls of the product and along the drawer front to allow this free air through the product (Fig 2). The free ventilation
helps keep the electronic components cool and allows the mist to rise and leave the product. Please take note of the
requirement for ventilation around the product and ensure that vents are not blocked. If tting into a surround/enclosure
ensure that there is a ventillation gap to allow a clear path for the air to get into the product.
ELECTRICAL CONNECTION
Plug the re into a 16amp 230/240 Volt outlet located within 1m of the product. Be sure to have access to the plug after
installation to allow for disconnection. Ensure that the supply cable exits at the back of the re to suit your supply socket
location and is not trapped under the re such that it might cause it to be damaged.
INSTALLING THE PRODUCT INTO SURROUND/ENCLOSURE
Once your enclosure has been built to the required dimensions and the electrical connection has been installed, follow
the steps below to install your product.
1. Sit the product on the constructed base, ensuring the cable is accessible and not caught under the product.
2. Ensure the product is at the correct height to suit the installation and ensure it is adequately level.
3. Once the product is at the correct height and is level, centre the product within the opening.
4. With the product in its nal position, unscrew the fuel bed and carefully lift o to remove (Fig 4). The fuelbed should
be lifted by holding the metal tray the logs are xed on, not by lifting the top logs as this could damage them.
5. Using xing screw pack provided, screw x the product into position through the xing holes in the base to ensure
it can’t tip over when the drawer is opened (Fig 5).
6. Carefully place the fuelbed back in position, lifting by the metal tray and screw x to secure.
MANUAL CONTROLS (TETHERED RECEIVER UNIT)
The product is tted with manual controls on a tethered receiver unit, which must be connected to operate the product.
This also acts as the receiver unit for the remote control operation. The manual controls are located under the log on
the right hand corner of the fuelbed (Fig 6). Particular care should be given after installation to ensure the receiver jack
is fully connected to ensure the product functions correctly (Fig 7).
COMMISSIONING/INITIAL PRODUCT START-UP
FILLING THE WATER TANK
Before powering on the product for the rst time, ensure that a full water tank has been placed on the product. Open the
drawer and remove the water tank from its location on top of the sump (Fig 8) and open it by unscrewing the orange cap
(Fig 9). The tank should be lled with clean (decalcied) water only - Refer to WATER QUALITY & CLEANING for more
details. When the tank is replaced on top of the sump, it will take about one minute for the tank to empty into the sump.
Allow the sump to ll fully before switching on the product. Once lling is complete, the tank can be relled and replaced
on top of the sump. This will allow for the maximum capacity of water to be stored in the product.
 Loading...