©
2020
大疆创新 版权所有
7
DJI ENTERPRISE X-PORT User Manual
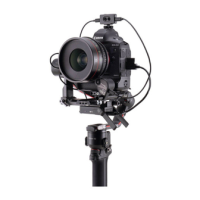
3. Rotate the payload around the Pitch axis centerline and ensure that the payload can remain
stationary at all positions.
4. Use an L-shaped hexagonal screwdriver to loosen the 4 screws on the Roll arm (no need to remove
the screws), hold the yaw arm with one hand, and adjust the position of the roll arm to ensure that
the roll arm can keep balance while rotating, then re-tighten the 4 screws.
5. Use an L-shaped hexagonal screwdriver to loosen the 4 screws on the yaw arm (no need to remove
the screws), hold the yaw base with one hand, and adjust the position of the yaw arm to ensure
that the gimbal can remain stationary (not rotate around the yaw base) at any position when the yaw
base centerline is not perpendicular to the ground, then re-tighten the 4 screws.
6. Trim the yaw waterproof sticker to t the gimbal, make sure there is about a 1 mm slot between
the sticker and the gimbal, then remove the release paper to attach the waterproof sticker into the
groove of the yaw arm.
7. Trim the roll waterproof sticker to fit the gimbal, and remove the release paper to attach the
waterproof sticker into the groove of the roll arm.
For the same payload, once adjustment is nished, you can record the adjustment position
on the corresponding ruler on the yaw / roll arm. This reading can be referenced for each
adjustment to save time in nding the center of mass position.
 Loading...