Do you have a question about the Dometic Go Power! GP-RVC-R and is the answer not in the manual?
Explains warning formats, hazard categories, and common safety symbols used in the manual.
Details essential safety measures for electrical connections, battery handling, wiring, and personal protective equipment.
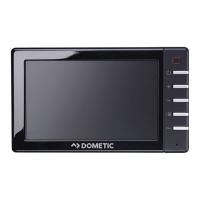
Identifies and labels the components visible on the front of the remote display unit.
Identifies and labels the components visible on the side of the remote display unit.
Describes the initial screens displayed when the controller/remote display is powered on.
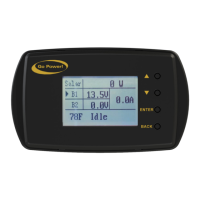
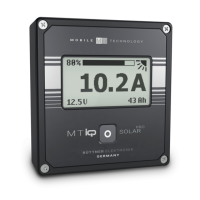
Details the information presented on the primary display screen, including PV voltage, current, and battery status.
Explains how to access and navigate through various status screens using the device buttons.
Provides detailed information on specific device status screens, identified by menu numbers.
Outlines the procedure for accessing and navigating the system settings interface.
Covers a comprehensive range of system settings and parameters available for configuration.
Lists and describes all status parameters and basic settings available on the controller.
Details advanced configuration parameters including battery types, voltages, and timing settings.
Explains commands like Force CHG and options to reset settings or clear historical data.
Explains the different normal charging states (Idle, Bulk, Absorb, Float, Equalize) indicated by the controller.
Describes common fault states and error codes, such as reverse polarity and voltage warnings.
Details how to manually force the controller into bulk or float charging stages for specific battery banks.
Explains how to reset configurable parameters to factory defaults or clear historical data.
Lists the necessary tools and materials required for mounting the remote display.
Provides a step-by-step guide for securely mounting the remote display unit to a wall.
Guides users through the process of pairing the remote display with a mobile device via Bluetooth.
Illustrates how the solar controller's status is displayed within the Go Power! Connect mobile application.
Explains the visual indicators and corresponding battery voltage ranges for State of Charge (SOC).
Outlines the five-year warranty period and lists conditions that void the warranty.
Provides instructions for troubleshooting, contacting support, and returning defective products.
Provides a template with dimensions for accurately locating mounting holes for the remote display.
The Go Power! RV-C Remote Display (GP-RVC-R) is a user-friendly interface designed to monitor and control compatible Go Power! solar controllers, specifically the GP-RVC-30-MPPT and GP-RVC-10-MPPT models. This remote display provides real-time status information and allows users to adjust various settings, enhancing the management of their RV's solar charging system.
The primary function of the GP-RVC-R is to act as a remote interface for Go Power! solar controllers. It displays critical operational data, including solar voltage and current, battery voltage and current for up to two battery banks (BAT1 and BAT2, depending on the controller model), internal solar controller temperature, charge state, and fault information. For dual-bank controllers like the GP-RVC-MPPT-30, the display can show separate parameters for each battery bank. The remote also indicates the Bluetooth connection status, allowing users to confirm connectivity with the Go Power! Connect mobile application.
Beyond monitoring, the GP-RVC-R enables users to access and modify a range of settings on the connected solar controller. These settings cover various aspects of battery charging and system operation, such as battery type, capacity, voltage limits for over-voltage protection (OVP), under-voltage warning (Warn V), and discharge limits (ODV). It also allows for the configuration of equalization voltage (Eq V), bulk-absorption voltage (Bulk V), float voltage (Float V), recharge voltage (Chg Rtn), and equalization duration (Equ Time) and interval (Equ Int). Temperature compensation factors (T Comp) can also be adjusted.
The remote display also provides command functions, including "Force CHG," which allows users to manually initiate bulk or float charge stages for specific battery banks. This is particularly useful for managing charging priorities in dual-bank setups or for specific maintenance needs. Additionally, users can reset all configurable parameters to factory defaults and clear historical data directly from the remote display.
The GP-RVC-R features a clear LCD screen that presents information in an organized manner. Navigation through the various screens and menus is intuitive, utilizing a set of physical buttons: "Up," "Down," "Enter," and "Back."
Upon startup, the display shows a splash screen indicating connection establishment, followed by the "Go Power!" logo. The main screen provides an immediate overview of the system's current status. From the main screen, a short press of the "Enter" button grants access to detailed status screens, which provide more in-depth information on parameters like total watt-hours (Total WH), total amp-hours (Total AH), and amp-hours for today and previous days (Ah Today, Ah 1Day ago, Ah 2Days ago, Ah 3Days ago). Device information, including hardware version (HW Ver), name (Name), serial number (SN Num), and type (Type), is also accessible.
For adjusting settings, a long press of the "Enter" button leads to the system setting interface. Within these setting screens, users can navigate through parameters using the "Up" and "Down" buttons. A small black triangle indicates the currently selected item. To edit a setting, the user presses "Enter," which causes the parameter's value to flash, indicating it's ready for modification. The "Up" and "Down" buttons are then used to change the value. Pressing "Enter" again locks in the new setting, while the "Back" button cancels the change.
The remote display also integrates Bluetooth wireless technology, allowing for live status monitoring and settings configuration via the Go Power! Connect mobile application, available for both Android and iOS devices. This feature provides an alternative and often more convenient way to interact with the solar charging system, especially when the physical remote is not easily accessible. Pairing the mobile device with the controller is a straightforward process initiated through the app, requiring the Bluetooth symbol to be visible on the remote's status bar. The app displays similar information to the remote, including battery state of charge (SOC) indication through visual battery icons that correspond to different voltage ranges.
The GP-RVC-R itself requires minimal maintenance. Its robust design is intended for interior wall mounting, ensuring it is protected from environmental elements. The installation process is simple, involving drilling a hole for the cable, feeding the cable through, connecting it to the remote, attaching the remote to the wall with provided screws, and snapping on a cover plate to conceal the screws.
For the solar controller it manages, the remote display offers crucial maintenance-related functionalities. The ability to view charge states (IDLE, CHARGING:BULK, CHARGING:ABSORB, CHARGING:FLOAT, CHARGING:EQUALIZING) helps users understand the battery's charging progress and health. Fault indicators (PV:REVERSE, PV:OVP, BAT:REVERSE, BAT:WAR, BAT:UVP, BAT:OVP, BAT:NC) provide immediate alerts to potential issues, allowing for timely troubleshooting and intervention. For instance, a "BAT:UVP" error indicates the battery voltage is below the discharge limit, prompting the user to address the low battery condition.
The "Force CHG" command can be used for specific battery maintenance routines, such as ensuring a full bulk charge or maintaining a float charge. The "Reset to Defaults" command is a valuable tool for troubleshooting or reconfiguring the system from a known baseline, especially after making multiple adjustments or if unexpected behavior occurs. Clearing historical data allows for a fresh start in tracking system performance metrics.
The Bluetooth connectivity and the Go Power! Connect app further enhance maintenance by providing remote access to status and settings. This allows users to monitor their system and make adjustments without needing to be physically present at the remote display, which can be particularly useful for RV owners. The app's SOC indication, presented with clear battery icons and corresponding voltage ranges, offers a quick visual assessment of battery health.
Overall, the GP-RVC-R is designed to be a comprehensive and user-friendly tool for managing and maintaining RV solar charging systems, providing both detailed information and control capabilities.
| Category | Monitor |
|---|---|
| Model | GP-RVC-R |
| Manufacturer | Dometic |
| Input Voltage | 12 VDC |
| Output Voltage | 12 VDC |
| Display | LCD |
| Current Consumption | 0.1A |
| Operating Temperature | -20°C to +60°C |
| Dimensions | 1.2 inches |