76
Press SOUND / OUTPUT DIRECTION key and hold it for 1s to switch off/on beep
signal.
Warning: beep signal for returning suspicious banknote in «Back» output mode
can't be switched off.
Shortly push SOUND / OUTPUT DIRECTION key to change banknote output
direction. In «Forward» mode the notes will be returned through output slot (if the
removable tray is not installed) or through slot 12 Fig. 1 (if the removable tray is
installed) In «Back» output mode the banknotes will be returned to input tray.
Note: For higher detection speed do not install
the removable tray in «Forward» mode.
SETTINGS
AUTOMATIC DETECTOR DORS 200 AUTOMATIC DETECTOR DORS 200
CONTENTS
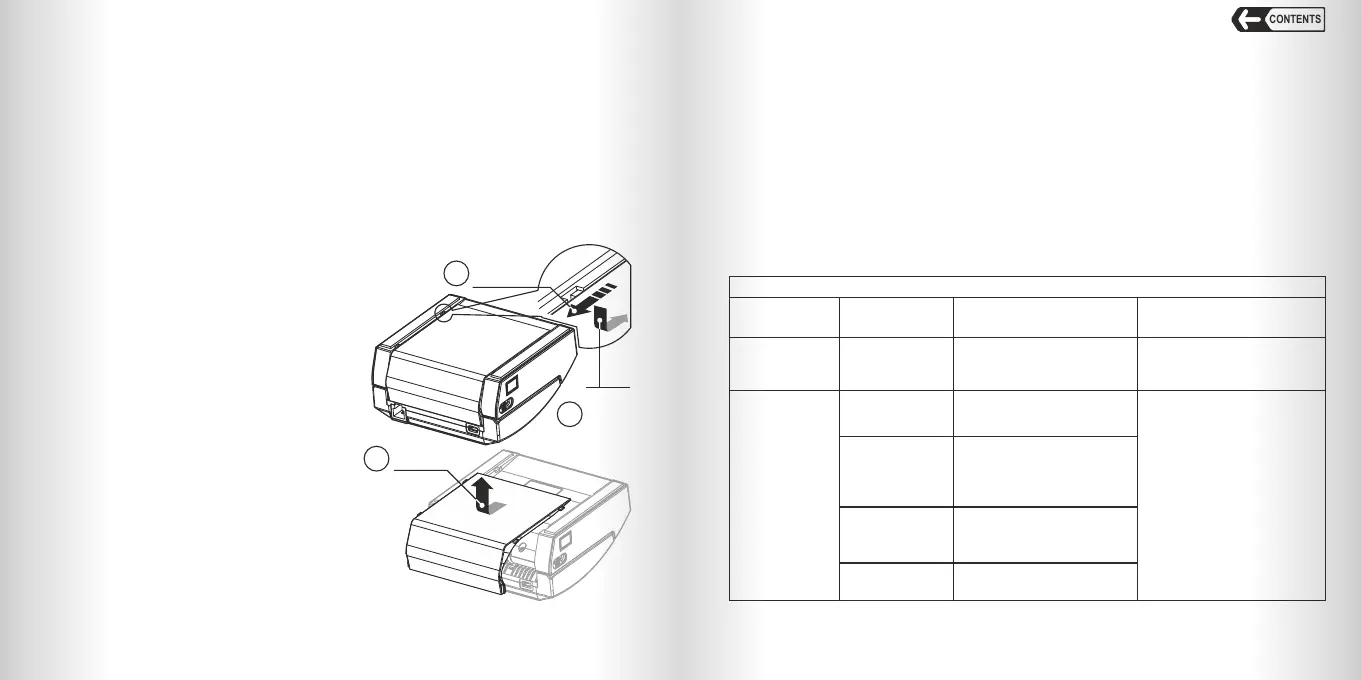
Fig. 4
Bottom
view
1
Move
the tray
The removable tray is used to install the
detector in a confined space next to vertical
surfaces. The detector is shipped with a tray
installed. If necessary, the user can remove
or install the output tray:
To remove the tray:
1. Switch off the detector;
2. Disconnect the detector from mains;
3. Turn the detector upside down and
remove the tray, see Fig. 4 (1 and 2).
3
Slide
the tray
latches
into the
slots and push
the tray until
it stops
TRAY INSTALLATION / REMOVAL
2
Remove
the tray
To install the tray:
1. Switch off the detector;
2. Disconnect the detector from mains;
3. Turn the detector upside down, insert
the tray latches into the slots and push t
he tray until it stops, see Fig. 4 (3).
To switch the detector off after operation press and hold ON/OFF key for more than
1 second. At the next switching on the same settings will be applied as were at
switching off.
SWITCHING THE DETECTOR OFF
Error Messages
In case of an error the detector stops automatically, beeps (if sound signals are
switched on) and a corresponding message appears on the display. See the «Error
Messages» table to find a reason of the error cause and its elimination procedure. If
the error code is not displayed or can't be found in this table then refer to the
«Troubleshooting» table.
SERVICE MAINTENANCE
Table «Error Messages»
Messages that appear during self-testing of the detector
Indicator
status
Message
Error description
and possible reason
Troubleshooting
Red and blue indicators
flash simultaneously
«Err Code»; Code
parameter can have
different values
depending on the error.
Software error of detector initialization.
Switch off and then switch on the
detector. If the error remains, contact
your vendor.
3. «ACC dISCH» and «ACC XX» - the detector is running from the battery, XX is for
charge level (0 …100).
4. «ACC LO» - the battery is discharged; banknote detection is unavailable. Connect
the detector to power adapter and turn on the device to charge the battery.
Red and green
indicators flash
simultaneously.
«Err 1»
Drive error. The rollers are blocked.
Motor or motor driver malfunction.
Sync sensor failure.
Switch the detector off. Open its top
cover. Wipe the light guide, scanner
and input tray sensor with a dry lint-
free cloth, remove the foreign objects
from the path. Close the cover tightly.
Switch the detector on. If the error
message appears again please
contact your vendor.
«Err 2», «Err 3»,
«Err 5»
Scanner window is dirty.
Light guide is dirty. One of backlight
LEDs is out of order. Scanner area is
under direct sunlight. Detector top cover
is not closed.
«Err 4»
Input tray sensor error. Sensor window
is dirty. The sensor receiver is blocked
by direct sunlight. Sensor LED is out of
order.
«Err 6»
Magnet sensor error. Scanner surface is
dirty. Magnet sensor is out of order.
 Loading...