EasyManua.ls Logo

Dreamline ASCEND - User Manual

Default Icon
32 pages
Print Icon
To Next Page IconTo Next Page
Loading...
© DreamLine
®
All Rights Reserved
© DreamLine
®
All Rights Reserved
PLEASE REVIEW THIS ENTIRE MANUAL PRIOR TO INSTALLATION
1-866-731-2244
ASCEND
SHOWER INSTALLATION INSTRUCTIONS
Do Not Return Product to the Store. Contact DreamLine® with any questions
IMPORTANT!
DreamLine
®
reserves the right to alter, modify or redesign products at any time without prior notice for the
purpose of product improvement and customer experience. Please refer to the model’s web page on
DreamLine.com for the latest technical drawings, installation manuals, warranty information or additional
product details.
ASCEND Shower Door Manual Ver 1 022021
©2021 DreamLine
®
All Rights Reserved
MODEL #
ACADWWW720XXX01
Available in:
01 - Chrome
04 - Brushed Nickel
06 - Oil Rubbed Bronze
09 - Satin Black
Left-hand installation shown as example
Question and Answer IconNeed help?

Do you have a question about the Dreamline ASCEND and is the answer not in the manual?

Overview

The provided manual describes the DreamLine® ASCEND Shower Door, a frameless shower door designed for modern bathrooms. The primary function of this device is to provide a secure and aesthetically pleasing enclosure for a shower space, allowing for both left-hand and right-hand installations.

Function Description:

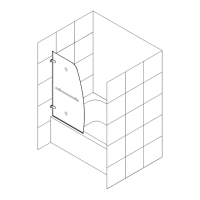
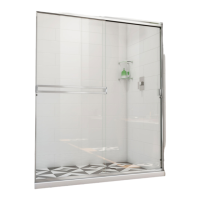
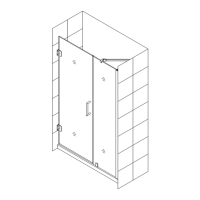
The DreamLine® ASCEND Shower Door is a single-panel, pivot-style shower door that swings open and closed. It is designed to be installed on a finished threshold and against finished walls, creating a watertight seal for the shower area. The door features a ClearMax™ Glass technology coating, which is a specially formulated treatment that prevents the buildup of soap and water spots, simplifying maintenance. The pivot hinges allow for flexible installation on either side of the shower opening, and the door glass can be flipped to accommodate the desired swing direction. The design incorporates wall profiles and glass profiles to ensure stability and adjustability for out-of-plumb conditions.

Important Technical Specifications:

  • Model Number: ACADWWW720XXX01 (and various other SKUs listed in the manual, such as SDAD27D720VXXXX, SDAD32W720VXXXX, SDAD40W720VXXXX, etc., indicating different sizes and configurations).
  • Available Finishes: Chrome (01), Brushed Nickel (04), Oil Rubbed Bronze (06), Satin Black (09). The bold digit in the SKU indicates the finish (e.g., 1 for Chrome, 4 for Brushed Nickel, 6 for Oil Rubbed Bronze, 9 for Satin Black).
  • Glass Thickness: 3/8" (10mm) tempered glass for Door Glass (Item #05).
  • Glass Technology: ClearMax™ Glass coating, applied to the inside surface of the shower door glass. Some models may have coating on both surfaces.
  • Out-of-Plumb Adjustment:
    • Pivot Side: 1/2" adjustment on the hinge side.
    • Strike Side: 1/4" maximum adjustment on the strike side.
  • Threshold Requirement: A minimum flat threshold and wall surface of 2-3/8" is required for installation. The threshold must be level.
  • Door Glass Dimensions (examples from Factory Parts Information):
    • 71" (1811mm) X 34" (857mm) X 3/8" (10mm)
    • 71" (1811mm) X 29" (731mm) X 3/8" (10mm)
    • 71" (1811mm) X 28" (705mm) X 3/8" (10mm)
    • 71" (1811mm) X 26" (654mm) X 3/8" (10mm)
    • 71" (1811mm) X 31" (807mm) X 3/8" (10mm)
  • Hardware Components: Includes Wall Profile, Wall Bracket, ST4.0 x 40mm Screws, Wall Anchors, Pivots, Glass Profile, Glass Bracket, M6 x 16mm Screws, Vertical Vinyl Seal, M5 x 10mm Screws, Lock Washers, ST4.0 x 10mm Screws, Decorative Caps with Washers, Handle, Strike Side Wall Profile, Strike Side Glass Profile, Strike Vinyl, and Bottom Sweep.

Usage Features:

  • Reversible Installation: The shower door is designed to be reversible, allowing the pivot hinges to be installed on either the left or right side of the shower opening. The door glass can also be flipped to accommodate the desired swing direction.
  • ClearMax™ Glass: This proprietary coating on the glass surface helps repel water and soap scum, making the glass easier to clean and maintain its clarity. For best results, it is recommended to squeegee the glass after each use and dry with a soft cloth. The ClearMax™ label on the glass indicates the side that should face the inside of the shower.
  • Adjustability: The design allows for out-of-plumb adjustments on both the pivot and strike sides, accommodating minor irregularities in wall and threshold surfaces. This flexibility is crucial for achieving a proper seal and smooth door operation.
  • Handle: A handle is provided for easy opening and closing of the door. It is installed after the main glass panel is in place and adjusted.
  • Sealing Components: Vertical vinyl seals, strike vinyl, and a bottom sweep are included to minimize water leakage from the shower enclosure.

Maintenance Features:

  • ClearMax™ Glass Care: To maintain the effectiveness of the ClearMax™ coating and the clarity of the glass, it is recommended to squeegee the glass after each use and dry it with a soft cloth. Avoid abrasive cleaners or cleaning products containing scouring agents, bristle brushes, or abrasive sponges, as these can scratch the glass.
  • Hardware Care: All metal parts should be wiped with a soft cloth after each use to ensure a long-lasting finish. Abrasive cleaners, ammonia, bleach, or acid should not be used on hardware. For stainless steel surfaces, clean at least once a week, working with the grain.
  • Bases and Backwalls Care: For acrylic back walls, wipe them with a soft cloth after each use. Use non-abrasive sprays or cream-based cleaners. Avoid aerosol spray cleaners, abrasive cleansers, metal brushes, or scrapers.
  • Regular Inspection: It is crucial to regularly inspect the glass and other hardware for misalignment, proper attachment, and any damage. This includes checking the stability of the unit, tightness of screws/bolts, integrity of vinyl seals, and condition of exposed/concealed glass edges. Any damaged glass must be replaced immediately.
  • Silicone Caulk Maintenance: Inspect the silicone caulk for gaps periodically and replace it as necessary to prevent water leakage. Allow 24 hours for the sealant to cure before initial use.

Safety Warnings:

The manual emphasizes several critical safety warnings:

  • Professional Installation Recommended: Due to the nature of tempered glass and the precision required, professional installation is highly recommended.
  • Tempered Glass Handling: Tempered glass can shatter if improperly installed or mishandled. Corners and edges are particularly susceptible to damage. Never lean against the installed glass, and do not attempt to lift or move heavy glass alone; always use an assistant and a professional-grade glass suction cup.
  • No Damaged Glass: Do not install or operate the shower door if the glass has chipped corners, slivered edges, or is otherwise damaged.
  • Proper Hardware Installation: Ensure all hardware is installed correctly with proper gaskets to avoid placing stress on the glass edges, which can lead to breakage.
  • No Cutting Tempered Glass: Tempered glass cannot be cut after it has been tempered.
  • Safety Equipment: Always wear safety goggles, work gloves, and appropriate footwear during installation.
  • Leakage Risk: Follow all instructions for silicone sealant application and allow 24 hours for curing before use.

The DreamLine® ASCEND Shower Door is designed for durability and ease of use, with a strong emphasis on proper installation and maintenance to ensure safety and longevity.

Dreamline ASCEND Specifications

General IconGeneral
BrandDreamline
ModelASCEND
CategoryBathroom Fixtures
LanguageEnglish

Related product manuals