44
DREMEL LC40 CONTROL SOFTWARE
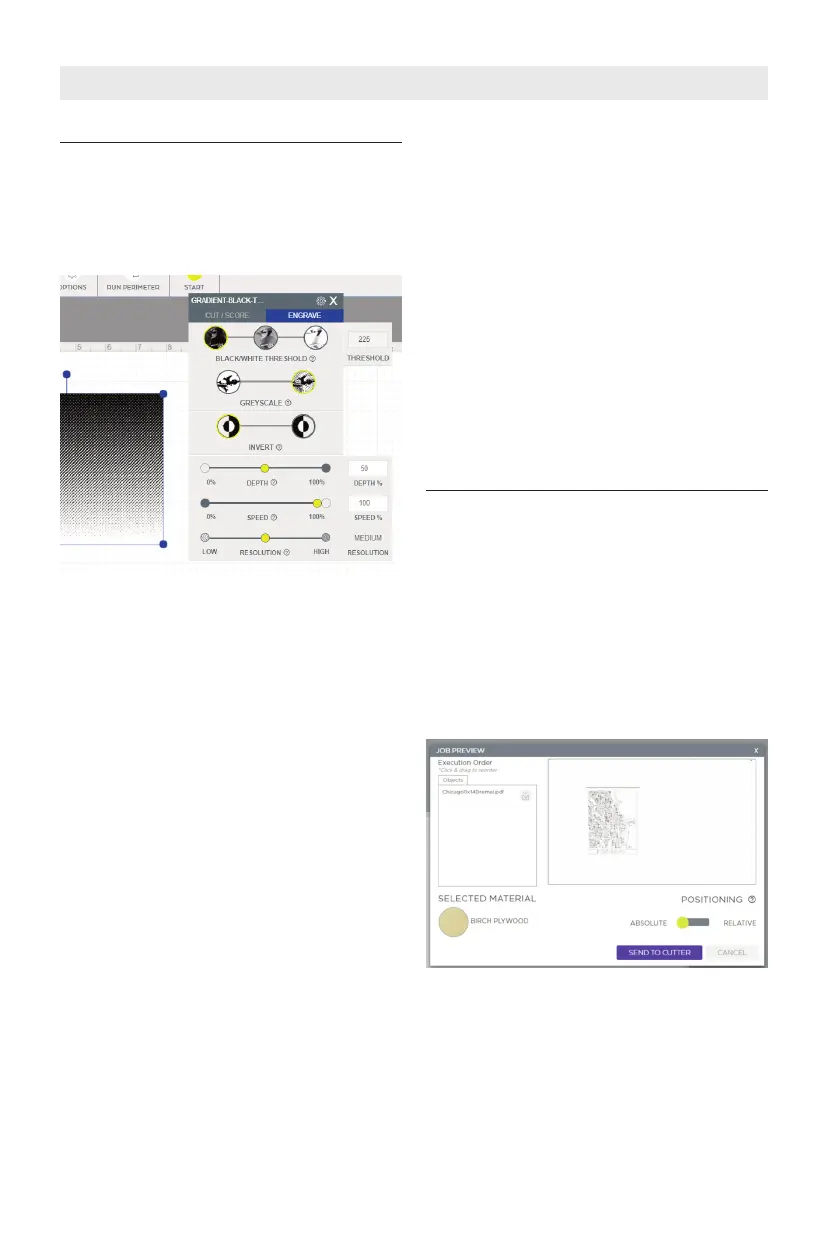
ENGRAVE
This function dar kens or removes the
surface of the work piece, rather than
cutting through it. This function is also
known as “raster” and will require an image
file to execute. The laser head will move
side to side like an inkjet printer.
Print Settings box (Engrave)
BLACK/WHITE THRESHOLD – Use this to
adjust the amount of black that is included
in the image. The furthest left setting will
include a larger amount of black from the
file, while the furthest right setting will
include less black, or a larger amount of
white.
GREYSCALE – Takes a black and white
image and assigns different densities of
dots to visually create a number of different
shades of grey. Darker areas of the image
will have more dots, while lighter areas will
have less dots. This is useful for images that
have a lot of different colors, and it is
desired that the finished product appear
more realistic. This setting can be toggled
on or off.
INVERT – This setting will transform the
image so that the white areas become
black, and the black areas become white.
DEPTH – Adjust to control how deep the
laser will go into the work piece. Turning up
the depth will remove more material, so
that a noticeable void is felt when touching
the work piece, creating almost a 3D effect.
Turning down the depth will keep the
surface of the work piece relatively flat or
even.
SPEED – Adjust how quickly the laser head
moves. Slowing the laser head down will
generally make the engraving darker or
deeper, while turning the speed up typically
results in a lighter finish.
RESOLUTION – 3 different resolution
options are available: low, medium, high.
This setting adjusts the DPI (dots per inch)
in the image, the low setting will be faster
and lighter than the high setting. In low
setting the resolution is pixelated, or
individual dots are easy to see. The high
setting will result in a less pixelated final
result.
JOB PREVIEW
After pressing “start” the PREVIEW screen
allows review of all the settings and
placement of the files before sending the
job to the laser. Changes can be made to
the order the files execute. By default,
engraving is completed first then cutting. If
other settings need to be adjusted, exit out
of this box before sending the job. If
everything looks correct, the job can be
sent to the laser. The physical start button
on the laser must be pressed twice before
the job will begin.
Job Preview Screen