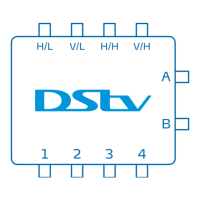
Connecting the DStv Switch (5-1) to one DStv Explora
Once the switch has been connected to the satellite dish, use the
supplied cable and connect output A or B on the switch to the input
labelled UNICABLE™ IN on the back of your DStv Explora.
1 2 3 4
DStv Explora
H/L V/L H/H V/H
A
B
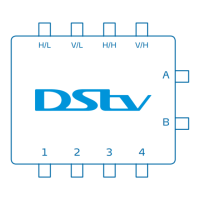
Connecting the Switch to your Decoder(s)
The DStv Switch (5-1) has two Explora outputs (labelled A and B) and four
normal multiswitch outputs (labelled 1 to 4).
• The Explora outputs can only be connected to a DStv Explora, they aren’t
designed to connect to other decoder models. (Note: The DStv Switch (5-1)
can only be connected to one DStv Explora at any one time.)
• The four normal multiswitch outputs can be connected to up to four single
view decoders, one 4 Tuner HD PVR, or a mix of DStv decoders (other
than the DStv Explora). Again, remember that the DStv Explora cannot be
connected to these particular outputs.
DStv Switch - User Guide
6
These diagrams exclude the connections between decoders that are required for XtraView. For
information on XtraView installations, including connections and settings, please contact a DStv
Accredited Installer or go to www.dstv.com