Technical information
Cartridge and
stylus
Please refer to the "Information on your
unit's
cartridge", en-
closed with these instructions for use.
Fitting a 1/2" cartridge (see page 3)
With
extremely light
ULM cartridges
(ultra-low-mass),
your
Dual
record player develops outstanding reproduction capabili-
ties.
In
this
case,
the
characteristicsof
the
tonearm
are so
excel-
lent
that considerably heavier 1/2" cartridges
also
function
under optimum conditions. Proceed as follows if you wish to
fit a 1/2" cartridge.
1) If
there is one on your
unit,
remove the removal prevention
screw
(Fig.
5/"S").
2) Swivel the tonearm lift (13)
backwardsand
remove
the
ULM
cartridge from the holder (Fig. 6).
3)
Slide
the short holder
plate
(Fig. 7)
approximately
5 mm
backwards and lift it off.
4) Place the
long
holder plate onto the tonearm (Fig. 8) in
such a way, that it lies on the surface and the back and is
pointing upwards at the front at an
angleof
approximately
30°.
Shift the holder plate so that its
large
opening lies
above the round guide
lug
in the tonearm. Now carefully
swivel the holder plate into horizontal position and tightly
pull
it forwards
until
you can
feel
it clicking into position.
5) Attach the 1/2" cartridge with the enclosed accessories to
the cartridge holder. This has been fitted correctly if the
stylus
—
viewed from above
—
is in the V-shaped recess of
the enclosed fitting template. Viewed from the side, the
stylus must be in the rectangular recess (Fig. 9).
6) Connect the cartridge holder's connection to the cartridge.
The connections have
color
codes:
red R right hand channel
green RG right hand channel chassis
blue GL left
hand channel chassis
white L left hand channel
7) Place the cartridge holder at an
angle
from below onto the
tonearm
head,
press it
fully
backwards and upwards until
you can feel it clicking into position. Now carefully swivel
the tonearm lift forwards and, if you
wish,
lock the cartridge
and the stylus to prevent removal by screwing the described
screw.
8) Depending on
requirements,
screw on one or both of the
enclosed disk-shaped additional weights to the rear of the
tonearm counterbalance (1).
Tum
the smaller thread of the
special screw into the thread of the counterbalance. Screw
one additional weight onto the screw -with the knurled
marking
on the outside
—
if the weight of the fitted cartridge
is no
more
than approximately 6.5 g and a second one if it
is heavier.
9) Now once again
carefullybalance
the tonearm
— as
described
in the section on "Balancing the tonearm".
Fitting cartridges with recess-type cartridge
assembly
Cartridges with a Dual recess-type cartridge assembly can be
fitted
in the same way as
112"
cartridges. The cartridge holder
(Fig.
10) is designed to
permit
fitting of such
cartridgeswithout
an additional
attachment
screw.
Removal prevention
Thanks to an ingenious device, the cartridge and stylus can be
easily safeguarded against unwanted removal. For this purpose,
the
self-tapping
screw provided with the accessories is screwed
into the
hole
on the left hand side of shining pin on the
holder plate (Fig. 5). At the same
time,
make sure that the
tone-arm
lift (13) is vertical to the cartridge head center.
Stylus
The stylus is subjected to natural wear and tear during normal
playing.
Therefore, we
recommend
you occasionally check the
stylus and, in the case of
diamond
styli,
this should be carried
out after approximately 300 playing hours. Your specialist
dealer
will
be pleased to do this for you free of charge. Worn
or
damaged
(splintered) styli chisel the modulation from the
grooves and destroy
records.
Therefore,
only use as replacement
the stylus types
recommended
in the technical data of the
cartridge. Copied styli result in audible quality losses and in-
creased wear and tear of records. Please
remember
that, for
physical reasons, the stylus holder with the diamond stylus is
extremely fine and must therefore be necessarily sensitive to
impacts,
shocks or uncontrolled
movement.
In
order to have
the stylus checked, take the
complete
cartridge holder (remo-
val from the tonearm
is
described above) to your specialist dealer.
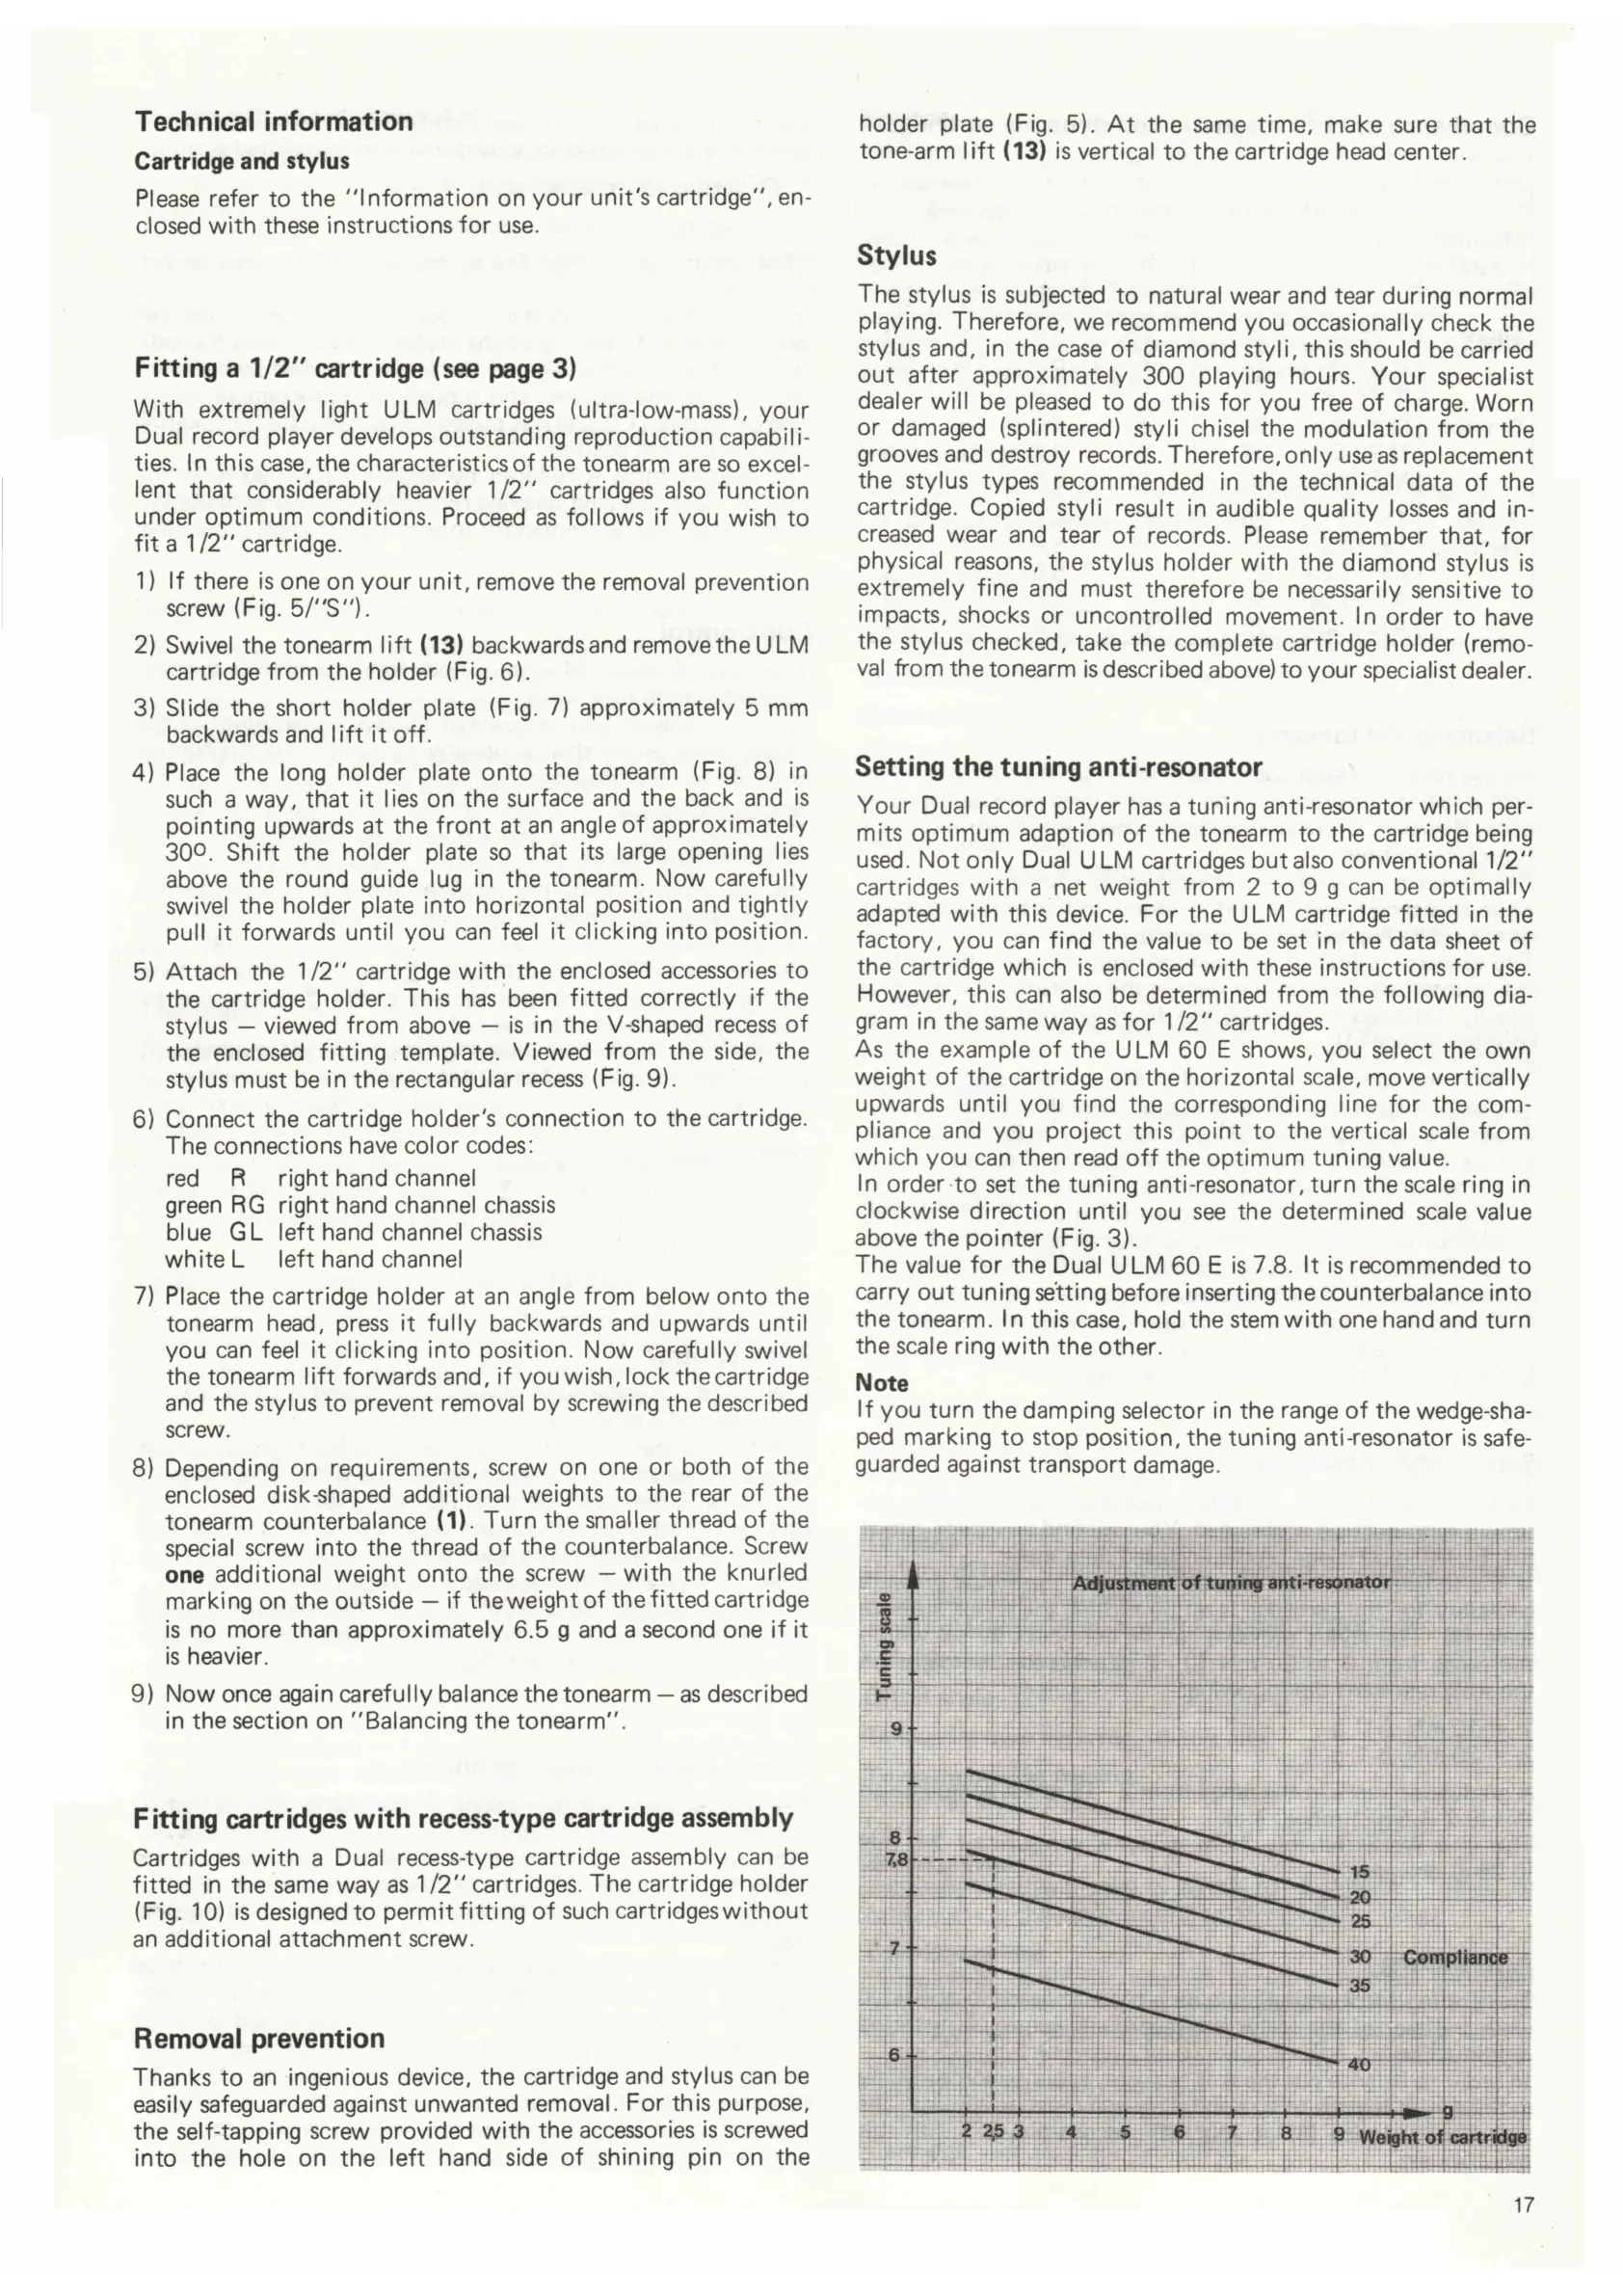
Setting the tuning anti-resonator
Your Dual record player has a tuning anti-resonator which per-
mits
optimum adaption of the tonearm to the cartridge being
used.
Not only Dual
U
LM cartridges but also conventional 1/2"
cartridges with a net weight from 2 to 9 g can be
optimally
adapted with this device. For the ULM cartridge fitted in the
factory, you can find the
value
to be set in the data sheet of
the cartridge which is enclosed with these instructions for use.
However, this can also be
determined
from the following dia-
gram in the same way as for
112"
cartridges.
As the example of the ULM 60 E shows, you select the own
weight of the cartridge on the horizontal
scale,
move
vertically
upwards until you find the corresponding
line
for the
com-
pliance and you project this point to the vertical scale from
which you can then read off the optimum tuning value.
In
order to set the tuning anti-resonator,
turn
the scale ring in
clockwise direction until you see the determined scale value
above the pointer (Fig. 3).
The value for the Dual
ULM
60 E is 7.8. It is recommended to
carry out tuning
setting beforeinserting
the counterbalance into
the tonearm.
In
this case,
hold
the
stemwith one hand
and turn
the scale ring with the other.
Note
If
you turn the
damping
selector in the range of the wedge-sha-
ped marking to stop position, the tuning anti-resonator is safe-
guarded against transport
damage.
Adjustment
of
tuning anti-resonator
%
2,5 3
30
Comptiance
35
9
Weight of cartridge
17
 Loading...