10 11
USING YOUR DCT2i
Toasting
Plug in and switch on your DCT2i at the wall.
Choose your function by turning the Function Control Dial to the desired setting.
Toast: Top and bottom elements are on. Both sides of the bread will be toasted.
Bagel: Only bottom element is on. Place bagels cut side down on the conveyor.
Standby: Do not use for toasting. See page 12 for details.
Using the table below as a guide, adjust the Toast Settings Dial based on how you like your bread;
clockwise for darker and anti-clockwise for lighter.
*Toaster will be too hot so will burn the bread. Risk of re. **Bread will not toast properly and will be soggy.
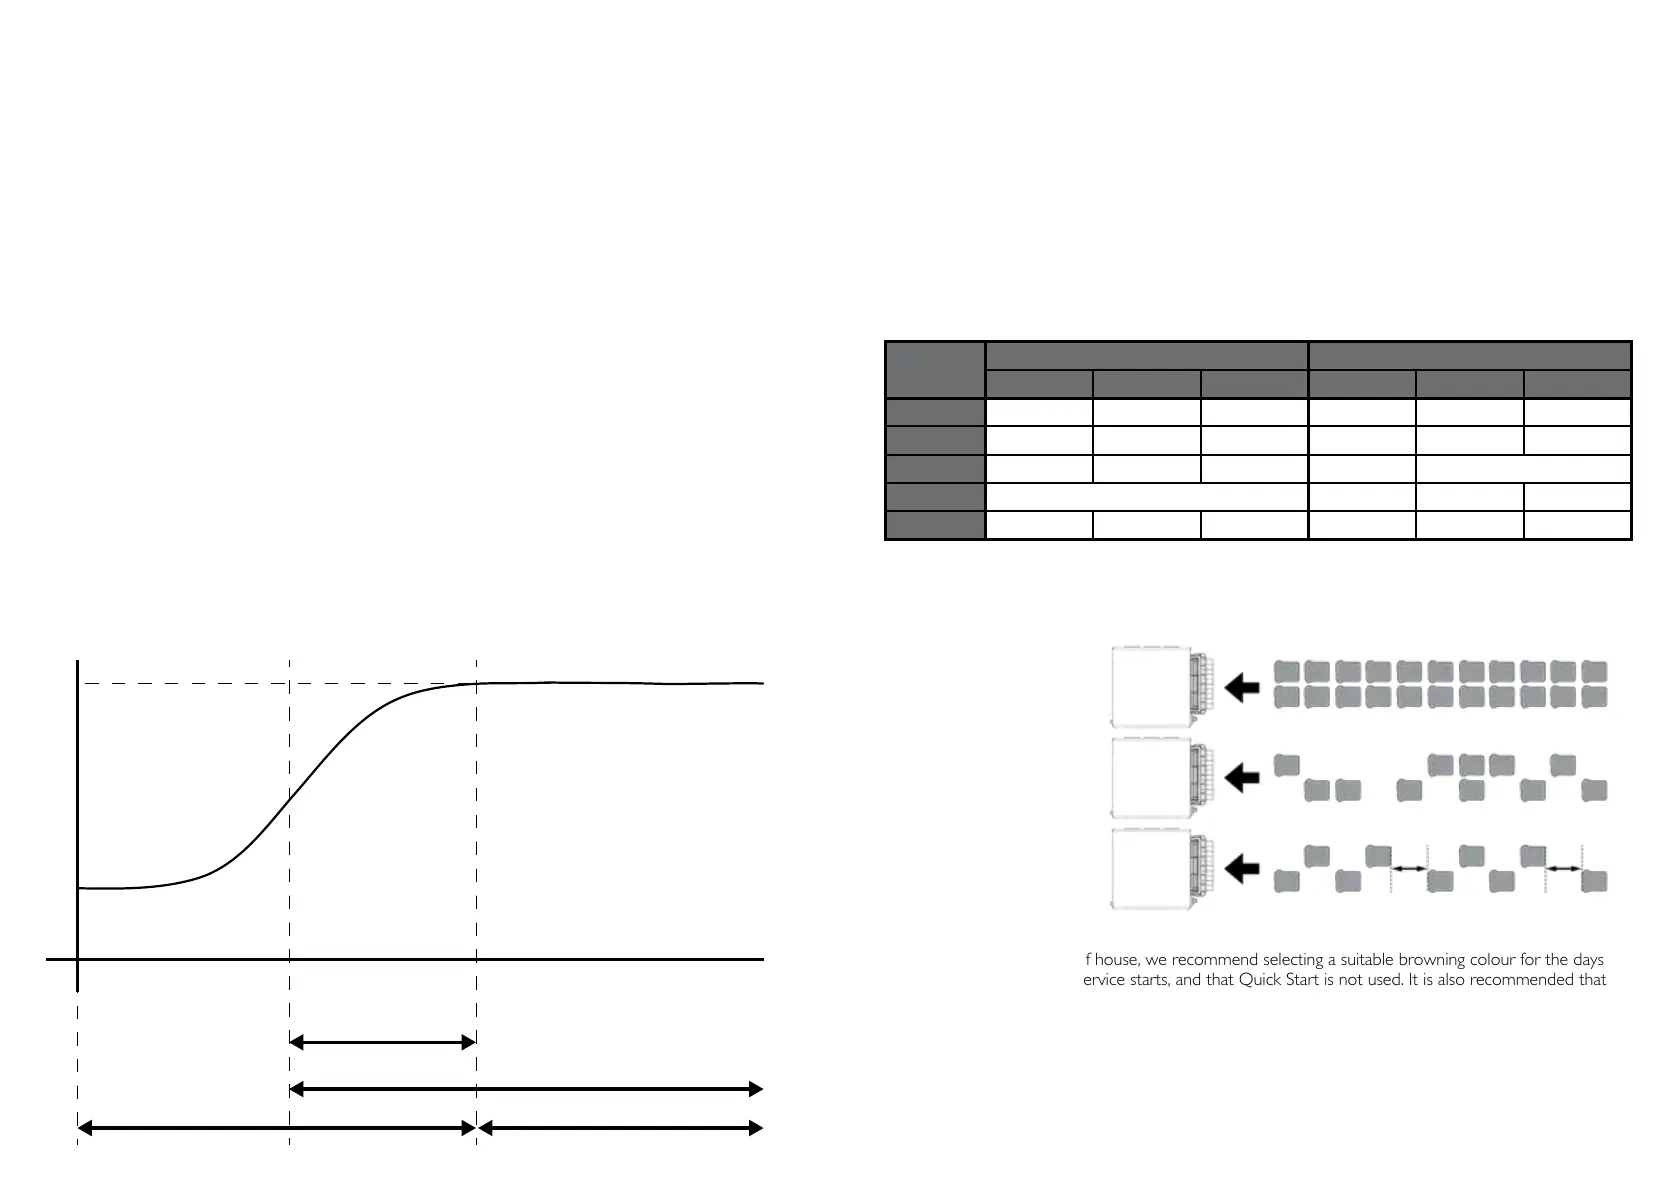
USAGE TYPES
Continuous Toasting
(toast every 1-5 secs)
Back to back or larger
batches.
Intermittent Toasting
(toast every 5-30 secs)
Buffet Toasting
(toast every 30+ secs)
#
Irregular intervals over 30
seconds, used on demand.
Reminder
• If using the toaster front of house, we recommend selecting a suitable browning colour for the days
delivery of bread before service starts, and that Quick Start is not used. It is also recommended that the
Anti-Tamper Guard is tted to prevent customers changing the settings. See page 13 for details.
• To achieve the maximum performance from your DCT2i, load continuously as per the diagram above.
For best results use day old bread.
• When swapping between functions; toasting continuously or intermittently, or changing bread type, you
should adjust your toast settings. See the table above for recommendations.
• When it’s time to turn off your DCT2i, change the Function Control to ‘OFF’, wait for the Cooling Fan
(audible) to stop, switch off and unplug the appliance from the wall. Note: The Cooling Fan can take up
to 10 minutes to switch off. Warning: Fire risk if appliance is left unattended at any time.
USING YOUR DCT2i
Correct Toast Setting: Important Information
Your DCT2i is designed to toast bread products in buffet and kitchen environments. To achieve optimum
performance, make sure that any user understands how to operate and control the toaster for intended
use.
Note: For new toasters, or those that haven’t been used in a while, follow the Setting Up guide on page 8
Warm Up Procedures: Fully Warm and Quick Start
Fully Warm Start Up Procedure
Dualit always recommends this procedure when time is available. Switch on and allow your DCT2i to
run empty. The DCT2i will be fully warm after 30 minutes. This procedure produces the most consistent
toasting results and no adjustment of the toast settings are required by the operator once toasting has
started. See the diagram below and the table on page 11 which help explain the differences between
Quick Start and Fully Warm start procedures.
Quick Start Procedure
If time is short, the DCT2i can be ready to start toasting in as little as 5 minutes. As soon as the green
Ready Indicator illuminates, you can start toasting. Begin by using the Usage Type and toast setting for
your bread as per the table on page 11. The Toast Chamber will continue to heat up for 30 minutes until
it reaches Fully Warm, after which it is important to reduce the toast settings in order to maintain the
consistent browning of your toast. Dualit recommend that after 10 minutes of Quick Start toasting, the
operator should reduce the toast settings to half-way between the initial Quick Start toast setting and the
Fully Warm toast setting. See the table on page 11 for more information.
Type of
Bread
Quick Start - Toast Setting Full Temperature - Toast Setting
Continuous Intermittent Buffet Continuous Intermittent Buffet
White 6 5.5 5 5 4.5 4
Granary 9 8.5 8 6 5.5 5
Fruit Bread 4 3.5 3 2.5 Not recommended*
Rye Not recommended** 9 8.5 8
Bagel 6.5 6 5.5 6 5.5 5
TOASTER WARM UP CHART
TEMPERATURE OF TOASTER
FULLY WARM
SWITCH ON
WARMING UP FULLY WARM
QUICK START
DURING THIS
PERIOD THE
TOASTING SETTING
WILL NEED TO BE
MONITORED AND
REDUCED AS THE
TOASTER WARMS
UP
FULL TEMPERATURE
TOASTING
STABILISED, NO
NEED TO ADJUST
TOASTING SETTING
UNLESS BREAD
TYPE OR USAGE
CHANGES
TIME (APPROX)
READY LIGHT ON (GREEN)
# #
 Loading...