14
Installation Manual
IllustrationCheck
4. Drill holes for the remaining four screws.
5. Hang the unit again by the first screw, and then
insert and tighten the remaining four screws.
6. Take waterproofing measures so that water does
not enter the building from screws mounting the
device.
• Make sure the unit is installed securely so that it will
not fall or move due to vibrations or earthquakes.
Securing to the wall
1. Drill a single screw hole, making sure to hit a stud.
2. Insert and tighten the screw and hang the unit by
the upper wall mounting bracket.
3. Determine the positions for the remaining four screws
(two for the top bracket and two for the bottom), and
remove the unit.
• Installation must conform with all local building, water and Gas Regulations and AS/NZS5601.
• The weight of the device will be applied to the wall. If the strength of the wall is not sufficient,
reinforcement must be done to prevent the transfer of vibration.
• Do not drop or apply unnecessary force to the device when installing. Internal parts may be
damaged and may become highly dangerous.
• Install the unit on a vertical wall and ensure that it is level.
• Insure no additional pressure is applied to the pipework.
Locating Screw Holes
Mounting
Structure
• When installing with bare hands, take caution to not
inflict injury.
• Be careful not to hit electrical wiring, gas, or water
piping while drilling holes.
Item
CAUTION
Be sure to do
Mounting Bracket
(upper)
Anchoring Screw
Location of Screw Hole
Locating Screw Holes
Installation
15
Installation Manual
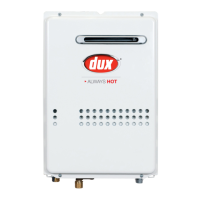
Filling the condensate trap with water
The condensate trap can be filled before connecting the flue pipe.
Filling the condensate trap before ue pipe installation.
DANGER
Prior to initial start up, make sure that you fill the condensate trap with water.
This is to prevent dangerous exhaust gases from entering the building.
Failure to fill the condensate trap could result in severe personal injury or death.
Please follow one of the procedures described below to ensure that the condensate trap is filled with water.
1) Fill the condensate trap by pouring approx. 850ml of water into the exhaust accessory on the top of the
appliance as illustrated below.
Or, if the flue pipe has already been installed:
2) After installing the drain pipe, make sure that the area around the appliance is well ventilated; open a window
or a door if necessary.
Then, operate the unit and verify that condensate is coming out of the drain pipe.
(During normal use of the water heater, condensate will begin to discharge from the drain pipe within
15 minutes of use. However, depending on the season and/or installation site conditions, it may take longer.)
30 oz.
850ml
Intake
Exhaust
SBB80RX_P001-P044_E_tonb.indd 15 2017/01/27 8:13:54