22
Installation Manual
6. Close the gap between the air intake pipe and
the hole in the wall with water-resistant sealant.
Install the rosettes or wall plates around the flue
terminal and attach with screws or kit.
7. Connect the appliance to the terminal. Start at
the outlet of the appliance. Use only water for
greasing the seals.
Vertical Flue Termination
General
• Store material inside.
• Check the components on possible damages.
• Use only flue components Dux part numbers listed under optional accessories.
• Install after national regulation
Fill out chimney label (when supplied) and place it near boiler adaptor.
Cleaning
Outside can be cleaned with a wet towel or with some detergent
Install products according to national regulations. Printing errors or technical alterations reserved.
In case of doubts ask sales department for advice.
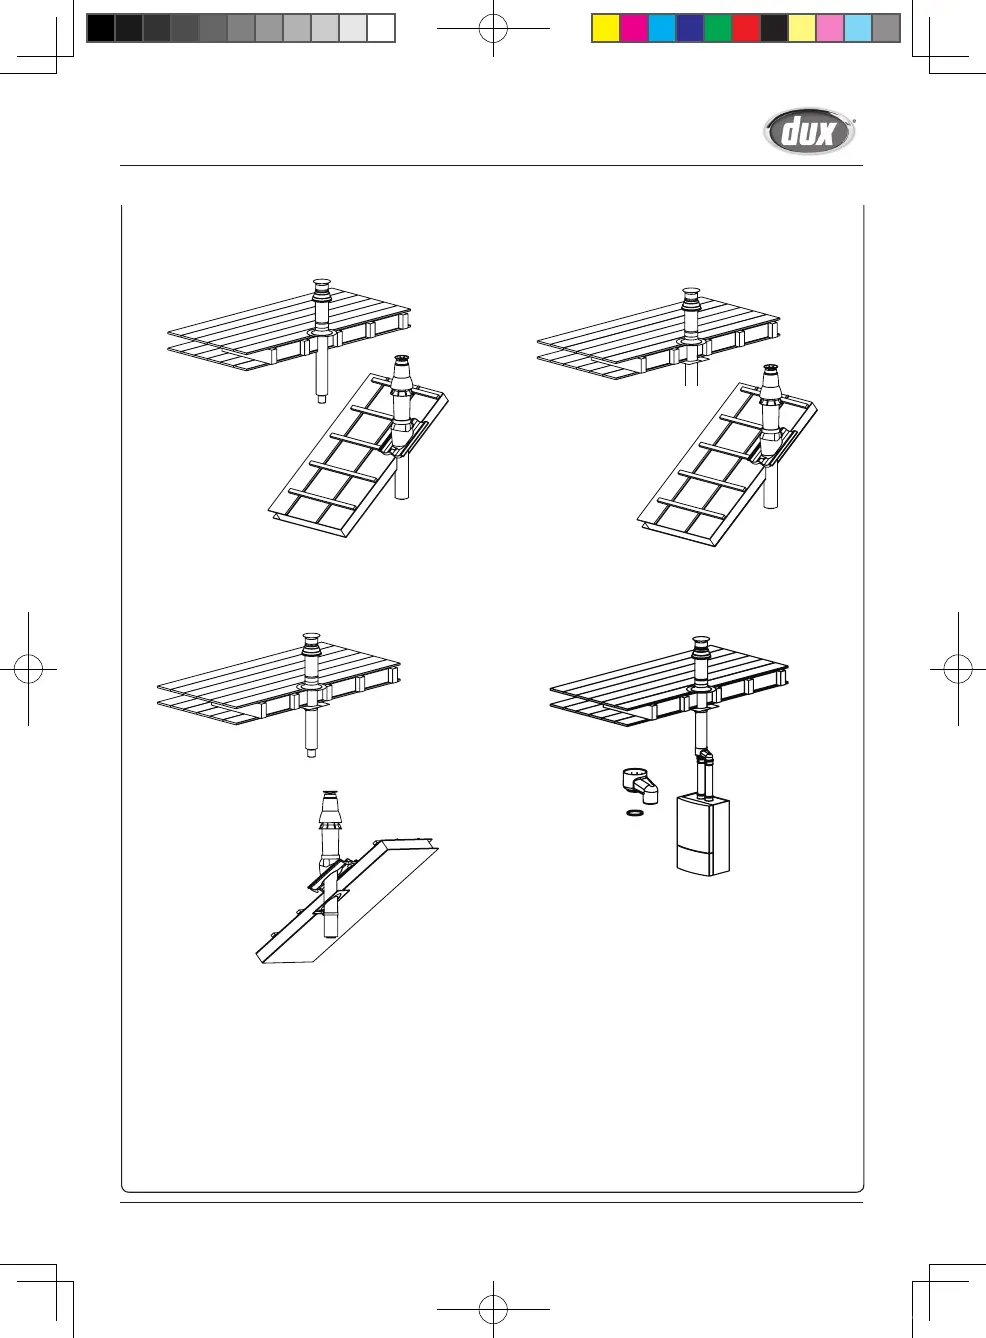
1. Check the flue terminal on any damage.
2. Taking the roofing into account, determine the type of
weather collar synthetic file or universal pitched roof
flashing; for a flat roof an aluminium flat roof flashing.
3. Determine where the flue terminal will be positioned.
With a tile roof use the universal pitched roof flashing.
Installation Sequence
Synthetic tile
Flat roof flashing
Universal pitched
23
Installation Manual
4. Make a hole for the flue terminal from the outside.
Ensure that no saw dust or dust gets into the
boiler.
7. Put the flue terminal into a vertical position
using an air level. (If desired, cover plates,
to be supplied separately, can be fitted).
9. Depending on the type of terminal, concentric or twin tube, the
installation proceeds as follows:
- concentric: Determine the length of the flue pipes and install
these with the clamps in accordance with the installation
instructions supplied in the package.
- twin-tube: Fit the gasket and the twin-tube connection.
Make sure that the gasket is not damaged. Ensure that the
flue tube and the air inlet tube are not exchanged; the flue
tube is the pipe in the centre below the flue terminal.
8. Fix the supplied wall clamp round the flue
terminal and fit it to the roof construction.
Do not tighten the clamp yet.
10. Finally, secure the roof wall
clamp and check that all
steps have been carried
out correctly.
5. Fit the weather collar.
6. Carefully insert the flue terminal through the
roof from the outside. Attention: do not tum
the cap.
SBB80RX_P001-P044_E_tonb.indd 23 2017/01/27 8:13:57