Do you have a question about the EarthWay 2050TP and is the answer not in the manual?
Remove all components and hardware from the box. Place hopper upside down with front facing away.
Place control support under wire brace, ensuring lever faces down and hitch plate faces up.
Use nuts and bolts to attach the control support to the cross braces.
Attach the wire brace to the control support using brace clip, bolt, and nut.
Obtain proper setting from the matrix or website and set the stop bolt on the rate gauge.
Pull control lever back to stop, push forward to close flow holes before stopping.
Empty, rinse, apply oil to metal parts. Gearbox is sealed and lubricated.
Slide lever back, position wheel 6-12" from border, close lever to '0', then slide lever forward.
Diagram illustrating spreader components with key numbers for parts ordering.
Table listing part numbers, descriptions, and keys for the 80-pound broadcast spreader.
Provides customer support email, website, and mailing address.
Details warranty coverage, exclusions (corrosion, misuse), and claim procedures.
Specifies limitations on damages, labor charges, and legal jurisdiction for disputes.
Disclaims all other express, implied, or statutory warranties, including merchantability.
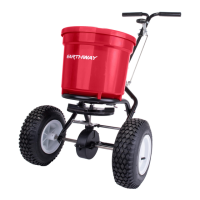
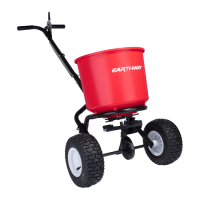
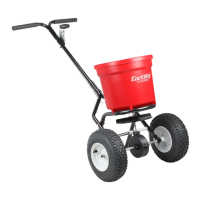
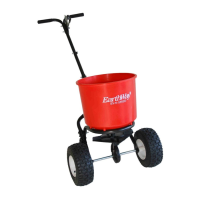
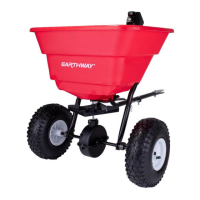
The EarthWay 80 lb Estate Tow Broadcast Spreader, model 2050TP, is a robust and versatile tool designed for efficient and controlled spreading of various granular materials over large areas. Its primary function is to distribute grass seed, fertilizer, and sand evenly, making it ideal for estate maintenance, large lawns, and agricultural applications. The tow-behind design allows it to be hitched to a lawn tractor or ATV, significantly reducing manual effort and increasing coverage speed compared to push spreaders.
A key usage feature of this spreader is its patented SideSpread-Control™ system. This innovative mechanism allows users to prevent material from being spread to the left side of the spreader. To activate this feature, a lever located below the hopper is slid to the back. When engaged, the left wheel should be positioned 6-12 inches from a sidewalk or border. This design is superior to traditional side deflectors, which often block material, creating a concentrated path of product near the wheel and leading to wasted material, dark green stripes, and potential lawn damage. The SideSpread-Control™ ensures that the correct application rate is maintained while preventing material from being deposited on driveways, sidewalks, flowerbeds, or into storm drains, thereby saving money and protecting the lawn and environment. When a full, 180-degree spread pattern is desired, the control lever is slid from back to front.
The spreader includes a comprehensive SPREADER RATE SETTINGS chart, which provides recommended settings for different materials and desired application rates. For instance, it specifies settings for grass seed, fertilizer (SGN 240, 3/32"), and sand (SGN 150, 1/16") based on pounds per 1000 square feet. This guidance helps users achieve precise and consistent application, preventing over- or under-application of materials.
Assembly of the 2050TP is straightforward, beginning with removing all components from the box and placing the hopper upside down. The control support is attached to the cross braces using nuts and bolts, ensuring the control lever faces down and the hitch plate faces up. The wire brace is then secured to the control support using a brace clip, bolt, and nut. The manual provides clear visual aids and step-by-step instructions for this process. Tools required for assembly include an adjustable box wrench and a #2 Phillips screwdriver.
Operating the spreader involves several important steps to ensure optimal performance and longevity. Users should first obtain the proper setting for their material from the provided SETTING MATRIX or the manufacturer's website. The stop bolt on the rate gauge assembly is then set to the desired rate. While pushing the spreader forward (or towing it), the control lever is pulled back to the stop bolt to initiate spreading. To stop spreading, the lever is pushed forward to close the flow holes before the spreader stops moving. This sequence prevents material from being dumped in one spot when the spreader is stationary.
Helpful hints for usage emphasize reading directions before assembly and ensuring the gearbox is correctly oriented, with "FRONT" pointing to the front of the spreader. The impeller must turn clockwise when pushing forward; reversing the gearbox during assembly will cause issues. The spreader is calibrated for a brisk walking speed of three miles per hour; slower or faster speeds will alter the spread pattern. Wet fertilizer can also affect the spread pattern and flow rate. It is crucial not to use powdered materials, as they can damage the gearbox.
Maintenance features are designed to prolong the life of the spreader. After each use, any remaining material should be emptied from the hopper, and the spreader should be rinsed. A light coating of oil should be applied to all metal parts to prevent corrosion. The gearbox is permanently lubricated at the factory and is sealed, so it should not be opened, as dirt may enter and compromise its function. The gears are designed for durability and do not require user lubrication.
Optional accessories enhance the spreader's functionality. An optional heavy-duty rain cover (#77003) protects materials in the hopper from moisture, while an optional square screen (#40003) helps break up clumps and prevent foreign objects from entering the impeller, ensuring a smooth flow of material. An optional salt deflector kit (#77122) is available for specific applications, though it is noted that rock salt is not recommended for use in this spreader, and the agitator should be removed when using ice melt.
The EarthWay 80 lb Estate Tow Broadcast Spreader is backed by a one-year limited warranty, covering defects in original workmanship and materials. This warranty underscores the manufacturer's commitment to quality and provides assurance to the user. However, it explicitly excludes damage resulting from incorrect installation, mishandling, misuse, tampering, improper storage, normal wear and tear, or corrosion due to the nature of fertilizers and ice melt products. This detailed description highlights the thoughtful design, user-friendly features, and practical maintenance considerations that make the 2050TP a reliable choice for large-scale material spreading.
| Type | Broadcast Spreader |
|---|---|
| Hopper Capacity | 80 lbs |
| Material | Poly |
| Wheels | 10-inch pneumatic |
| Application | Seed, fertilizer |