46
.
4.6.1
4.6.2
4.6.3
47
.
4.7.1
4.7.2
4.7.3
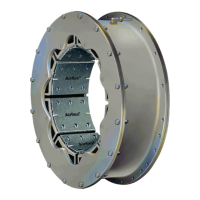
Friction Lining Replacement
Caution:
Use only genuine Airflex replacement
parts.
Make sure the torque bars and release springs
have been remove from the backing plates.
For riveted friction shoe assemblies, drill
the rivets with a
15/64”
(6mm) drill and tap the
rivet body out. Larger elements have linings
attached with flat head screws and locknuts.
Air-flex special wrench p/n
304572
will aid in
holding the locknuts during removal. See
Table 7.
TABLE
7
FRICTION SHOE ASSEMBLY FASTENERS
DRIVE PIN RIVETS
11.5VC500 24VC650 42VC650 24VCl000
14VC500 28VC650 14VCl000 28VC1000
16VC600 33VC650
16VC1OOO
2OVC600 37VC650 2OVC1OOO
FLAT HEAD SCREWS* (BRASS)
AND LOCKNUTS
32VCl000 42VC1200 52VC1200 6OVC1600
38VC1200 46VC1200 51VC1600 66VC1600
* Screws are 3/8-16NC-2 x 1.25 long flat head
4.7.4
Carefully insert the air actuating tube into the
rim. Push the valves on the tube through the
corresponding holes in the rim and install the
spiral snap rings (if applicable).
4.7.5
Place a torque bar in each mating hole in the
side plate, slide a friction shoe assembly onto
each torque bar and carefully tap a release
spring (51VC1600,60VC1600 and 66VC1600
elements have two release springs in each
cavity) into place. Make sure the spring is
positioned on the side of the torque bar
opposite the friction lining. Also, the spring
must contact the torque bar at two points, not
one. See Figure 15.
Tube
Backing
-Release
k
Spring
4.7.6
4.7.7
Attach the new lining to
the backing plate with
new screws and locknuts
or drive pin rivets (See
Figure 14), as applicable.
Work from the center of
the friction lining out to
the ends. The rivets are
installed by driving the pin
flush with the head.
.
14
Assembly of the Element
Make sure that all of the components have
been cleaned and any damaged or worn com-
ponents have been repaired or replaced.
Assemble one of the side plates to the rim
with cap screws and lo&washers. It is not
necessary to install through bolts and locknuts
at this time.
Lay the rim/side plate assembly on a clean, flat
work surface, side plate down.
VC 5000
Revised: July, 1995 (PDF format)
)
/Plate
4.7.8
4.7.9
4.7.10
4.7.11
Reinstall per 2.0.
15
\
Torque
Bar
Fig. 15
Lay the remaining side plate in position so the
air connections and torque bar holes are
properly aligned.
Carefully guide the torque bars into the cor-
responding holes in the side plate. It is often
helpful to install four equally spaced screws
and nuts through the rim and side plate to
keep some tension on the side plate
throughout this step.
Attach the side plate to the rim with cap
screws and lockwashers, making sure all of
the torque bars are seated in their side plate
holes.
Note the orientation of the air connections
and install the through bolts and locknuts
where applicable.
Reinstall the elbows (or quick release valves),
using a good quality sealant on the pipe
threads. Install the air connections on single
narrow, dual narrow and single wide elements.
Install only the short air connections (element
closest to spider) on dual wide elements.
0
Copyright Eaton Corp., 1989. All rights reserved.
 Loading...