51
User Manual MN013016EN
Effective July 2022
Magnum PXR and Power Defense SB low
voltage power circuit breakers user manual
EATON www.eaton.com
Primary disconnect inspection
Table 20. Pre-inspection conditions
Device Position of poles Mechanism Device position in cassette
Fixed Open Closed Charged Discharged — — — —
Drawout Open Closed Charged Discharged Connected Test Disconnected Removed
Procedure
For Magnum PXR and PD-SB breakers with vertically mounted
primary disconnects:
1. With breaker removed from cell, verify that vertical adapter nuts
and bolts are torqued to 37–43 lb-ft.
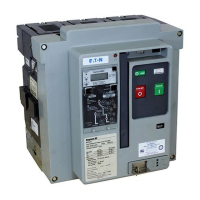
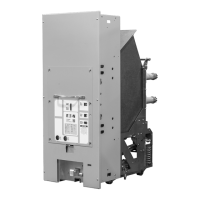
Figure 86. Primary disconnects
For all Magnum PXR and PD-SB breakers primary disconnects:
1. Remove the primary disconnect.
2. Inspect primary disconnect contact surfaces for indications of
plating wear, corrosion, or arcing and pitting. Replace primary
disconnect if there is evidence of any exposed copper.
3. Inspect finger springs for broken, cracked, or misalignment
with fingers.
4. Remove loose contaminates.
5. Reinstall and tighten the M6 screw (refer back to Table 18)
to retain the primary disconnect. Verify that the primary
disconnect is free to rotate about the screw, and return
to the home position.
6. Be certain that the retaining screw is in the proper position and
does not deform the end plates on the primary disconnects.
Secondary disconnect inspection
Table 21. Pre-inspection conditions
Device Position of poles Mechanism Device position in cassette
Fixed Open Closed Charged Discharged — — — —
Drawout Open Closed Charged Discharged Connected Test Disconnected Removed
Procedure
Breaker:
1. Remove the breaker front cover.
2. With breaker removed from cell, verify that the breaker
secondary disconnect pins are fully seated and locked into
position by lightly pulling on each wire individually.
ote: N Do not exceed 1 lb of force or damage to pin or housing may occur.
3. Ensure all pins are straight without bends, corrosion, and do not
show evidence of arcing.
4. Damaged pins are to be replaced. Refer to renewal parts catalog.
m WARNING
REMOVE ALL POWER TO THE CASSETTE SECONDARY PINS.
Cassette:
1. On the cassette side of the secondary disconnect, ensure
all sockets are fully seated and locked into position by lightly
pressing on each socket.
2. Visually inspect each socket for evidence of arcing, corrosion,
or foreign objects.
3. Damaged sockets are to be replaced. Refer to renewal parts
catalog
4. Ensure that socket housings are free to move to allow
self-aligning with the breaker side secondary housing.
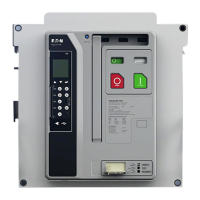
Figure 87. Breaker secondary
Figure 88. Cassette secondary
Vertical adapter bolt
Primary disconnect bolt
 Loading...