12
Instruction Book IB182071EN
July 2018
Remote Power Racking System
(RPR-2)
www.eaton.com
m WARNING
SELECTION OF THE INCORRECT POWER CIRCUIT BREAKER PROGRAM MAY
RESULT IN THE RPR-2 UNIT SIGNALING COMPLETION OF THE REMOVAL
CYCLE WITH THE POWER CIRCUIT BREAKER ONLY PARTIALLY REMOVED.
12) Take the Pendant and move a safe distance away from front
of the power circuit breaker. (The distance should be predetermined
through Arc Flash calculations.)
m WARNING
IF AT ANY TIME DURING THE REMOVAL PROCESS AN OVER-TORQUE
OCCURS THE AMBER LIGHT ON THE PENDANT AND TOWER WILL
FLASH. THE UNIT WILL NOT REMOVE THE BREAKER FURTHER UNTIL THE
PROBLEM IS RESOLVED. FOLLOW THE COMPANY’S SAFETY PROCEDURES
WHEN APPROACHING THE SWITCHGEAR CELL.
13) When area is clear, depress and hold the Remove button
(black with white arrow) on the pendant. (Figure 4.3) This will
initiate the removal process on the RPR-2 unit. The amber light
on the pendant and on the tower light will illuminate while the
power circuit breaker is in the removal process.
ote:N If at any time during the removal process the Remove button is
released, the tower lights and pendant light will not be illuminated.
14) When the power circuit breaker is in the Disconnected
position, the green tower light will illuminate and the amber
light on the pendant will turn off. This indicates that it is now
safe to approach the power circuit breaker.
15) To disconnect the RPR-2 unit, push the unit toward the
switchgear cell to disengage the brakes. Lift the brake lever up
to engage the holding magnet.
16) Turn the Insertion Shaft Lock to the Latched position. Push the
unit towards the breaker until the insertion shaft latches.
17) Pull the unit away from the switchgear, while disconnecting
the insertion shaft from the racking adaptor.
18) Remove the racking adaptor from the breaker and place it back
into the storage box on the RPR-2 unit.
19) Turn Off the Power Module with the Power Switch. To turn
off the UPS, press and hold the Off button for approximately
five seconds.
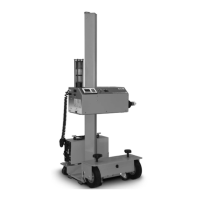
20) Lower the Power module to the lowest position and engage
the Transport Latch. (Figure 3.3) The pendant can be stored
by wrapping the cord around the post at the base of the RPR-2
unit. (Figure 3.5) Place the RPR-2 unit cover over the base
while in storage. (Figure 3.4)
21) The UPS should be connected to a wall receptacle when not in
use to maintain a charge on the batteries.
16) Turn the Insertion Shaft Lock to the Latched position. Push the
unit forward until the insertion shaft latches.
17) Pull the unit away from the switchgear, while disconnecting
the insertion shaft from the racking adaptor.
18) Remove the racking adaptor from the breaker and place it back
into the storage box on the RPR-2 unit.
19) Turn Off the Power Module with the Power Switch. To turn
off the UPS, press and hold the Off button for approximately
five seconds.
20) Lower the Power module to the lowest position and engage
the Transport Latch. (Figure 3.3) The pendant can be stored
by wrapping the cord around the post at the base of the RPR-2
unit. (Figure 3.5) Place the RPR-2 unit cover over the base
while in storage. (Figure 3.4)
21) The UPS should be connected to a wall receptacle when not in
use to maintain a charge on the batteries.
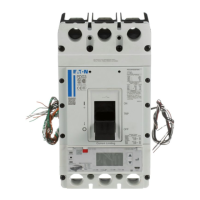
4.2 REMOVING POWER CIRCUIT BREAKERS
1) Follow all procedures defined by company’s Personal Protective
Equipment and Safety policy and the precautions and racking
instructions in the breaker IB.
2) Move the RPR-2 unit in front of the switchgear cell. Open
the cell door to allow for access to the rotary type racking
mechanism of the breaker. If the cell has closed door racking
capability, insert the racking adaptor through the provided
opening with the cell door closed.
3) Verify that the power circuit breaker is open and ready to be
racked out from the Connected position.
4) If engaged, release Transport Latch to allow for vertical
movement of the Power Module. (Figure 3.6)
5) Turn on the Powerware UPS for the RPR-2 by pressing the
On button for approximately five seconds and allow for the
unit to initialize. (Figure 4.5) For all other menu settings and
features, please refer to the UPS instruction CD.
6) Turn on the power to the Power Module with the Power
Switch. (Figure 3.6)
7) Select the correct breaker program on the Power Module by
pressing and releasing the Breaker Select Button until the
desired program is displayed on the Fusion Controller. (Figure
4.1) Before attempting to rack the circuit breaker, ensure the
nameplate matches the predetermined circuit breaker program
on the Eaton display of the Fusion Controller.
8) Select the REMOVE direction on the Insert/Remove switch.
(Figure 4.1)
9) Select the correct racking adaptor for the breaker being
inserted. (Figure 3.1) If applicable, place the racking adaptor
on the breaker’s racking mechanism shaft. Position the RPR-2
shaft with the racking adaptor. Turn the Insertion Shaft Lock to
Unlatched position to allow for connection the RPR-2 into the
racking adaptor on the power circuit breaker. (Figure 3.6) If
necessary, the Jog button (Figure 3.6) can be pressed to rotate
the shaft for correct alignment (amber pendant and tower light
will illuminate). Horizontal alignment can be achieved with the
casters and vertical alignment by raising or lowering the Power
Module. (Figure 4.2)
10) Once the RPR-2 is connected, properly adjust the unit away
from the cell to insure the proper amount of travel is available
for the power circuit breaker insertion process. When an
adequate amount of travel distance is achieved, the red tower
light will illuminate.
11) Engage the foot brake on the RPR-2 truck. Verify that the
correct power circuit breaker program and the Remove
direction are selected by viewing the LCD screen on the Fusion
Controller (Figure 4.1).
 Loading...