wheeled trimmer
8
OPERATION
Models: All tilt models
The OCT feature is used to trim in hard to reach places.
This feature enables both the trimmer head and body to
tilt for trimming close to the ground. The degree of tilt is
dependent on the setting selected on the height adjustment
handle located on the right side of the Wheeled Trimmer.
To engage the OCT feature, simply move the handle into
one of the four settings that are available.
Level:1. The height adjustment handle is set in the
position closest to the rear of the trimmer.
5.4 degrees2. : The height adjustment handle is set in
the second position from the rear of the trimmer.
10.3 degrees3. : The height adjustment handle is set in
the third position from the rear of the trimmer.
13 degrees4. : The height adjustment handle is set in
the position closest to the front of the machine for
maximum tilt.
The Wheeled Trimmer can be adjusted to mow at an
angle. This allows the machine to trim in hard to reach
places. Parallel trimming is adjustable on this model to
the left 2". The trimmer body pivots on the axle. To adjust
the parallel trimming setting:
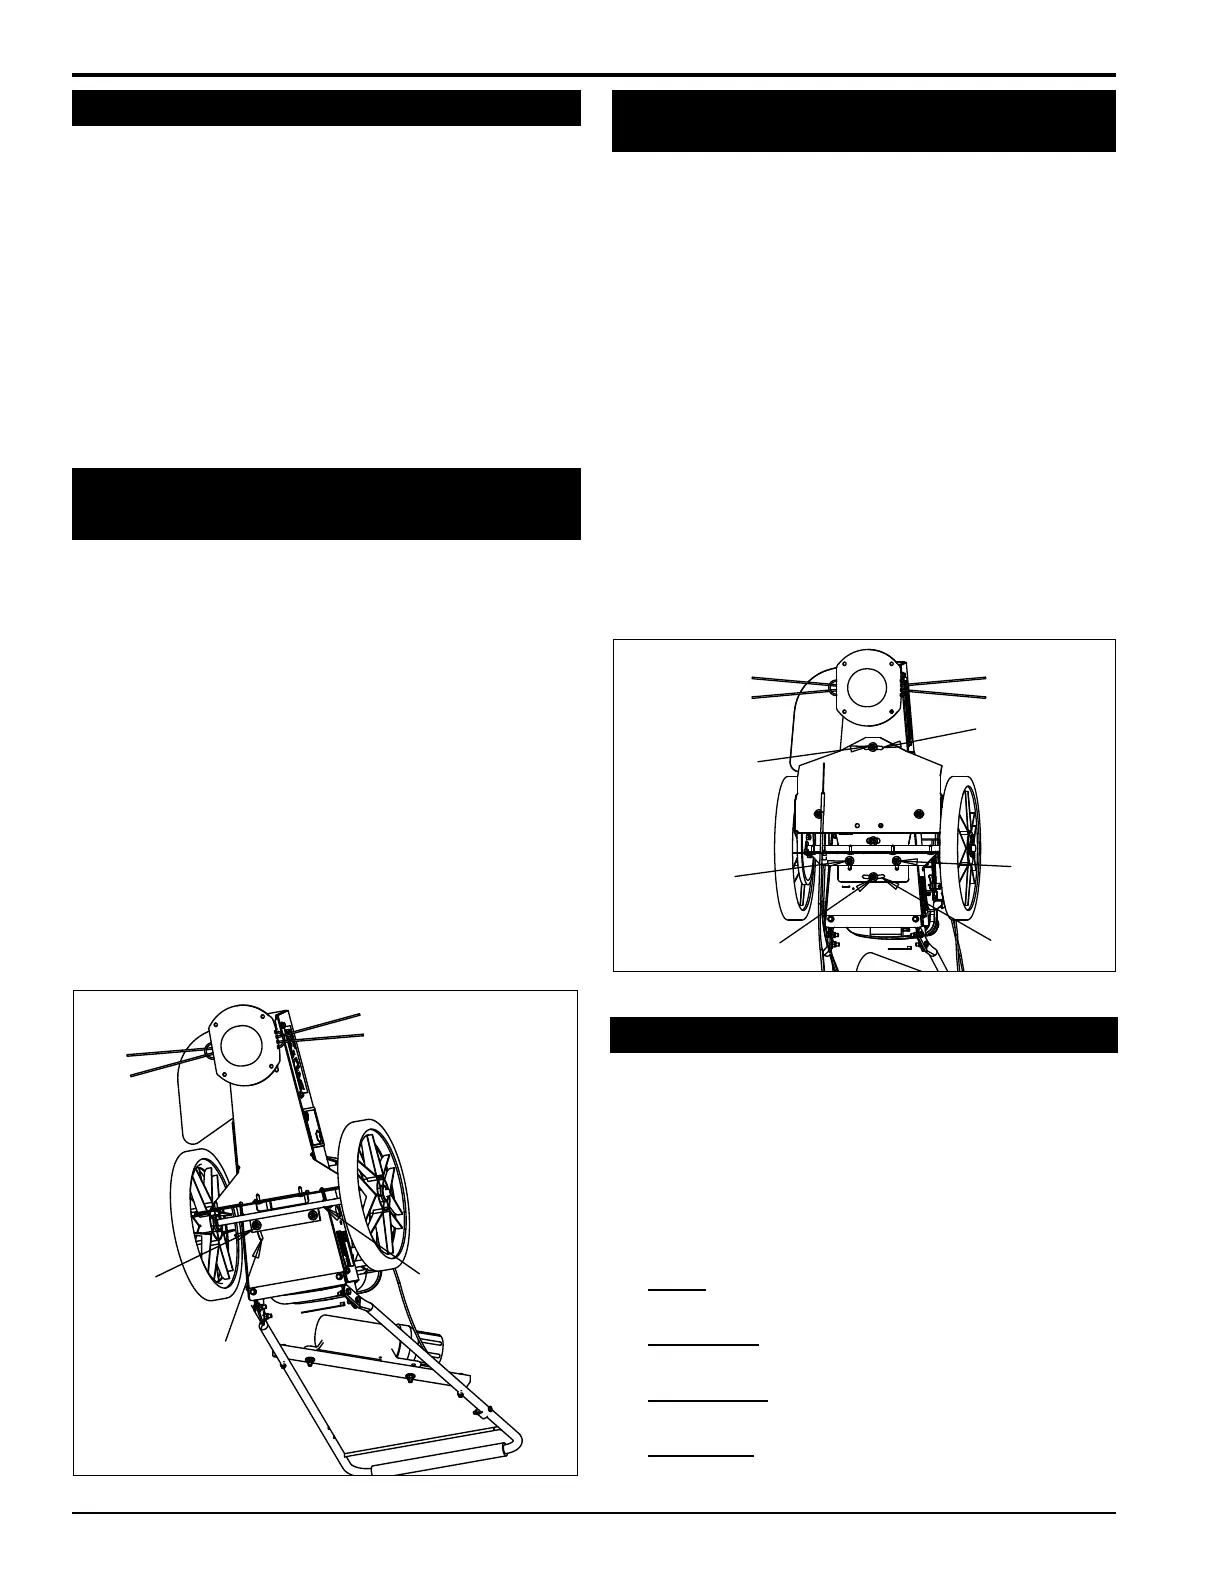
Loosen the right axle nut located on the bottom of the 1.
trimmer directly behind the axle shaft (Figure 4.1).
Lift the right wheel and pull back. The wheel and axle 2.
will rotate backwards due to a slot cut in the bottom of
the trimmer frame.
Tighten the nut loosened in Step 1.3.
When finished using the parallel trimming feature, 4.
loosen the right axle nut, and push the axle forward to
the original position.
Tighten the right axle bolt and resume regular trimming 5.
or mowing.
Models: All self-propelled models
The Wheeled Trimmer can be used in either push or self-
propelled mode.
Pull up the self-propelled bail located under the 1.
handlebar to start the self-propelled mode.
Adjust the trimmer speed with the shift lever. Position 2.
1 is the slowest and position 3 is the quickest. The
ground speed ranges from 1-2 mph.
Operate mower safely and as intended.3.
To stop the mower release the self-propelled bail.4.
To stop the engine, release the trimmer bail.5.
Figure 4.1 - Adjusting the Mower
The Wheeled Trimmer can be adjusted to mow at an angle.
This allows the machine to trim in hard to reach places.
Parallel trimming is adjustable on this model 2" to the left
or the right. To adjust the parallel trimming setting:
Loosen the two nuts on the bottom of the trimmer as 1.
shown in Figure 4.2; the first (A) is located behind the
trimmer spindle, while the other (B) is located behind
the trimmer flap on the transmission support plate. Do
not adjust parallel trimming with the trimmer axle. This
will cause the drive chains to fall out of adjustment.
Pivot the trimmer body, on the slotted holes, 2" to the 2.
left or right.
Tighten the nuts loosened in Step 1.3.
When finished using the parallel trimming feature, 4.
loosen bolts A & B and place the trimmer body in the
original position.
Tighten the bolts and resume regular trimming or 5.
mowing.
Figure 4.2 - Adjusting the Mower
RIGHT
AXLE NUT
SLOT
AXLE SHAFT
4.4 SELF-PROPELLED OPERATION
4.5 PARALLEL TRIMMING FOR PUSH
TRIMMERS
4.6 PARALLEL TRIMMING FOR SELF-
PROPELLED MODELS
4.7 OFF CENTER TILT FEATURE (OCT)