EasyManua.ls Logo

ECS H61H2-M6 - User Manual

ECS H61H2-M6
72 pages
Print Icon
To Next Page IconTo Next Page
Loading...
Preface
Preface
Copyright
This publication, including all photographs, illustrations and software, is protected
under international copyright laws, with all rights reserved. Neither this manual, nor
any of the material contained herein, may be reproduced without written consent of
the author.
Version 1.0C
Disclaimer
The information in this document is subject to change without notice. The manufac-
turer makes no representations or warranties with respect to the contents hereof and
specifically disclaims any implied warranties of merchantability or fitness for any
particular purpose. The manufacturer reserves the right to revise this publication and
to make changes from time to time in the content hereof without obligation of the
manufacturer to notify any person of such revision or changes.
Trademark Recognition
Microsoft, MS-DOS and Windows are registered trademarks of Microsoft Corp.
MMX, Pentium, Pentium-II, Pentium-III, Celeron are registered trademarks of Intel
Corporation.
Other product names used in this manual are the properties of their respective
owners and are acknowledged.
Federal Communications Commission (FCC)
This equipment has been tested and found to comply with the limits for a Class B
digital device, pursuant to Part 15 of the FCC Rules. These limits are designed to
provide reasonable protection against harmful interference in a residential installa-
tion. This equipment generates, uses, and can radiate radio frequency energy and, if
not installed and used in accordance with the instructions, may cause harmful inter-
ference to radio communications. However, there is no guarantee that interference
will not occur in a particular installation. If this equipment does cause harmful
interference to radio or television reception, which can be determined by turning the
equipment off and on, the user is encouraged to try to correct the interference by one
or more of the following measures:
Reorient or relocate the receiving antenna
Increase the separation between the equipment and the receiver
Connect the equipment onto an outlet on a circuit different from that to
which the receiver is connected
Consult the dealer or an experienced radio/TV technician for help
Shielded interconnect cables and a shielded AC power cable must be employed with
this equipment to ensure compliance with the pertinent RF emission limits governing
this device. Changes or modifications not expressly approved by the system’s manu-
facturer could void the user’s authority to operate the equipment.

Table of Contents

Other manuals for ECS H61H2-M6

Question and Answer IconNeed help?

Do you have a question about the ECS H61H2-M6 and is the answer not in the manual?

ECS H61H2-M6 Specifications

General IconGeneral
BrandECS
ModelH61H2-M6
CategoryMotherboard
LanguageEnglish

Summary

Legal and Regulatory Information

Copyright Notice

Legal notice regarding copyright protection for the manual.

Disclaimer Statement

Notice regarding information accuracy and potential changes.

Trademark Recognition

Acknowledges registered trademarks of various companies.

FCC Compliance Statement

Regulatory Compliance Statements

Declaration of Conformity

Statement of compliance with FCC rules for digital devices.

Canadian Communications Compliance

Compliance statement for Canadian Interference-causing Equipment Regulations.

About This Manual

Chapter 1: Introducing the Motherboard

Describes the features and overview of the motherboard.

Chapter 2: Installing the Motherboard

Details the process of installing motherboard components.

Chapter 3: Using BIOS

Provides information on using the BIOS Setup Utility.

Chapter 4: Using Motherboard Software

Explains how to install and use the motherboard software.

Chapter 5: Troubleshooting

Offers basic troubleshooting tips for common issues.

Chapter 1: Introducing the Motherboard

Introduction

Welcome and overview of the motherboard model.

Motherboard Features

Details key specifications and capabilities of the motherboard.

Hardware Specifications

Lists detailed technical specifications of the motherboard.

Motherboard Components

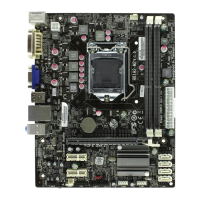
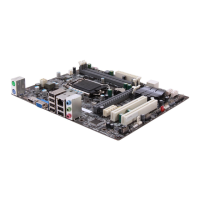
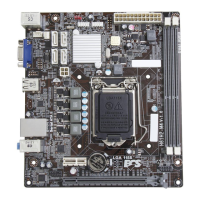
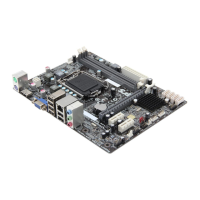
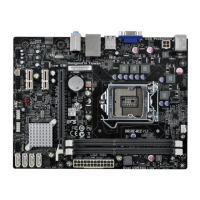
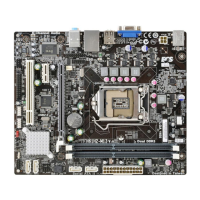
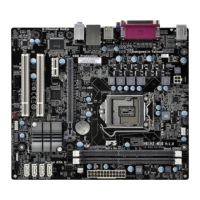
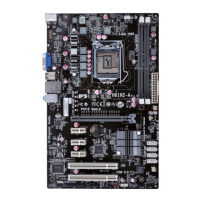
Identifies and describes the physical components on the motherboard.

Chapter 2: Installing the Motherboard

Installation Safety Precautions

Essential safety guidelines to follow during installation.

Choosing a Computer Case

Advice on selecting a compatible computer case.

Installing Motherboard in Case

Step-by-step instructions for mounting the motherboard.

Checking Jumper Settings

Guidance on verifying and setting motherboard jumpers.

Installing Hardware Components

Instructions for installing various hardware components.

Connecting Optional Devices

How to connect external devices to the motherboard.

Installing a SATA Hard Drive

Procedure for installing Serial ATA hard drives.

Installing a Floppy Diskette Drive

Steps for connecting a floppy diskette drive.

Connecting I;O Devices

How to connect common input/output devices.

BIOS Firmware Information

Details about the motherboard's BIOS firmware.

Chapter 3: Using BIOS

About the BIOS Setup Utility

Overview of the BIOS setup utility and its functions.

Standard BIOS Configuration

Information on the default BIOS settings and their purpose.

Entering the BIOS Setup Utility

Steps to access and navigate the BIOS setup interface.

Chapter 4: Using Motherboard Software

Auto-installing Software (Windows XP;7;8)

Guide to automatic installation of drivers and software.

Running Software Setup

Procedure for initiating the software installation process.

Manual Software Installation

Alternative method for installing drivers manually.

ECS Utility Software

Overview of provided ECS utility software.

Chapter 5: Troubleshooting

Startup Problems During Assembly

Troubleshooting steps for initial system startup issues.

Startup Problems After Prolonged Use

Solutions for issues that arise after extended usage.

Maintenance and Care Tips

Recommendations for maintaining motherboard longevity.

Basic Troubleshooting Flowchart

Visual guide to diagnose and resolve common PC issues.

Chapter 1: Introducing the Motherboard

Introduction

Welcome and overview of the motherboard model.

Chapter 1: Introducing the Motherboard

Processor Features

Details about the motherboard's CPU socket and processor support.

Chipset Information

Information regarding the Intel H61 Chipset.

Memory Specifications

Details on supported DDR3 SDRAM memory types and capacity.

Audio Features

Information about the onboard audio codec and its features.

Chapter 1: Introducing the Motherboard

Onboard LAN (Optional)

Features of the onboard LAN controller.

Expansion Slots

Types of expansion slots available on the motherboard.

Integrated I;O Ports

Description of the integrated input/output ports.

BIOS Firmware Information

Details about the motherboard's BIOS firmware.

Chapter 1: Introducing the Motherboard

CPU Specifications

Specifications related to the CPU socket and processor compatibility.

Chipset Specifications

Details of the Intel H61 Express Chipset.

Memory Specifications

Memory architecture and supported DDR3 SDRAM.

Expansion Slots Specifications

Details of PCI Express and PCI slot types.

Storage Controller Specifications

Information on SATA 3.0 Gb/s host controllers.

Audio Specifications

Specifications for the onboard HD audio codec.

LAN Specifications

Details of the onboard Gigabit LAN controller.

Rear Panel I;O Specifications

List of ports available on the rear panel.

Internal I;O Connectors & Headers

Description of internal connectors and headers.

System BIOS Specifications

Details about the system BIOS and utility.

AP Support Information

Information on supported applications like eBLU/eDLU/eSF.

Form Factor

Physical dimensions of the motherboard.

Chapter 1: Introducing the Motherboard

Motherboard Components Diagram

Visual identification of motherboard components with labels.

Chapter 1: Introducing the Motherboard

Motherboard Components Table

Detailed list of motherboard components and their labels.

Chapter 2: Installing the Motherboard

Safety Precautions

Essential safety guidelines to follow during installation.

Choosing a Computer Case

Advice on selecting a compatible computer case.

Installing Motherboard in Case

Step-by-step instructions for mounting the motherboard.

Chapter 2: Installing the Motherboard

Checking Jumper Settings

Guidance on verifying and setting motherboard jumpers.

Setting Jumpers

Explanation of how to set motherboard jumpers (SHORT/OPEN).

Chapter 2: Installing the Motherboard

Checking Jumper Settings

Shows the location of motherboard jumpers and their settings.

Jumper Settings

Details the CLR_CMOS jumper and its default setting.

Chapter 2: Installing the Motherboard

Installing Hardware

General instructions for installing hardware components.

Installing the Processor

Guidance on safely installing the CPU onto the motherboard.

Before installing the Processor

Preparation steps before CPU installation.

Fail-Safe Procedures for Over-clocking

Steps to recover from overclocking failures.

Chapter 2: Installing the Motherboard

CPU Installation Procedure

Step-by-step visual guide for CPU installation.

Chapter 2: Installing the Motherboard

Installing Memory Modules

Instructions for installing DDR3 SDRAM memory modules.

DDR3 SDRAM Memory Module Table

Table showing compatible DDR3 memory modules and speeds.

Chapter 2: Installing the Motherboard

Installation Procedure

Procedure for installing memory modules into DIMM slots.

Chapter 2: Installing the Motherboard

Expansion Slots

Description of PCI Express and PCI slots for add-on cards.

PCIEX16 Slot

Usage of the PCI Express x16 slot for graphics cards.

PCIEX1 Slot

Details on the PCI Express x1 slot functionality.

PCI1~2 Slots

Information on the standard PCI slots.

Chapter 2: Installing the Motherboard

Installing Add-on Cards

Steps for installing expansion cards into motherboard slots.

Chapter 2: Installing the Motherboard

Connecting Optional Devices

Guide to connecting motherboard's optional devices.

F_AUDIO: Front Panel Audio header

Pinout and function of the front panel audio header.

SATA1~4: Serial ATA connectors

Details on Serial ATA connectors for storage devices.

Chapter 2: Installing the Motherboard

F_USB1~2: Front Panel USB headers

Pinout and function of front panel USB headers, including EZ Charger.

COM: Onboard serial port header

Pinout and function of the onboard serial port header.

Chapter 2: Installing the Motherboard

SPDIFO: SPDIF out header

Description of the SPDIF out header for digital audio output.

CASE: Chassis Intrusion Detect Header

Function of the chassis intrusion detection header.

ME_UNLOCK: ME Unlock Header

Function of the ME Unlock header.

Chapter 2: Installing the Motherboard

Installing a SATA Hard Drive

Procedure for installing Serial ATA hard drives.

About SATA Connectors

Information about the motherboard's SATA connectors.

Chapter 2: Installing the Motherboard

Installing a Floppy Diskette Drive

Steps for connecting a floppy diskette drive.

FDD: Floppy Disk Connector

Details on the floppy disk drive connector and cable orientation.

Chapter 2: Installing the Motherboard

Connecting I;O Devices

Guide to connecting external I/O devices to the motherboard backplane.

PS2 Mouse and Keyboard Connectors

Connecting PS/2 mouse and keyboard devices.

Display Ports

Connecting monitors to DVI or VGA ports.

Parallel and LAN Ports

Connecting printers (LPT) and networks (LAN).

Chapter 2: Installing the Motherboard

USB and Audio Ports

Connecting USB 2.0 devices and audio equipment.

Chapter 2: Installing the Motherboard

Connecting Case Components

Connecting case components like fans and switches to the motherboard.

Power Cable Connections

Instructions for connecting 24-pin ATX and auxiliary power cables.

Chapter 2: Installing the Motherboard

CPU Fan and System Fan Connectors

Details of CPU and system fan power connector pins.

ATX Power Connector Pinout

Pinout of the ATX 24-pin power connector.

Chapter 2: Installing the Motherboard

ATX 12 V Power Connector

Pinout of the ATX 12V power connector.

Internal Speaker Connector

Pinout of the internal speaker connector.

Chapter 2: Installing the Motherboard

Front Panel Header Connections

Connecting front panel switches, LEDs, and audio.

Chapter 3: Using BIOS

About the Setup Utility

Overview of the BIOS setup utility and its functions.

Standard BIOS Configuration

Information on the default BIOS settings and their purpose.

Entering the BIOS Setup Utility

Steps to access and navigate the BIOS setup interface.

Chapter 3: Using BIOS

BIOS Setup Utility Navigation

Instructions for navigating the Aptio Setup Utility interface.

Resetting the Default CMOS Values

Procedure to reset BIOS settings to factory defaults.

Using BIOS Navigation

Explanation of how to use the BIOS navigation keys and menus.

Chapter 3: Using BIOS

BIOS Navigation Keys

List and function of keys used for BIOS navigation.

Chapter 3: Using BIOS

Main Menu Overview

Overview of system information in the BIOS main menu.

System Language and Time Settings

Setting system language and updating date/time.

Chapter 3: Using BIOS

Advanced Menu Overview

Accessing settings for CPU and other system configurations.

LAN Configuration Settings

BIOS settings for the onboard LAN controller.

Onboard LAN Controller and PXE Support

Enabling/disabling LAN controller and PXE boot support.

Chapter 3: Using BIOS

PC Health Status Monitoring

Monitoring system voltages, temperatures, and fan speeds.

Smart Fan Control Configuration

Configuring CPU fan speed based on temperature and modes.

Chapter 3: Using BIOS

Smart Fan Parameter Settings

Detailed settings for smart fan PWM, temperature, and offset.

System Component Characteristics

Display of overall hardware health monitoring details.

Chapter 3: Using BIOS

Power Management Setup

Configuring system power management features and wakeup options.

Chapter 3: Using BIOS

ACPI Setting Configuration

Configuring ACPI sleep states for the system.

CPU Configuration Settings

Settings related to CPU operation and features.

Chapter 3: Using BIOS

CPU Feature Details

Display of CPU model, speed, HT, VT-x, and other features.

CPU Power Saving Features

Configuration of CPU energy-saving functions like C1E.

Chapter 3: Using BIOS

SATA Configuration Options

Settings for serial SATA configuration modes and ports.

Chapter 3: Using BIOS

USB Configuration Settings

Settings for USB device configuration and legacy support.

Chapter 3: Using BIOS

Super IO Configuration

Settings for Super IO configuration, including floppy controller.

Chapter 3: Using BIOS

Serial Port Configuration

Configuration for the serial port (COM) settings.

Chapter 3: Using BIOS

Parallel Port Configuration

Configuration for the parallel port (LPT) settings.

Chapter 3: Using BIOS

Intel Smart Connect Technology Settings

Settings for Intel Smart Connect Technology features.

Chapter 3: Using BIOS

Chipset Menu Overview

Settings for chipsets, including System Agent and graphics configuration.

System Agent Configuration

Configuration for System Agent parameters.

Initiate Graphic Adapter and Multi-Monitor

Setting primary graphics adapter and enabling multi-monitor.

Chapter 3: Using BIOS

Multi-Monitor Technology

Enhancing productivity with multiple display devices.

Chapter 3: Using BIOS

PCH Configuration Settings

Configuration settings for the Platform Controller Hub and audio.

Chapter 3: Using BIOS

ME Configuration Settings

Configuration settings for Management Engine Firmware.

Chapter 3: Using BIOS

M.I.B III (MB Intelligent BIOS III) Menu

Settings for clock speed, system bus, and memory voltage.

CPU OverClocking Configuration

Settings for CPU overclocking.

Chipset OverClocking Configuration

Settings for chipset overclocking.

Chapter 3: Using BIOS

Memory Voltage Control

Controlling memory voltage settings.

Chapter 3: Using BIOS

CPU OverClocking Configuration Details

Detailed settings for CPU frequency, ratio, and voltage.

Chapter 3: Using BIOS

Chipset OverClocking Configuration Details

Settings for memory timing parameters.

Chapter 3: Using BIOS

Memory Timing Configuration Details

Detailed settings for memory timing parameters.

Chapter 3: Using BIOS

B.O.M.P Technology and Spread Spectrum

Features for safe setup and EMI reduction.

CPU Information Display

Display of CPU model, speed, and memory frequency.

Chapter 3: Using BIOS

Boot Menu Configuration

Settings for boot order, NumLock state, and boot mode.

Chapter 3: Using BIOS

CSM Parameters and Boot Options

Settings for CSM, OpROM, and boot device priorities.

Chapter 3: Using BIOS

Security Menu Options

Setting administrator/user passwords and secure boot.

Chapter 3: Using BIOS

Image Execution Policy

Selecting image execution policy per device path for security.

Chapter 3: Using BIOS

Key Management Settings

Managing secure boot keys and provisioning.

Chapter 3: Using BIOS

Exit Menu Options

Exiting BIOS setup with or without saving changes.

Chapter 3: Using BIOS

Updating the BIOS

Instructions for downloading and installing BIOS updates.

Chapter 4: Using Motherboard Software

Auto-installing Software (Windows XP;7;8)

Guide to automatic installation of drivers and software.

ECS Utility Software Features

Overview of eSF, eDLU, and eBLU utilities.

Chapter 5: Troubleshooting

Startup Problems During Assembly

Troubleshooting steps for initial system startup issues.

System Power and Display Issues

Diagnosing power-on failures and no-display problems.

Boot Shutdown Issues

Diagnosing unexpected shutdowns during boot.

Chapter 5: Troubleshooting

Startup Problems After Prolonged Use

Solutions for issues that arise after extended usage.

Maintenance and Care Tips

Recommendations for maintaining motherboard longevity.

Chapter 5: Troubleshooting

Basic Troubleshooting Flowchart

Visual guide to diagnose and resolve common PC issues.

Related product manuals