EasyManua.ls Logo

EINHELL CE-BC 1 M - User Manual

EINHELL CE-BC 1 M
6 pages
Print Icon
To Next Page IconTo Next Page
Loading...
GB
- 12 -
Danger!
When using the equipment, a few safety pre-
cautions must be observed to avoid injuries and
damage. Please read the complete operating
instructions and safety regulations with due care.
Keep this manual in a safe place, so that the in-
formation is available at all times. If you give the
equipment to any other person, hand over these
operating instructions and safety regulations as
well. We cannot accept any liability for damage
or accidents which arise due to a failure to follow
these instructions and the safety instructions.
1. Safety regulations
The corresponding safety information can be
found in the enclosed booklet.
Danger!
Read all safety regulations and instructions.
Any errors made in following the safety regula-
tions and instructions may result in an electric
shock, re and/or serious injury.
Keep all safety regulations and instructions
in a safe place for future use.
This equipment can be used by children of 8 ye-
ars and older and by people with limited physical,
sensory or mental capacities or those with no ex-
perience and knowledge if they are supervised or
have received instruction in how to use the equip-
ment safely and understand the dangers which
result from such use. Children are not allowed
to play with the equipment. Unless supervised,
children are not allowed to clean the equipment
and carry out user-level maintenance work.
Waste disposal
Batteries: Only dispose of these items through
motor vehicle workshops, special collection
points or special waste collection points. Ask your
local council.
Explanation of the warning signs on the
equipment (see Fig. 4)
1 = The equipment is totally insulated
2 = CAUTION - Read the operating instructions to
reduce the risk of injury
3 = Fuse value on pcb
4 = Disconnect from the mains supply before
connecting or disconnecting the battery to or
from the charger.
IMPORTANT: Explosive gases. Avoid ames
and sparks. Provide good ventilation during
the charging process.
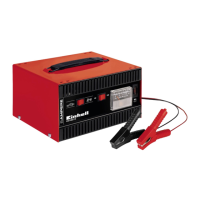
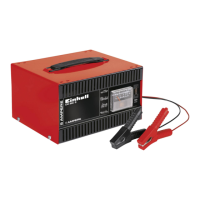
2. Layout and items supplied
2.1 Layout (Fig. 1)
1 Function key
2 LED display
3 Charging cable, black (-)
4 Charging cable, red (+)
5 Suspension eye
6 Mains power cable
2.2 Items supplied
Open the packaging and take out the equip-
ment with care.
Remove the packaging material and any
packaging and/or transportation braces (if
available).
Check to see if all items are supplied.
Inspect the equipment and accessories for
transport damage.
If possible, please keep the packaging until
the end of the guarantee period.
Danger!
The equipment and packaging material are
not toys. Do not let children play with plastic
bags, foils or small parts. There is a danger of
swallowing or su ocating!
Original operating instructions
Safety instructions
3. Proper use
The charger is designed for charging non-main-
tenance-free or maintenance-free 6V/12V lead
acid batteries (wet / Ca/Ca / EFB batteries) and
for lead gel and AGM batteries which are used in
motor vehicles.
The equipment must not be used for charging li-
thium iron phosphate rechargeable batteries (e.g.
LiFePO4) or other lithium rechargeable batteries.
The equipment is designed for mobile use only
and not for installation in caravans, mobile homes
or similar vehicles. The equipment cannot be
used as a bu er power supply, e.g. while chan-
ging a battery. Do not expose the charger to rain
or snow.
Anl_CE_BC_1_M_SPK9.indb 12Anl_CE_BC_1_M_SPK9.indb 12 14.03.2019 06:30:1914.03.2019 06:30:19

Other manuals for EINHELL CE-BC 1 M

Questions and Answers

Overview

This document describes a battery charger, model CE-BC 1 M, designed for charging lead-acid batteries.

Function Description:

The CE-BC 1 M is a microprocessor-controlled automatic battery charger. It is suitable for charging non-maintenance-free or maintenance-free 6V/12V lead-acid batteries (wet / Ca/Ca / EFB batteries) and lead gel and AGM batteries used in motor vehicles. The charger is designed for mobile use only and not for permanent installation in caravans, mobile homes, or similar vehicles. It cannot be used as a buffer power supply, for example, while changing a battery. The equipment is not designed for commercial, trade, or industrial applications.

The charging process involves several steps, with the final step being maintenance charging, which keeps the battery capacity at 95-100%, ensuring the battery remains fully charged at all times. The charging operation does not require constant monitoring, but it is recommended not to leave the battery unattended for extended periods to allow for disconnection from the mains power supply in case of a fault.

The device features a function key (1) for selecting the charging voltage (6V or 12V), an LED display (2) to indicate charging status, and charging cables (black for negative (3) and red for positive (4)). A suspension eye (5) is provided for convenience, and a mains power cable (6) connects the charger to the power supply.

Important Technical Specifications:

  • Mains voltage: 220-240 V ~ 50 Hz
  • Max. power rating: 20 W
  • Nominal output voltage: 6 V DC / 12 V DC
  • Max. nominal output current: 1 A
  • Protection class: II
  • Protection type: IP65
  • Ambient temperature: -20°C - 40°C
  • Battery capacity: 3-32 Ah

Usage Features:

Before connecting the equipment to the power supply, ensure that the data on the specifications label matches the supply voltage. Frozen batteries must not be charged.

Charging Settings:

To set the charging voltage, connect the charger to a socket outlet. All three LEDs will flash briefly, then the 12V LED will flash rapidly. Press the Mode button (1) to toggle between 6V and 12V charging. The selected voltage's LED will flash rapidly. During charging, the applicable LED will flash slowly.

Connecting the Battery:

  1. Release or remove battery stoppers if fitted.
  2. Check the acid level in the battery. If necessary, top up with distilled water. Handle battery acid with care as it is aggressive; rinse off splashes thoroughly with water and seek medical advice if necessary.
  3. First, connect the red charging cable to the positive pole of the battery.
  4. Then, connect the black charging cable to the bodywork of the vehicle, away from the battery and the petrol pipe.
  5. The 6V or 12V LED will flash slowly, indicating charging is in progress.

Important Safety Notes during Charging:

  • Under normal circumstances, the negative battery pole is connected to the bodywork. However, in exceptional cases where the positive battery pole is connected to the bodywork (positive earthing), connect the black charger cable to the negative pole on the battery first, then connect the red charger cable to the bodywork at a point away from the battery and the petrol pipe.
  • Charging may create dangerous explosive gas. Avoid spark formation and naked flames. Ensure good ventilation during the charging process.

Charging Completion:

Once the battery is fully charged, the 6V or 12V LED will shine continuously. If the charger shows "Battery fully charged" after only a few minutes, it indicates low battery capacity, and the battery needs replacing.

Calculating Charging Time:

The approximate charging time for a fully discharged battery up to 80% charged can be calculated using the formula: Charging time/h = Battery capacity in Ah / Amp. (charging current) The charging current should be 1/10 to 1/6 of the battery capacity.

Error LED (C):

The error LED will flash (light up) in the following cases:

  • Wrong charging voltage selected for a 6V battery (e.g., 12V selected). The equipment will fully charge the 6V battery and automatically detect the incorrect voltage selection.
  • Battery voltage is less than 3.5 V or more than 15 V, indicating the battery is unsuitable for charging or defective.
  • Terminal clamps connected with wrong polarity. The protection against swapped poles prevents damage to the battery and charger. Remove the charger and restart the process.
  • Short-circuit between the two terminal clamps. Protection against short-circuits prevents damage to the battery and charger.

Finishing Charging:

  1. Pull the plug out of the socket.
  2. First, disconnect the black charging cable from the bodywork.
  3. Then, release the red charging cable from the positive pole on the battery.
  4. In case of positive earthing, first disconnect the red charging cable from the bodywork, then the black charging cable from the battery.
  5. Screw or push the battery stoppers back into position. Important: If the mains plug is pulled out but the charger cables are still connected to the battery, the charger will draw a small amount of electricity from the battery. Always completely remove the charger from the battery when not in use.

Overload Cut-out:

The charger is equipped with electronic protection against overload, short circuit, and swapped poles. It also has one or more fine fuses. If a fuse is defective, it must be replaced with a new fuse of the same amperage. Contact customer service if necessary.

Maintenance Features:

Battery Maintenance:

  • Ensure the battery is always fitted securely.
  • Ensure a perfect connection to the electrical system's cable network.
  • Keep the battery clean and dry. Apply a thin coating of acid-free, acid-resistant grease (Vaseline) to the connection terminals.
  • Check the acid level in non-maintenance-free batteries approximately every 4 weeks and top up with distilled water if necessary.

Cleaning:

  • Always pull out the mains power plug before starting any cleaning work.
  • Keep all safety devices, air vents, and the motor housing free of dirt and dust. Wipe the equipment with a clean cloth or blow it with compressed air at low pressure.
  • Clean the device immediately after each use.
  • Clean the equipment regularly with a moist cloth and some soft soap. Do not use cleaning agents or solvents that could attack plastic parts. Ensure no water seeps into the device, as water ingress increases the risk of electric shock.
  • Store the charger in a dry room. Clean off any corrosion on the charging terminals.

Device Maintenance:

There are no parts inside the equipment that require additional maintenance.

Ordering Replacement Parts:

When ordering replacement parts, quote the machine's type, article number, identification number, and the required part's replacement part number. Refer to www.isc-gmbh.info for prices and information.

Disposal and Recycling:

The equipment is supplied in packaging designed to prevent transit damage. The raw materials in the packaging can be reused or recycled. The equipment and its accessories are made of various materials, such as metal and plastic. Do not place defective equipment in household refuse. The equipment should be taken to a suitable collection center for proper disposal. Contact local council offices for information on collection points.

For EU countries only, never place electric power tools in household refuse. In compliance with European Directive 2012/19/EC, old electric and electronic equipment must be separated from other waste and disposed of in an environment-friendly fashion, such as by taking it to a recycling depot. As an alternative to returning the equipment to the manufacturer, the owner must ensure proper disposal at a suitable collection point in accordance with national recycling and waste disposal regulations. This does not apply to accessories or aids without electrical components supplied with the old equipment.

The reprinting or reproduction of documentation and papers accompanying products, in whole or in part, is permitted only with the express consent of iSC GmbH. Subject to technical changes.

EINHELL CE-BC 1 M Specifications

General IconGeneral
BrandEINHELL
ModelCE-BC 1 M
CategoryBattery Charger
LanguageEnglish

Related product manuals