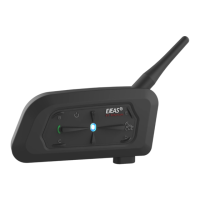
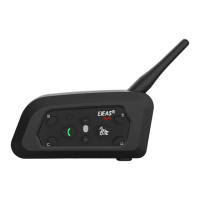
This document describes the V7 Motorcycle Bluetooth Helmet Intercom, a device designed to enhance communication and entertainment for motorcyclists.
Function Description:
The V7 intercom offers a range of functionalities including Bluetooth intercom for communication between riders, Bluetooth music streaming, automatic phone call answering, voice assistant integration, EUC (External Unit Controller) remote control, and support for a mobile app. It allows for up to 2 mobile phones to be connected simultaneously.
Usage Features:
Product Installation:
The installation process involves attaching the main unit to the helmet using either a clip-on mechanism or an adhesive mount. Speakers are then placed inside the helmet, and the microphone is positioned for clear voice capture. The wiring is routed and secured within the helmet.
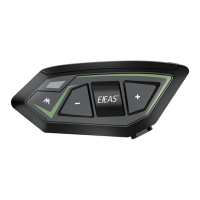
Operation Diagram:
The device features several buttons:
- A Button/Power Button: Used for powering the device on/off and for various pairing functions.
- B Button: Primarily used for intercom pairing and connection/disconnection.
- C Button (Phone Button): Used for phone-related functions like answering/rejecting calls, redialing, and activating the voice assistant. Also used for intercom pairing.
- D Button (Volume -): Decreases volume and is used for intercom pairing.
- E Button (Volume +): Increases volume and is used for intercom pairing.
- F Button (A+E Button): A combination button used for intercom pairing.
Power ON/OFF:
- ON: Press and hold the A Button/Power Button for approximately 1 second until the red light comes on, accompanied by a power-on tone. In standby mode, the blue light flashes slowly (0.1s on / 2s off), and a "Di, Di, Di" tone is heard.
- OFF: Single-press the Off Button (A Button). The indicator light turns off.
Low Battery Indication:
The red light flashes rapidly 3 times when the battery is low. The device automatically turns off when the battery is ultra-low.
Charging Indication:
The red light is always on when charging.
Intercom Function (Intercom Pairing):
- New V7 Pairing: After switching on, press and hold the A Button for approximately 5 seconds until the red and blue lights alternately flash. Alternatively, long-press (about 3s) any of the A, B, C, D, E, or F (A+E) buttons until the red and blue lights flash alternately. The other V7 unit should enter pairing mode using the same steps. Once paired, the blue light will flash fast, and a "Di, Di, Di" tone will be heard, indicating successful connection.
- Compatible with Old Model Pairing Steps (V6/V4):
- Simultaneously press and hold (approx. 3 seconds) A, B, C, D, or E Button, or A+E Button (Intercom F) to start pairing. The red and blue lights will flash alternately, and a "Di, Di, Di" tone will be heard.
- For old models (V6/V4), follow their instructions to enter pairing state. Blue light flashing fast indicates successful pairing.
- Click again on A, B, C, D, E, or A+E Button (Intercom F) to start pairing. Blue light flashing fast indicates successful pairing.
- Intercom Connection and Disconnection: Once paired, click the corresponding intercom button (A, B, C, D, E, or A+E Button for Intercom F) to connect or disconnect. Buttons not used for pairing will not respond when pressed.
Mobile Phone Pairing:
- After power on, press and hold the Phone Button for approximately 5 seconds until the red and blue lights flash alternately fast.
- Search for "V7" on your phone's Bluetooth settings, click it, and connect.
- Successful pairing is indicated by blue slow-speed double flashing lights and a "Di, Di, Di" tone.
- The current battery level is displayed on the phone's Bluetooth icon (requires mobile phone HFP connection).
Bluetooth Reconnection with Mobile Phones:
After power on, the device automatically reconnects to the last paired cellphone. If there is no connection, click the Phone Button to reconnect.
Mobile Control (Answering the Phone):
When a call comes, wait 8 seconds to answer automatically.
Telephone Priority:
Incoming calls interrupt Bluetooth music and intercom. Music and intercom resume after the call ends.
Voice Assistant:
Double-click the Phone Button when in standby or with music to activate the voice assistant (requires phone support). Commands include "Open Music," "Previous music," "Next Music," "Call EJEAS," and "Open navigation."
Music Control:
- Play/Pause: Click the Phone Button.
- Previous Song: Long press the D Button (Volume -) for 2 seconds.
- Next Song: Long press the E Button (Volume +) for 2 seconds.
- Volume -: Single press the D Button (Volume -).
- Volume +: Single press the E Button (Volume +).
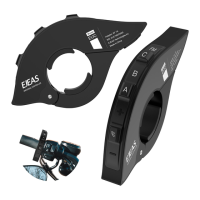
Handle EUC (Optional) Key Descriptions:
This section details the functions of each button when interacting with an EUC remote.
- Volume - (Short press): Volume -.
- Volume - (Long press): Previous song when music is playing.
- Volume - (Double click): None.
- Phone Button (Short press): Answer/hang up phone calls, play/pause music, connect to the last connected phone.
- Phone Button (Long press): Reject calls, activate voice assistant.
- Phone Button (Double click): Last number redial.
- Volume + (Short press): Volume +.
- Volume + (Long press): Next song when music is playing.
- Volume + (Double click): None.
- Intercom Button A (Short press): Intercom A pairing.
- Intercom Button A (Long press): Disconnecting the intercom.
- Intercom Button A (Double click): Intercom D pairing.
- Intercom Button B (Short press): Intercom B pairing.
- Intercom Button B (Long press): Disconnecting the intercom.
- Intercom Button B (Double click): Intercom E pairing.
- Intercom Button C (Short press): Intercom C pairing.
- Intercom Button C (Long press): Disconnecting the intercom.
- Intercom Button C (Double click): Intercom F pairing.
- Volume - + Useless key (Long Press): Clear handle pairing records.
EUC Pairing:
- Long press both the FM Button and Volume - of the EUC for 5 seconds to clear the pairing record of the EUC. Red and blue lights will be on at the same time.
- Press and hold the Phone Button + E Button for about 5 seconds to enter pairing mode. The voice prompts "ding ding ding," and the red and blue lights flash alternately. If pairing is not successful within 2 minutes, it will exit pairing.
- Click any button of the EUC.
- "Pairing Successful" voice prompt. (If EUC cannot be successfully paired in 2 minutes, it will automatically exit pairing mode.)
Maintenance Features:
Firmware Upgrades:
Connect the product to a PC using a USB cable. Download and open the "EJEAS Upgrade.exe" software. Click the "Upgrade" button to start the upgrade and wait for completion.
Restore Default Settings:
Press and hold the Phone Button + B Button for about 2 seconds. The red light flashes 3 times quickly to delete the pairing record, and then the intercom will automatically power on again.
Mobile App:
- First-time users download and install the EJEAS SafeRiding Mobile App (available for iOS and Android).
- Press and hold (approx. 5s) the Phone Button until the red and blue lights flash alternately fast.
- Open the APP, click the Bluetooth icon in the top right corner. The interface shows the name of the intercom device searched. Select the intercom device to be connected and click to connect. (iOS systems require entering phone pairing again in system settings -> Bluetooth, connect audio Bluetooth).
- The next time the app is used, open it, click the Bluetooth icon in the top right corner, and click to select Intercom for connection from the paired devices.
The APP provides intercom group management, music control, FM control, switch off, check authenticity, and other functions.
Important Technical Specifications (FCC Compliance):
This equipment has been tested and found to comply with the limits for a Class B digital device, pursuant to part 15 of the FCC Rules. These limits are designed to provide reasonable protection against harmful interference in a residential installation. The equipment generates, uses, and can radiate radio frequency energy. If not installed and used according to instructions, it may cause harmful interference to radio communications. There is no guarantee that interference will not occur in a particular installation. If this equipment does cause harmful interference to radio or television reception (which can be determined by turning the equipment off and on), the user is encouraged to try to correct the interference by one or more of the following measures:
- Reorient or relocate the receiving antenna.
- Increase the separation between the equipment and receiver.
- Connect the equipment into an outlet on a circuit different from that to which the receiver is connected.
- Consult the dealer or an experienced radio/TV technician for help.
Changes or modifications not expressly approved by the party responsible for compliance could void the user's authority to operate the equipment.